Changing the oil pump on a Partner chain saw
Design and operation of the chainsaw oil pump
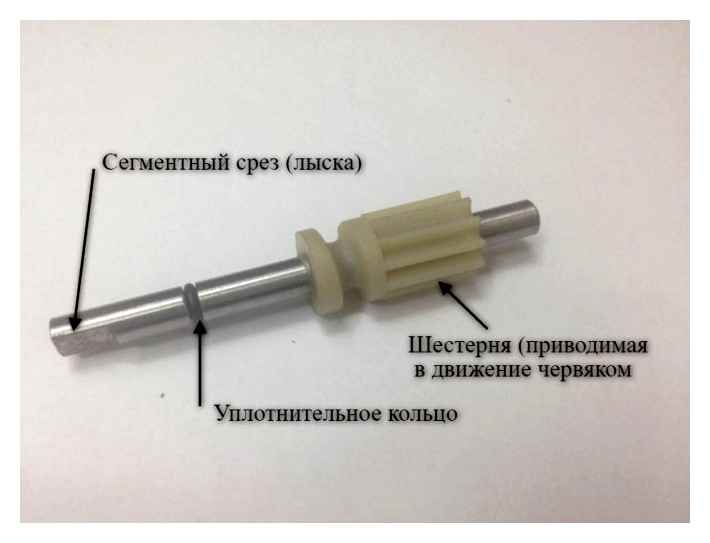
A groove in the shank ensures that the oil from the saw’s oil tank is captured and fed to the hose that feeds it to the bar.
The plunger in branded instances of saws is made of a single solid metal rod. But in cheaper varieties, usually the pinion is not only made by stamping, but also mounted on the plunger stem, which naturally affects the life of the part.
The groove on the end has several types:
- The housing has a ½ to 1/3 of the plug’s diameter longitudinal groove for gripping the oil;
- On the end, the radial groove provides the ability to adjust the movement of the plunger relative to the axis.
When changing the oil pump it is important to choose all parts of the chain saw series to match the cams and slots with the casing and cam track as closely as possible.
How the oil pump works
The vast majority of imported and domestically made chainsaws have a valve-less oil pump located on the crankcase on the chain side. The segmented notch on the cylindrical surface and the plunger rotation from the drive shaft through the worm gearing ensures the lubricating oil flow to the guide rail.
As the chainsaw oil pump drive rotates, the plunger first launches oil into the discharge chamber, and after rotating 90°, it closes the inlet and pushes the lubricating fluid out in a reciprocating motion. In order to achieve one axial movement per revolution, an eccentric mechanism is mounted at the end of the plug which operates according to the camshaft principle. The size of the axial movement of the shaft is limited by an annular projection with a profiled configuration.
Peculiarities of disassembling a Partner saw
Like any technique and procedure with it, the disassembly of the Partner saw involves some peculiarities of which the owner should be aware. There is a lot you can learn about in our videos, but it is worth focusing on the following nuances:
- The crater cover is installed without a gasket, but a thin ball of red sealant should be used instead. Make sure to degrease both surfaces beforehand so that they are in better contact;
- Use a special puller to remove the flywheel, although many professionals have adapted to wield a wrench and lightly tap with a mallet;
Disassembling your Partner saw is not difficult at all, based on a quality video and step-by-step recommendations from our service technicians. In general, this mechanism consists of similar elements as most custom chainsaws. So disassembling and reassembling it is no problem. Kosi Kosa Gasoline Tool Shop is pleased to offer you quality tools as well as informative articles on machine operation and repair.
How to Change the Oil Pump on a Partner Chainsaw
Partner 350 Chainsaw Troubleshooting and Repair
Chainsaw Partner 350. One of the most common gasoline-powered saws. Very often their owners ask questions about how to repair the Partner 350. After reading this article, you will know the answers to questions about how to diagnose problems in your Partner, as well as how to solve them yourself.
IMPORTANT. An experienced electrician poured into the net the secret of how to pay half as much electricity, legally. Read more
Diagnosing a Partner 350 Chainsaw
Correct fault identification is more than half of the repair. In the case of malfunctions due to the saw not starting, the essence of the diagnosis. Check the spark and fuel in the cylinder, since there is nothing in the chainsaw to burn or nothing to ignite ,
Checking the spark
To check the spark, unscrew the spark plug, place it in the cap of the high voltage wire and attach it to the cylinder (there should be ground on the spark plug). Then pull the starter a few times, looking carefully at the spark plug. There will be no sparks if the Partner 350 chainsaw has malfunctions such as:
- defective spark plug (excluded only by replacing it with a known good);
- Broken wires in the system;
- A malfunction of the ignition control button;
- Faulty ignition coil;
- lack of clearance between the coil and the flywheel;
- Key failure between the crankshaft and flywheel.
Fuel test
The first sign that a cylinder is not getting fuel is a dry spark plug. After opening a dry spark plug, the next thing you need to do to more accurately determine the malfunction is to try to run 350 nozzle partner into the cylinder through the spark plug hole, no more than 5 ml of gasoline. If the chainsaw won’t start, then there is probably no compression in it or not enough to start the engine. Causes:
If the saw starts after the spark plug has been filled with gasoline, then the problem is in the carburetor or the Partner 350 fuel line. A complete diagnosis of the fuel system is necessary.
Bearing diagnosis
Having done the chainsaw diagnostics, you should check the crankshaft bearings for play. To do this, the handwheel must be pulled up and down. If there is any play, the bearings need to be replaced.
Also remember to check the crankshaft stroke. To do this, the piston must be locked in the upper position and gradually push the flywheel to the left to the right, simulating its natural movement. If there is any play, the Partner 350 crankshaft must be replaced.
tools
To disassemble the Partner 350, you will need some special tools:
- A clutch wrench (can be purchased or made from a compatible socket).
- Piston stop.
- Torx tool set.
- A soft metal hammer.
Partner 350 will need tweezers and a medical clamp for easy disassembly. Of the usual tools, you’ll need a screwdriver or cordless drill with a set of attachments, a hammer.
Disassembly Algorithm and Process Description
If you need to completely disassemble your Partner 350 chain saw, the first step is to start. is a compressor saw cleaner. The chain saws are then removed in the following order:
Tools
To disassemble your Partner 350 you will need a few special tools:
- Clutch wrench (can be bought or improvised from a suitable socket).
- Piston stopper.
- Torx hexagon set.
- Soft metal hammering.
A special tool for the clutch
Pry bar For the convenience of disassembly Partner 350 need tweezers and a medical clip. Of the usual tools you need to have screwdrivers or a cordless drill with a set of nozzles, a hammer.
Algorithm and description of the disassembly process
If you have to completely disassemble your Partner 350 chain saw, the first place to start is with the compressor to clean it. Next, the chain saw components are removed in the following order:
After the first stage of disassembly is complete, we clean the chainsaw again with a compressor, t. к. the air ducts are already accessible, which in most cases are heavily contaminated with wood dust.
In the next step it is convenient to remove the air filter housing and carburetor Partner 350.
After removing the carburetor, the cylinder intake window should be plugged with a rag, it will prevent foreign objects from getting into the engine crankcase.
The silencer can be removed after the carburetor is removed, or after the engine is removed. The outlet window is also covered with a rag.
It is necessary to apply a piston stopper, having established it in a spark plug hole.
The clutch on all Partner 350 chain saws unscrew the clutch in the direction of the chain travel to prevent it from unscrewing during operation. Flywheel nut has a standard thread and unscrewed with a 13 head, counterclockwise.
Once the clutch is removed, the oil pump can be accessed and must also be removed.
The last step is to loosen the screws on the engine and remove it from the housing.
Instructions for removing the flywheel from the crankshaft
You’ll need a special handwheel puller to remove the flywheel, but most chain saw mechanics use a soft-metal mallet. к. With its help the removal process is significantly accelerated.
The bottom line is that the flywheel nut is unscrewed until it is level with the plane of the shaft, and then with a hammer and a mallet, mounted on the nut, with one sharp blow the flywheel is removed from the shaft.
The method is a bit barbaric, but time-tested and recommended by many masters as the most practical and reliable.
Faults and repair
Common reasons why the oil pump does not work:
- Breakdown of the drive pinion;
- Lubricant leakage from the lines;
- Low pressure due to wear of the plunger pair;
- Lubricant leakage from under the protective cover.
Repair the oil pump of a chainsaw with their own hands can be done with basic locksmith skills and tools, consisting of a set of screwdrivers and wrenches or socket heads. For element replacement and diagnosis it is necessary to remove the unit from the engine.
In the course of maintenance check integrity of lines and seals. Repair of the chainsaw oil pump consists of replacing worn elements. Since not all parts of the pump are available for sale, the unit is often replaced as a whole. Some owners repair the pump by installing homemade elements, picking up parts from other equipment.
How to make adjustments
Changing the pump’s operating parameters is accomplished by adjusting the ram stroke. For this purpose a special screw is used, which rotates an eccentric that limits the mobility of a rod. On the body of the saw there are arrows and inscriptions Min and Max, explaining how the element works.
How to change
To change the pump it is necessary to remove the outer plastic elements, which are secured with screws. Some saw models have to have the damping elements and handles removed. Then remove the oil hose from the tank, unscrew the pump mounts to the engine casing. There are some constructions, in which the pump is removed with the help of a screw, screwed into a special hole. After a new assembly is installed, assembly is performed in the reverse order.
Fixing oil leakage on a Chinese chainsaw (Fotoreport)
5 / 5 ( 20 votes )
In this article, how to get rid of such a malfunction as oil leakage on Chinese-made chainsaw engine capacity 45-52cm3 (Forward, Redverg, Huter, Patriot, Green, Etalon and others)
Agree rather unpleasant moment when before or after work to find a puddle of oil under the chainsaw. First of all, it means that the saw headset is not sufficiently lubricated during operation. Secondly, it is uncomfortable to store the saw (in the garage, in the car or in the house)
This type of problem is caused by the design of the saw and the oil supply system. But it can and should be eliminated. this repair is not expensive or time-consuming.
Using the stopper we block the piston movement in the cylinder
The piston stopper is used to block the piston stroke in the cylinder when removing the flywheel or clutch. Can be either plastic or metal.
The alternative is a rope with twisted knots
Next, you need to unscrew the clutch clutch (left-hand thread) with a puller or wrench
Car shock absorber disassembly wrench can fit almost all types of clutches (wrench is adjustable). In case of periodic repairs it is possible to buy it, the cost is quite democratic.
Immediately inspect the drive sprocket for wear (it needs to be replaced if necessary)
The sprocket with removable ring is installed on this saw (in case of wear only the ring is replaced)
And also a thread on oil pump drive (it should not be “flattened”.
As you can see in this case the thread is good and it doesn’t need to be replaced.
Further we unscrew 3 screws (Allen key 3 mm) and remove protective cover
Let’s remove oil pump. for this remove two screws fixing it and take out of hoses
The first thing that catches your eye is a “sad” state of crankshaft oil seal. It is “squeezed” from the seating and it is strongly worn. and it is source of air into the engine, as a consequence of improper work of the saw
The oil pump drive began to wipe the outer surface of the oil seal (dark marks on the drive are a witness to this)
Let’s continue with the leaky oil system.
We remove the oil hose with filter from the seat in the crankcase. this is one of the places where oil flows out.
Also unscrew screw (right) and remove guard rail
Prepare work area by removing dirt and chips from saw crankcase
The oil tank breather plug is missing for some unknown reason.
Be sure to install it in its seat (the STIHL MS-180 chain saw breather plug is the right size)
Install the new crankshaft oil seal at once (its size is 15284,5 mm)
Before installing the new one, apply a small amount of oil to the inside of the stuffing box.
Then we move on to the oil hose. If the old one is damaged or has worn out, prepare a new one.
On the inner surface of the hose (the one that is fixed in the saw crankcase) wrap a few coils of ordinary rubber tape
And a small amount of sealant around the “contour”
Rinse and blow out the oil filter and install it on the hose.
Next, we shove it into the oil tank and fix the landing place (be sure to degrease it)
Also check the condition of the upper pressure oil hose for damage (cracks). if necessary replace it with a new one.
So. the breather plug is installed, the packing is replaced, the oil hose is fixed, and the oil pump can be installed
Next we mount the oil pump (prewash and blow it out)
IMPORTANT: a washer (or two. depending on thickness) shall be installed on the inner “pipe of the oil pump for tight adherence to the oil hose)
The hose should press firmly against the oil pump
Next, fix the oil pump to the crankcase with two screws
Assemble the protective cap on the three screws and install the oil pump drive (on its surface there are splines for a sprocket. they should not be “worn”
Further we mount needle bearing, sprocket (take care of fit of slots of sprocket in slots of oil pump drive) and clutch washer
Next stop the piston movement in the cylinder
Screw on clutch clutch (left-hand thread)!)
Screw in the spark plug, install the air filter (clean it if necessary) and the cover.
How to disassemble a chainsaw: step-by-step process with photos and video
Full coverage of the construction of a multifaceted mechanism based on the work of a two-stroke internal combustion engine. From the air filter cover, to the crankcase oil seals. a complete, step-by-step disassembly of a chainsaw system, by the screws, on a concrete example. To be informative and concise, the purpose of each part is described in a nutshell. The following photo and video instructions will show you how to assemble each part with the subtleties of the different models.
Technical complexity of any mechanism can be measured relatively accurately by the number of parts interacting in it. Efficiency of repair and maintenance of the tool, depends on understanding of task of each element, but for following the step-by-step instructions, it is enough to know separate terms. The following list, complete with a picture, popularly demonstrates what a chainsaw is made of, with a description of the functions of the main parts in one short phrase (where necessary).
- Fuel tank housing. the basis for the mechanism and controls.
- Shock absorber plug.
- Special screw that secures shock absorber.
- Rubber damper. 1 of 4 fitted.
- Throttle trigger. controlling element of carburetor throttle.
- Gas pedal rod. a curved bar that connects the carburetor to the trigger.
- Air valve. supplies air to the tank when fuel volume decreases.
- Fuel filter.
- Fuel tank hose. transfers fuel from the tank to the carburetor.
- Air filter cover.
- Air filter. protects carburetor from dirt.
- Cylinder cap.
- Lever. adjusts the position of the carburetor choke.
- Carburetor. a device for metered supply of air-fuel mixture into the combustion chamber.
- Insulator. effective sealing gasket between carburetor and engine.
- Carburetor elbow. connecting component.
- Spark plug. provides the spark into the combustion chamber.
- Cylinder. is the main part of the engine casing.
- Muffler. reduces noise, dampens sparks, and directs exhaust away from the operator.
- Ignition coil (magneto). generates an electrical impulse transmitted to the spark plug.
- Ignition switch. closes and opens contacts on the coil.
- Handle.
- Flywheel. balances the clutch, performs air precleaning and generates charge in the coil.
- Bearing. secures crankshaft to crankcase.
- Crankcase left housing. part of the base to secure the engine and moving mechanism components.
- Piston.
- Piston shaft. connecting the piston to the crankshaft.
- Crankshaft. converts reciprocating motion of the piston into rotation.
- Oil suction hose. connecting the oil reservoir with the pump.
- Crankcase housing right.
- Oil pump. pumps oil from reservoir to chain as sprocket rotates.
- clutch drum is first contact with the chain.
- Clutch. transmits the rotation to the drum when the revs are increased.
- Chain brake handle.
- Tire cover. hides clutch and oil pump (includes tensioning mechanism).
- Chain catcher. winds or engages the chain if it breaks.
- Starter. the mechanism for manually turning the crankshaft, to create the spark and start the engine.
The components shown above comprise the basic outline of a standard chain saw. Most of the parts are made up of several smaller pieces, but these should be disassembled separately only when a particular component is repaired. To get to the engine, the elements can be removed in groups without disassembling the tire cover or the starter by the screws. But if you want to get a better idea of the chainsaw’s components, or learn about all the components of a single part, with the complete list.
Disassembling a Chinese chainsaw
Detailed photo instruction for complete and consistent disassembly of all parts of the mechanism. On the example of a Chinese chainsaw, the principle of interaction of all structural elements is shown. Dismantle with the drive unit clean and free of tire, chain, gasoline and oil.
To facilitate the manipulation of the object and easy access to the parts, first of all let’s remove the handle, unscrewing the bar cover in advance.
With room to maneuver, you can move on to the main components. Let’s take off the top cover, the air filter and the spark plug.
Loosen the mounting screws and remove the cylinder head.
Let’s take off a carburetor, for what we disconnect the choke lever, unscrew 2 fixing screws and take out the air filter base. Undo the throttle trigger and pipe connections.
Remove throttle lever so it won’t interfere with further disassembly. To do this, remove the top cover of the handle, disconnect the rod from the trigger and pull out through the hole.
Remove the starter cover by removing the 4 screws.
We proceed to disconnect the housing from the crankcase by removing the chain catcher and shock absorbers.
Disassembly of the engine begins with the removal of the carburetor crankshaft ring, gasket and insulator. For convenience, it is better to use needle-nose pliers.
Unscrew the fixing nuts / screws and remove the silencer. Remove the gasket and studs.
Now, removing the engine cylinder comes down to simply unscrewing the 4 screws. A screwdriver or long stick bit is needed.
To disconnect the piston from the crankshaft, remove the retaining ring and remove the axle.
The ignition module is secured with a couple of screws and removes in a few turns with a screwdriver.
The clutch is unscrewed clockwise and rotates with the crankshaft, which should be secured by placing the axle in the handle of the pliers. You can use a wrench from an angle grinder, or a hammer with a chisel, but it is better to take a special puller.
In fact, the clutch and flywheel are more convenient to unscrew before removing the cylinder and piston, which is easier to fix by placing a piece of thick rope or cable into the spark plug hole.
After the clutch, we remove the sprocket drum, needle bearing, and worm gear.
Unscrew crankcase side plate and oil pump cover and remove the oil pump.
Pull out the tube that connects the pump to the oil reservoir.
Fix the crankshaft and unscrew the flywheel (counterclockwise).
Unscrew the cap and remove the oil seal.
It remains to unscrew all the screws fixing the crankcase and separate the halves (force is required).
Remove the bearings from the crankcase, you can do it by “knocking” them out. To mount it back to the front, heat the place with a construction hair dryer.
Troubleshooting chainsaw
Experienced sawyers know that identifying the right breakdown is half the battle in getting the job done. Building on many years of experience with repairing the Partner 350 chain saw, our engineers developed a special troubleshooting procedure.
Top Breakdowns on the Partner 350 Chainsaw
Start with the simplest components and mechanisms and work up to the most complex ones.
This saves considerable time and prevents unnecessary operation. Troubleshooting is recommended in the following order:
Checking the spark on the spark plug electrodes
To diagnose the spark plug, remove it and make a few pulls with the starter without taking the cable out. If there is a discharge, it will be necessary to adjust the gap between the center electrode and the side electrode. Its value in the Partner 350 must not exceed 0.7 to 1.2 mm.
The lack of this distance can lead to incomplete combustion of the fuel mixture and, consequently, increased fuel consumption with the limited power of the unit. Exceeding this parameter results in inconsistent spark generation and intermittent operation of the combustion engine.
In case of absence of spark on electrodes it is necessary to replace a spark plug and repeat manipulation on diagnostics, described above.
If you see no discharge on the spark plug, check the high-voltage wire for continuity and replace it if necessary.
Diagnosing and Adjusting the Ignition of the Partner 350
Lack of bright blue spark in the spark plug may indicate the need to inspect the ignition module and adjust the gap. To do this, remove the plastic cover from the saw and check the coil. The wires leading to it should be firmly fastened with screws and should not be loose at the connection point. No moisture should be present on the drive shaft flywheel, as it interferes with the electromagnetic field.
Handwheel and ignition module of the Partner 350 chain saw
If no such discrepancy is found, check to see if the flywheel/impeller clearance is set correctly. It should have a value of no more and no less than 0.2 mm, and therefore if there is a discrepancy with the recommended distance you need to adjust the ignition of your Partner 350 chain saw yourself.
For the most accurate adjustment you will need a normal coin-shaped or flat dipstick, which you can buy in specialized or automobile stores.
After checking the ignition switch to the diagnostics of the fuel system.
350 chainsaw fuel system
The fuel system is an important factor in keeping your chain saw in working order: the fuel tank, fuel lines, and carburetor.
If the mixture does not come out of the tank you need to inspect the built-in filter and breather (hole in the cover). If the fuel filter is clogged you will need to replace it. To clean the breather, you can use an ordinary sharp needle, gently extracting the remains of dirt and sawdust from the valve. If the carburetor becomes clogged you will need to remove it and clean it thoroughly.
It must be remembered that the carburetor of a chainsaw Partner is a complex unit consisting of many small parts. Therefore, the utmost care is needed during disassembly, cleaning and reassembly.
operating principle of the carburettor
The carburettor serves for mixing the fuel (oil and gasoline) and air. It works by a jerk of the chainsaw starter that forces the diaphragm to pump the fuel. After the diaphragm-operated needle valve supplies gasoline to the main chamber through which it enters the cylinder. The throttle valve can be used to “enrich” or “deplete” the fuel mixture with air. When the choke is closed, less air enters the cylinder at the same fuel level. In this case, the flow rate increases and the engine output goes down. That’s why adjusting your Partner 350 plays an important role in creating the optimum balance between moderate fuel consumption and high output.
Self-adjustment is recommended only if special tools and skills are available.
Block: 2/4 | Number of characters: 4232
Replacing the piston group
If you need to replace the cylinder and piston on your Partner 350 chain saw, disassemble it as explained above. The piston is secured at the top of the connecting rod on the crankshaft with a piston pin. A roller bearing cage is installed between the pin and the connecting rod.
To replace the piston and cylinder, you must remove the piston from the cylinder and crankshaft, to do this, on one side of the piston with wire cutters and a small screwdriver, remove the piston pin retainer.
It is then pressed out from the opposite side with a small screwdriver. If the pin comes out tightly, it can be slowly knocked out with a hammer and a suitable but smaller gouge than the diameter of the piston pin bore.
The new piston is installed on the crankshaft so that the arrow on the piston cover points in the direction of the chain.
To check for correct installation, take the crankshaft with the piston mounted on it so that the shaft on which the handwheel is mounted is in your left hand, with the arrow pointing away from you.
After the new piston is mounted on the crankshaft, the ring is put on it, and then the piston is inserted into the cylinder, and the parts should be lubricated with engine oil, which will not break the ring and facilitate the process. Next, the crankcase is installed.
Service center mechanics use a piston replacement algorithm that allows the job to be done without fully disassembling the Partner 350 chain saw. Watch this video to see how it’s done.
STIHL 180 chain saw oil pump malfunctions
Tips for your STIHL chain saw: see for yourself
STIHL chain saws can be repaired by the user himself thanks to their straightforward design. Proven in the construction segment of the tool has a power of 1400 watts, engine capacity of 31 cubic meters. See.
Most common chain saw malfunctions
To operate the STIHL 180 chain saw follow the instruction manual supplied with the machine. The starter system is turned on by the user after making sure oil and gasoline are present and the chain is properly tensioned.
Working with the tool begins after it has been safely secured in the hand. If the tool fails to operate, determine what is causing the STIHL chain saw malfunctions.
Causes of tool malfunction may include:
- Leakage in oil system;
- Openings in the crankcase cord have formed;
- Carburetor malfunctions;
- Air entering the crankcase through the oil seals;
- Worn condition of the worm gear in the oil pump;
- No spark at the ignition section;
- Worn drive sprocket;
- If you can’t tighten the throttle trigger, you might need to use the tools that are included in the scope of this manual.
To perform an independent repair of a malfunctioning STIHL chain saw, you can use tools that are in stock with every user.
- Screwdrivers;
- Socket wrenches and wrenches;
- Hexes;
- Vacuum gauge used to detect defects in oil seals, carburetor, and crankcase;
- Air compressor, used in blowing and cleaning of assemblies and aggregates;
- STIHL Torx 27 T-handle wrench;
- Stopper, limiting the stroke of the crankshaft;
- Puller under the bearing.
What to do if there is a problem with various parts of the machine
Unpleasant phenomena such as loss of power, lack of connection, and idling support are common. The causes of such behavior of the tool are caused by malfunctions of the carburetor of the chainsaw. This is manifested by contamination with dust particles, sawdust. Such a breakdown without problems can be eliminated on their own.
Cleaning the carburetor is done using:
Malfunctions and troubleshooting
Problems with the oil pump can be divided into two categories. The first is a complete lack of oil supply, the second is a leaky. Depending on the type of problem and the main “symptom” to act differently.
No oil supply
If there is no oil supply to the saw head and you do not notice any leakage, it can be assumed that the plunger remains stationary. Why does the plunger stand in place? It may be worn out, or the screw to which it is connected is not installed correctly. The plunger can be in an unnatural position, which is often caused by improper assembly of the assembly.
We need to be guided by /-, special marks. Such marks, of course, can be lined up in the correct position, but the screw will not stand as it should (oppositely). How to fix this problem? Simply disassemble the pump and install the screw as it is supposed to be done. Sometimes it is enough to turn it to the “-” mark. The screw can not stand on its own, which is why it is blocking the plunger.
How do you know if the plug is worn out?? Note its nose or, more accurately, the edge of its nose that might be worn away. Then you will not see the characteristic protrusion in this place. This location with the entire edge will be about level. How to solve this problem? There are two options:
Product Repair
If disassembled correctly, it is easy to repair the Partner 350 chainsaw with your own hands. Repair of each group of breakdowns is made depending on the design features of the faulty elements.
Problems with the engine cylinder head
If there is a failure of the cylinder piston group, it is worth removing all parts from the crankshaft. It is important to know that the piston is connected to the support frame by the piston pin. This attachment element must be removed with a screwdriver. The faulty piston is removed and a new one is installed in its place, which is later placed in the cylinder. To lower
all friction parts are lubricated with engine oil.
The shaft housing must be to the left of the flywheel arrow and the recommended clearances between components must be observed. Functionality and performance of the shaft with a new piston must be checked before use.
Replacing the Oil Pump
The oil pump can always be repaired or, if the Partner 350 chain saw oil pump fails, it is worth replacing it with a new one. The oil pump is a star-driven pump that is connected to the clutch.
Before removing the oil pump, the chainsaw covers are unscrewed first, then the piston is secured and the clutch is loosened. Replace the drive sprocket with a new sprocket by installing the new part through the needle bearings. The sprocket has to be mounted on the shaft and the frame has to be lubricated beforehand.
Operating Instructions
These operating instructions contain recommendations so you can operate your Partner 350 without having problems. Safety precautions and operating procedures for the product during operation are described in detail. Covers repair, maintenance, and care of the Partner 350 chainsaw.
The types of chainsaw repairs you’re allowed to do with your own hands are defined in the instruction manual. All other faults can be repaired in a specialized workshop.
Always have the instruction manual handy, especially if this is your first chainsaw
You have just purchased your new chainsaw. Be sure to read this manual first, and consult it whenever you have questions about how to operate the tool. You can download and print the instruction manual for your chainsawPartner 350 at the link below.