When it comes to getting the right tightness for a chainsaw chain, there is a narrow “goldilocks zone”, where it is neither too loose nor too tight.
It can be a bit tricky to understand chain tension, especially if you’ve never adjusted it before. So why do you need your chain tension to be just right?
If the chain is too loose, it can jump off your chainsaw. A jumped chain has the potential to cause anything from a minor inconvenience to a serious injury.
On the other hand, if your chain is too tight, it can grind out your motor, and ruin (or damage) your chainsaw.
The good news is that the process for adjusting your chain is pretty simple.
After reading this post, you’ll know how tight a chainsaw chain should be, how to adjust it, and how to test that you’ve got it perfect. Let’s get to it!
How tight should a chainsaw chain be?
In short, your chainsaw chain should be what professionals call “snap tight”.
Basically, “snap tight” means that you should be able to pull your chain up until the drive links are partially exposed, but not free of the guide bar. If you’ve got your chain just right, it will “snap” back into place if you pull on it.
This probably sounds pretty theoretical, but don’t worry. There’s a simple way to test chain tension, which we’ve outlined below.
Testing the tension of your chain
There are 2 methods for testing your chain tension.
1. The snap test
To perform a “snap test”, gently pull your chain away from the bar, as far as it will go. Then, release the chain. If it snaps snugly back in place, then that’s a great sign of good tension.
If you’re unable to pull the chain away from the bar, then your chain is too tight. On the other hand, if you pull the chain away from the bar, and it just goes limp, then it’s too loose.
This test is helpful, but personally, I prefer the second test.
2. The pull test
This is the test I use most often. It’s straight-forward, and effective.
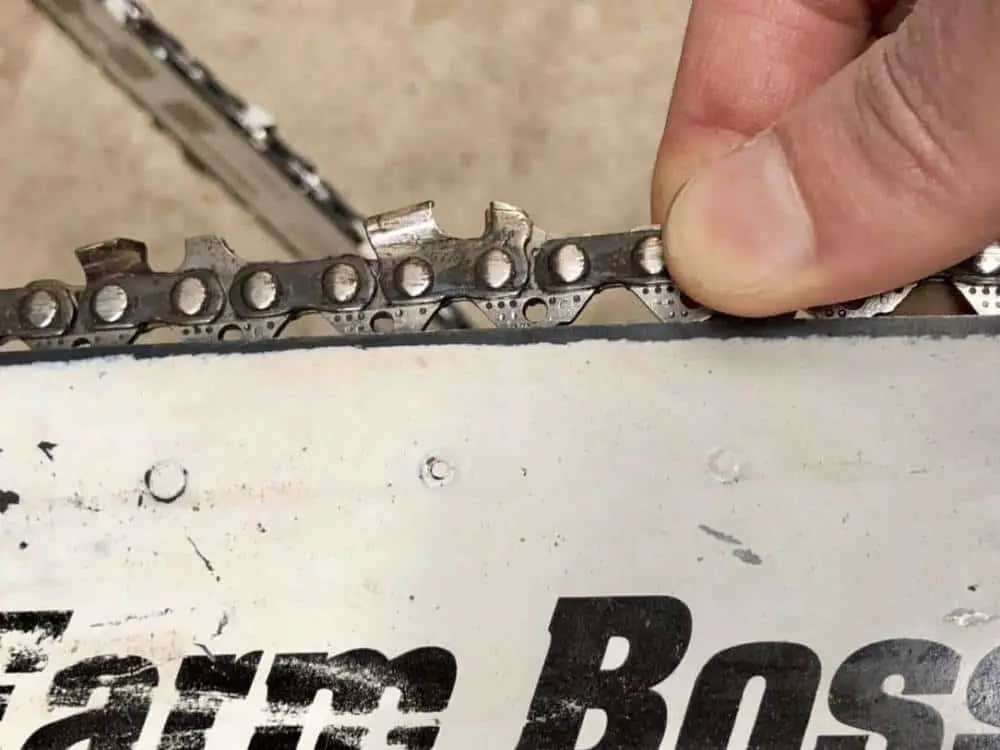
To perform the “pull test”, gently pull the chain away from the bar.
Pull as far as you can comfortably, without losing your finger grip on the chain.
You want the chain to partially lift away from the bar, but the drive links should NOT come completely clear of the bar groove.
See the photos to see exactly what to look for.
This would be too loose:

The drive links should still pull out a little, but their ends should remain within the bar groove.
This would be a good tightness:

If your test reveals that your chain is either too tight, or too loose, then you need to adjust it.
Don’t worry, I’ve got you covered.
You can adjust your chain’s tension, by following the 3 steps outlined below.
How to tighten the chain on your chainsaw
Overall, this is a pretty simple process.
To get started, you’ll need to do 3 things:
- Locate the tension screw
- Get the right tool (if needed)
- Tighten the chain
Let’s look at each step in-depth.
1. Locate the tension screw
Depending on the make and model of your chainsaw, access to the tensioning screw might be in different places.
The 3 most common locations, are as follows:
- Side panel – between the bolts which hold the guide bar in place
- Front panel – if you’re facing the front of the chainsaw, it will be located just to the right of the guide bar, and to the left of the bucking spikes (if your chainsaw has them).
- Integrated tension system – many new chainsaws now have an “easy-tension” system built-in. For this type of chainsaw, instead of tightening the chain with a screw, there is an integrated handle you can turn with your hand to adjust tension.
In the video below, you can see an example of all 3 of these tension screw locations. It also provides an easy-to-follow demo, of how to tighten your chain for one type of chainsaw.
2. Get the right tool (if needed)
For most chainsaws, you’ll need one of these tools (affectionately called a Scrench).
But if your chainsaw has a built-in “easy-tension” system, like the Oregon chainsaw in the above video, then you don’t need one for this adjustment.
You can get these at any chainsaw retailer, or you can find them online for around $10. Here’s one on Amazon, that might work for you (FYI: I get a commission on these).
3. Tighten the chain
Once you know where your tension screw is, and you have the correct wrench for it (if not using an “easy-tension” system), you’re ready to adjust your chain.
Hold the nose of your guide bar in one hand, and turn the tension screw with the other hand.
Continue turning the tension screw until the drive links of your chain are completely hidden by the guide bar. In other words, tighten until the chain links are flush with the guide bar.

Now that you’ve adjusted the chain tension, you can test it again with either of the 2 methods above.
Feel free to do a little fine-tuning, by testing and making small changes, until you get it just right.
If you keep trying to tension your chain and you just can’t get it right, you may have the wrong sized chain. To figure out how to measure your chain, check out our other post.
Wrap-up
Whether you’re adjusting or replacing your chain, the steps above will allow you to properly tighten it.
You want your chain to always be “snap tight”.
Knowing how to consistently tension a chain, is an essential skill for any chainsaw user.
Chainsaw chains are made of metal, and metal expands and contracts through use and environmental conditions, like heat.
As a result, the more you use your chainsaw, the more regularly you’ll need to adjust the chain tension.
You can use the tests above, to monitor tension. But be sure you always turn the chainsaw completely off, before touching the chain. Also be careful not to burn yourself, as the friction of sawing can really heat-up a chain.