How to coil a line on a STIHL trimmer mower
How to choose the correct line to wind on your STIHL brush trimmer: step-by-step instructions and video tutorials
A beautiful lawn can only look really well kept if the grass is regularly mowed. The grass trimmer is best suited for the treatment of difficult areas. Any owner of the unit sooner or later will face the problem of how to wind the line for the trimmer on the spool, because from the wrong actions can not only worsen the quality of mowing, but also to withdraw the equipment from failure. Today in our review of Homius we will tell you about all the ways and nuances of replacing the line and the peculiarities of the choice of consumable material.
the grass trimmer is useful for mowing small or difficult areas, such as near hedges, between beds, and along paths. Today, manufacturers produce a large variety of gasoline, electric and battery models, which can be selected under any requirements of owners.
As the cutting element of the grass trimmer, a line for the trimmer is used. In the process of work, sooner or later its length will run out, and then the owner will be faced with the question of how to properly replace and fix the thread tucked into the removable spool.
What to consider when choosing a line
Before inserting and fixing the line for the trimmer in the removable grass trimmer spool, it is important to choose the right material.
Rating of the best models of gasoline trimmer for grass. An overview of manufacturers and models, as well as useful tips from experts reviewed in this review, will help in the difficult choice among the many models of devices.
By quality
Before you put a grass trimmer line on your trimmer, you need to pay attention to the cross-section of the cord:
- Strands with a circular cross-section are the most common option. They are great for mowing grass, even in difficult areas;
- spiral trimmer line is suitable for thin grass. It is not very strong and will not be suitable for old thickets;
- Cord with serrations and sharp edges are chosen for mowing weeds;
- A trimmer line with a variety of geometric sections will help you mow your lawn more evenly, but the durability of the consumable is low.
Important! The most wear-resistant consumable material is a two-component line for trimmer with a circular section, reinforced on the inside.
The owner of a brushcutter must know that it is strictly forbidden to use wire made of metal, fishing line and various strings.
Rating of the best electric trimmers for grass. In this review, we will analyze the criteria for choosing an electric trimmer, technical characteristics, as well as the most popular models and brands according to consumer reviews.
Size
Before you wind the thread on the grass trimmer bobbin, you should pay attention to its size. The most commonly used line for trimmer with a 2 mm cross-section.
You can find the right diameter in the following ways:
- View the recommendations in the manufacturer’s instructions to the trimmer.
- Often manufacturers put cross-sectional information on the bobbin.
- The cross section of the filament should match the diameter of the hole in the reel.
Important! The thicker the thread is, the tougher the grass it can cut.
How to Wind a Trimmer Filament on a Semi-Automatic Grass Trimmer Reel
Grass trimmers (also known as lawnmowers) are actively used by modern society for the care of lawns and other similar objects of gardening farms. The tool is noted for its high efficiency, despite the questionable quality of grass cutting (compared to an ordinary peasant’s scythe. heaven and earth). The main advantage of trimmers (lawnmowers). high productivity with little physical effort of the operator. However, over time, the grass trimmer’s cutting element (caprone fishing line) wears out or gets damaged, making the grass trimmer a useless tool as a result. Hence the actual problem. how to replace the trimmer head and how to replace the line for trimmer grass trimmer heads? Let’s see this process on the example of Black and Decker lawnmowers and others.
Replacing the grass trimmer line with step-by-step instructions will allow even the inexperienced lawnmower owner to perform quite a complex job.
However, before you begin work on replacing the line on the trimmer, you need to ensure the safety of the work. In particular, you should take measures to protect against careless or spontaneous activation of the lawnmower:
- exclude spontaneous start,
- Remove the battery pack (if used),
- Place the tool in a convenient area to work.
It is convenient to work on the grass trimmer line replacement when the lawnmower is lying on the table and the person who does the grass trimmer line replacement has an opportunity to approach the tool from any side.
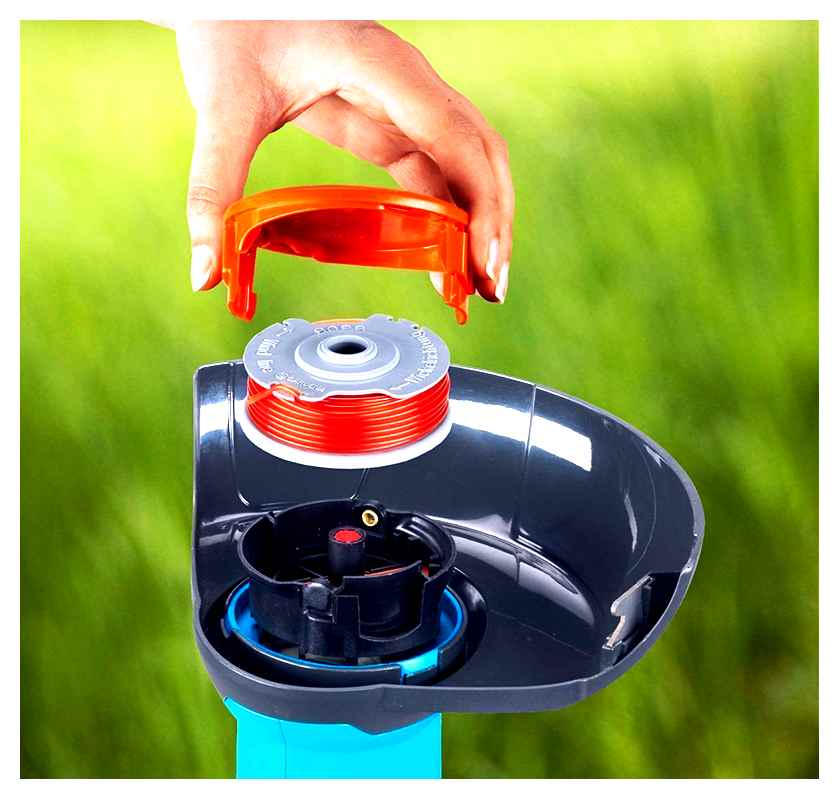
remove the grass trimmer head cover
The first stage of disassembly is to remove the grass trimmer head cover. Using the Black and Decker trimmer models and others as an example, to remove the cover it is usually enough to apply some pressure to unclip the locking latch, which is located on the side of the head body.
On some models of lawnmowers initially provides for the dismantling of the grass trimmer head, for which a hexagon wrench included in the tool kit is used. The head is normally held by two or three screws, which can be accessed through the side openings in the back decorative cover.
The head cover, where the filament spool is installed, is usually held in place by a latch tongue. It is enough to press the locking tab with some effort and turn the cover a little, after which the cover is easily removed At the moment of squeezing the locking tab you need to slightly turn and lift the cover of the grass trimmer head to remove the winding drum.
Step two: Removing the filament drum (spool)
The next step in the process is to remove the filament reel from the inner area of the head. You need to turn the head open to see the trimmer line and spool. On the side of the head find two recesses (eyelets), through which the line for the trimmer is led out.
The line for the trimmer should be released from the holes by turning the drum. then carefully remove the spool from the head area. The spool reel of some models is mounted on a spring. This must be taken into account during the extraction operation.
The procedure for removing the grass trimmer reel with fishing line from the inner area of the head: 1. head assembly with reel; 2. extraction gently with a small axial turn; 3. extracted parts The old grass trimmer line is completely removed from the reel. To perform the removal of the old line trimmer for grass, you need to remove the line from the loops-fixators and pull the free end. This method removes all the old winding. The same process is repeated on the second section of the drum. It is recommended that the technician use gloves when performing the work.
Winding line
Insert the line for the trimmer in the grass trimmer is not difficult. To carry out this operation it is necessary to follow a simple algorithm of actions. The first step is to determine how much consumable material. To make its calculations, you need to wind the line for the trimmer on the spool so that the resulting coil would be less than or equal to the diameter of the sides of the structure.
When you have decided on the size of the cord, you need to fold it so that one part is longer than the other by 15 cm. Winding the filament begins at the rim which divides the bobbin into two parts. Here will be located the fastener, in which you need to insert the thread bent in half.
Now it is necessary to understand in what direction to tuck the line for the trimmer in the grass trimmer. To do this, you need to inspect the bobbin. often a special arrow is indicated on it. If there is no explanatory information, you should find the pointer on the trimmer head, and start winding in the opposite direction. The further steps can be divided into 4 steps:
- Completing the filament winding. To do this, it is inserted into the side slot on the spool. Attach its second end to the opposite groove.
- The ends of the fixed fishing line are cut off. 7-10 cm of seam allowance remains.
- The inserted part is placed in the head of the grass trimmer. This is done by alternately inserting and pulling the thread into the inlet holes of the structure.
- The line is pulled out of the grooves. Once the action is completed, the product cover is secured with the clamps.
Once the last step is complete, the garden tool is ready for use. If after inserting the line into the grass trimmer the device does not work properly, it is recommended to repeat the procedure, changing the thickness or type of cord. Failure to do so can cause the product to malfunction.
What kind of line to choose for your trimmer?
Before you stock up on this stuff to put in your grass trimmer, you need to decide on a. After all, the conventional so-called round section trimmer line is not the only type that exists. So how to choose the most suitable one? Firstly, you need to determine the working conditions.
Choosing by type. Round brush line is the most common trimmer line. It fits on all spools, with very few exceptions. This type of material is suitable for cutting fresh, lush grass. But it might not be able to mow what are known as dead wood anymore. Attempts to mow shrubs with this thread are pointless to mention.
In addition to the usual type, there are others with sharp edges. They are usually made in “star” or “square” patterns. A sharp edge is the main feature and the key difference between these threads.
It is thanks to this feature that these types of filaments are capable of mowing dry weeds. But pointed filaments are not without disadvantages, the main of which are fast wear and tear and strength, noticeably inferior to the round type.
In addition to the types of fishing line already mentioned, there are other interesting and frequently encountered varieties. Particularly noteworthy among them are fishing lines, inside of which there is a metal wire. This type of filament is often used in gasoline-powered tools that have an engine with more than one and a half horsepower.
Strings with a metallic core come in both circular and sharp-edged sections. Regardless of the type of section, such threads are the best way to overcome plants that are difficult to mow. Filaments belonging to this type can easily mow not only dry grass, but even small bushes.
Filaments with wire inside compare favorably to other types of consumables by their incredible durability. But unfortunately, this feature has more than a noticeable effect on the price of this type of. The cost of filaments with a core is much higher than the cost of other types of filaments.
Choosing by thickness
You should also pay special attention to the thickness of the filament. For mowing young grass a thread with a diameter of one and a half millimeters is good. The larger the diameter of the thread, the drier and coarser the weeds it can handle.
There is a “but” in choosing a cord by thickness. It is important not only to assess the capabilities of the material, but also take into account the peculiarities of the grass trimmer. It is absolutely necessary to look in the user’s manual, which is included with the tool, and find information about the requirements for the cutting element.
Using an unsuitable thread can lead to tool failure. Using too thick a thread will overload the motor of the device. And using too thin a thread will increase the wear on the torque mechanism many times over.
That’s why the choice of consumable material should be approached with no less responsibility than to its filling in the trimmer for grass. When a suitable line for the trimmer is found and purchased, you can proceed to consider how to wind it on the spool.
How to wind the trimmer line onto the grass trimmer spool
Threading fishing line into the tool reel is, at first glance, a tricky business. But it is enough to study this process carefully. and in the future all the necessary actions will be performed without any difficulty.
To find out how to tuck the fishing line into your grass trimmer, it’s worth reading this guide. The step-by-step instructions below take into account the features of different trimmer reels, so they are applicable to any tool.
- The filament spool is the lower extremity of the grass trimmer. First and foremost, of course, it is necessary to remove this head from the device. To do this, you need to fix the rod (or, in other words, the shaft) on which the spool is attached. It needs to be fixed in such a way that it does not twist. The easiest way to do it is to put a kind of stopper (preferably metal one) between the thread of the shaft through a special hole. When the shaft is fixed, you can unscrew the spool.
- At this stage, it is necessary to extract the bobbin from the head, which is attached to the line for a trimmer. This requires the head to be disassembled into its components. To do this, first locate the locking mechanism on its body. It is located on the circumference of the product and is similar to a button. When the catch is found, you need to press it firmly. Keeping the lock pressed, it is necessary to turn the head cover clockwise. Then you need to remove the cover and remove the bobbin.
- A tight spring is placed between the bobbin and the head. It should be temporarily set aside so that it does not interfere with the winding process. Before proceeding to the stage of winding the fishing line, it is necessary to inspect the bobbin. If there are any remnants of the old thread on it, they must be removed. When the bobbin is clean, you can start preparing a new one.
- From the pre-prepared reel of new line it is necessary to measure and cut off six (maximum. seven) meters. The bobbin must be within arm’s reach.
At this point, actually begins the key stage, which is the subject of this article.
The first method of winding the fishing line
The correct amount of line has been cut. Now carefully examine the bobbin to see what type it is. On this depends on how it will be coiled line for the trimmer.
There are two types of bobbin. In general, they do not differ much from each other. Regardless of the type, the spool is divided into two compartments. the upper and lower. In the first type, the separating edge is not closed in a ring and has a recess.
In the second type it is solid, but near it on both sides there are small through holes. The way of winding the thread should be studied depending on which of the above types the spool belongs to.
- The previously prepared six-metre section should be bent in half. It’s best not to wind it right down the middle, but one half should be about fifteen centimeters longer than the other.
- Then the place of the bend should be inserted into the recess in the separating edge. One half of the line should be at the top of the spool, the other half at the bottom.
- Now you can start winding. Wind it in the direction of the arrow on the bobbin. When winding, keep the thread so that it is not twisted and the upper half is winded to the top half of the spool and the lower half to the bottom half. At each half about fifteen centimeters from the end should be left free.
- At the top edge of the bobbin there are small notches (or, in other words, grooves) for fixing the consumable material. The ends of the thread must be inserted into these notches so that they are secured one against the other.
- The final stage of threading the consumables in the tool. the ends fixed on the bobbin need to be slipped into the appropriate holes in the trimmer head for grass.
- That’s it. The winding process is complete. Now all that’s left is to reassemble the head into one piece. Carefully place the spring back between the bobbin and head. Then insert the bobbin into the head and press them together.
- Pull the loose ends of the thread out more. To do this, take turns pulling the ends of the consumables so they are out of the grooves of the bobbin. Make sure the cutting element is removed from the retaining grooves by trying to pull the threads out a bit, they should come out unobstructed through the holes in the head.
- Pressing the bobbin down, you need to put the cover over it. The cover should be screwed to the head so that all the grooves on their bodies aligned and the bobbin remained fixed between them.
- And finally, the last action. the head is screwed back into place at the bottom of the tool.
The process is completed. The line for the trimmer is tucked into the spool. The grass trimmer is ready for further work.
The second way of winding
- The previously prepared length of six meters, you need to bend exactly in the middle and cut it. That way you get two pieces of equal length.
- A small “hook” must be made at one end of each section. To do this, bend a couple of centimeters from the edge and fix for a while so that the “hook” does not unbend.
- Then take a single length. The “hook” is inserted into the through-hole at the top of the spool.
- Now we can proceed to the key step. winding. The direction in which you need to wind it is indicated by an arrow on the bobbin. It is important to make sure that the line for the trimmer is wound strictly within the upper part of the spool. Do not wrap the line around up to the tip, about fifteen centimeters should be left free from the tip.
- In the upper edge of the spool there are small notches (so-called slots) for fixing the consumables. The free “tail” of the thread must be inserted into one of these notches.
- The upper part of the spool is threaded. Now it is necessary to do the same procedure with the lower part. The second piece of thread is taken. The “hook” is threaded into the through hole in the bottom of the bobbin.
- After that you can start winding the line for the trimmer (within the lower section). This piece should be left free about fifteen centimeters from the end. This remaining “tail” must be inserted into the notch opposite to the one in which the end of the first piece is inserted.
Replacement instructions. how to insert the line for the trimmer
It should be noted that the spools in mowers can be different:
- for single-tendon operation;
- for operation with two tendrils;
- The line for the trimmer must be threaded through the hole inside the element.
And you should not confuse this part with an extension cord for a lawnmower on a spool, because despite the similar name, these are two completely different elements.
Mini chainsaw is designed for uncomplicated jobs and people who prefer to hold the device with one hand.
This article will tell you how much a ZIL 130 dump truck weighs and what this transport can do.
Read here //machinspec.com/lesozagotovitelnaya/benzopila/stanok-dlya-zatochki.html how to assemble a chain saw chain sharpening machine with your own hands quickly and easily.
In the first version, winding the cutting element is very simple:
- On the inside of the spool element there is a fixing ear.
- One tendril of thread is inserted into it.
- You need to thread the capron thread in the direction opposite to the rotation of the bobbin element.
- You only need 2 to 4 meters of fishing line. When the winding process is finished, put the small end of this cutting element outwards and fix it in the groove, which is necessary to fix the line so that it will not unravel during mower operation.
- If there is no special groove, then the end should be held by hand so that the cutting element will not untwist during further assembly of the element.
- The last step is to pass the outer end of the thread through the special hole located on the outside of the element. The spool can then be inserted into the mower.
Replacing the fishing line
When the roller works with two ends of polyethylene thread, then the following steps must be taken to tuck the trimmer line into the lawnmower:
- The inside of the spool will show how many notches there are for winding (two or one). If there is only one groove, then both ends of the thread will be threaded through this groove. If there are two, then the tendrils are laid out separately. each in its own notch.
- It is necessary to unwind 2 to 4 meters of polyethylene thread and pass its two ends into the hole.
- Wind both threads in the same direction, opposite to the rotation of the reel.
- When all the line for the trimmer is wound, the ends should be secured in the grooves or held by hand.
- Both ends are threaded through the eye on the outside of the reel body.
- The drum is then assembled and inserted into the mower.
To insert the line for the trimmer into the lawnmower, in which the spool contains two grooves, you need to use the previous version of threading this polyethylene thread. In this case each end of the line will be wound on its groove. All other actions are similar to the previous process.
The reel element or roller can have a completely different design from the previous two options. The line for the trimmer can be threaded through the eye, which is through and inside the spool. In this case, it is not necessary to disassemble the roller drum and manually wind the polyethylene thread.
Polyethylene thread is threaded through the hole and rotated by pushing a special button. This button is located on the body and is intended for the operation of the technique to be able to release the line for the trimmer as it wears out.
Rules and recommendations
No need to worry about winding the polyethylene filament the wrong way round, since it can only turn in one direction with this design.
Preliminary preparation
First, to wind the line requires removing the spool (bobbin, bobbin) from the grass trimmer. certain actions will depend on the difficulty of configuration and type of product itself:
- small electronic grass trimmers with a working motor and spool on the bottom usually have side buttons on both sides of the reel. Pressing them at the same time, the higher part of the spool with the internal content for winding the line is disconnected, while the lower part remains on the trimmer. Disassembly of the bobbin is better to create on an even, smooth place, so that the spring included in the design does not pop out and do not get lost;
- Electronic and gasoline grass trimmers with a bent bar without the ability to install a knife, usually have a special reel with a wingnut: in similar designs, one hand should hold the bobbin in a fixed position, and the other counterclockwise to twist fixing the reel on the bar nut, wingnut. How to tuck the line for the trimmer in the grass trimmer? How to tuck the trimmer line into the grass trimmer spool. It’s clear how to charge a trimmer line on a grass trimmer spool. After disconnecting the nut, the entire bobbin is removed.
- electronic and gasoline grass trimmers with the ability to install a blade on a straight shaft (for example, STIHL grass trimmers) have a hole under the reel. For the immobility of the rod in this hole is inserted screwdriver or other suitable object, and with a slow spinning achieved a mutual placement when the screwdriver goes inside the hole, and the spool is fixed. After which the body of the spool is rotated clockwise (at left-hand thread) and removed from the trimmer for grass.
For the second and third version of the spool, depending on the design, are disassembled by different methods. In spools with a drum, the drum is unscrewed, in spools with latches, the latches are pressed and one part of the spool is released from the other part. How to tuck the line for trimmer in how to do it right cheap line for trimmer. 2. On your property. If the bobbin halves are threaded together, it is sufficient to turn them by hand in opposite directions until they are completely unthreaded.
How to wind the line for the trimmer on the grass trimmer spool
First determine the length of the fishing line for your reel. Wind the line for the trimmer on the bobbin until it goes over the rims. We have 4 meters. How much you get out depends on the diameter of the trimmer line for the bobbin and the design features.
How to wind it up
Fold the line in half for the trimmer. Leave one end 10-15 cm longer than the other.
Lay the trimmer line according to the direction shown on the item body.
Insert the short end into the groove on the side of the spool.
Pinch the long end into the opposite groove.
Place the spool with the wound line in the bobbin case.
Cut the ends of the line, leaving 10 to 15 centimeters.
The filament change is complete, and now you just screw the bobbin onto the weed trimmer and you’re ready to go.
Features of trimmers
grass trimmer mowing with a fishing line can be used near: houses and other buildings, fences and hedges, trees and shrubs, beds and flowerbeds, rows in the garden.
Such a convenient, and most importantly, effective device, as a trimmer for grass, there are several variations:
As is clear from the names, the types of grass trimmer noticeably differ from one another. But regardless of the type of this tool, its cutting element may be a line for the trimmer. Of course, the grass trimmer fishing line tucked into the grass trimmer reel is not endless. And sooner or later it will be necessary to replace it with a new one.
The consumption of fishing line directly depends on the frequency of use of the device and the scale of the work performed. The more grass you cut and the more often it is trimmed with the grass trimmer, the more the trimmer line is consumed. And, consequently, the faster it will run out. In this connection, the question arises: how to tuck the line for the trimmer into the grass trimmer spool?
Not everyone knows the answer to this question. But the filament winding on the reel plays an important role in grass trimmer operation. In order for the device to function properly, it is very important to properly wind the new line for the trimmer on the spool. On how to change the line for the trimmer on the trimmer, and will be discussed in this article.
The final part of the instruction manual
Usually the process of line replacement on a particular model of trimmer is popularly described in the accompanying documentation. Another issue is that this documentation often comes in a foreign language, as notorious lawnmowers are, by and large, imported products.
Meanwhile, there are much easier, more economical and useful for human and natural health. to order the lawn with an ordinary peasant scythe. The blade of the grass scythe:
which is further accompanied by abundantly growing greenery, rather than the formation of dead wood as a result of the grass trimmer.
Trimmer line. varieties and the possibility of replacing with another material
Grass trimmer cord can be different diameters (from 1.2 to 4 mm), and you need to choose it depending on what kind of vegetation you want to mow. the thicker the trimmer cord, the coarser the grass it can handle. Experienced users recommend a 2 mm trimmer line that is universal.
The line shape can be round (for succulent grass) or with sharp square or star-shaped edges (for mowing dry grass). The second type is less durable and wears out faster than round cord.
One popular question about the operation of trimmers is whether the special mower cord can be replaced with other materials, such as metal or steel cables and strings, wire, etc.д. It is necessary to know that the installation of such items is not recommended, because with them, the grass trimmer turns into a dangerous technique. During mowing, pieces of wire or metal will constantly break off and fly in different directions, risking injury to the worker. And if you accidentally touch your limbs with them while working, you will be seriously injured.
Owners of trimmers, wondering whether it is possible to use fishing line for the trimmer, we answer. it is allowed, but it will tear and wear out much faster, and therefore require frequent replacement.
Tip! Fishing line for trimmer is well suited for cleaning grass near the fence or metal mesh. instead of spending expensive trimmer cord, you can charge a large-caliber (2-3 mm) tackle, which costs much less.
The difficulty in removing it depends on the tool model:
- Low motor tool. The motor is practically off the ground. To remove the spool, press the buttons on the side of the grass trimmer. Pressing these buttons opens the housing where the spool is located.
- Curved grass trimmer. Here you have to turn the special thumbscrew counterclockwise. The spool and the spring in it are then removed.
- Straight toolbar. The rod is held in place with a screwdriver or other object. Turning it clockwise will remove it. Then they take the tool apart and remove the spool.
- If you’re using one aerial tool, you’ll need about four meters of thread. This thread is inserted into the hole inside the spool where it can be secured. Then one end of the line is pointed in the direction of the arrow. Then the end of this thread is fixed in the groove that is in the spool. This is to prevent the thread from unwinding when assembling the spool. If there are no grooves, you must adhere to the hair growth line and reassemble the spool.
- When using a dual antenna tool, you must first check the number of available grooves.
If the bobbin is equipped with a semi-automatic mechanism, wrap the wire as follows:
- The thread goes down into the hole that is on the inside;
- Fasten the ends of the thread in the grooves on the body.
- The bobbin is assembled and the special button is pressed;
- After that, the trimmer line itself starts to wander in the right direction.
You should always remember that the cutting filament must be protected from hard objects. This will prolong its life.
If you don’t follow this rule, you will often have to stop work, remove the bobbin, and replace the thread with new.
Thread spools with different types of spools
With two-row automatic heads:
You must first press the clip until it clicks, remove the cover.
Turn the spool gently so that it can detach from the holder. Please remove this.
Measure two pieces of thread of equal length
To make further work easier, the ends of the hair should be trimmed at an angle. Take one end and insert it into the special hole in the spool. This can also be slots, grooves, clips, and more.
Next, in the direction of the arrow, you need to wind, and quite tightly and evenly. A special eye on the spool should be used to secure the end of the hair growth line.
The second half of the line is subjected to the same operation, only on the other half of the spool.
Then insert the spool into the head of the grass trimmer. And the rest of the hair down the hole in the head.
Then gently straighten the thread and close the cover. If the line for the hair growth trimmer is long, it is better to cut the extra. About fifteen centimeters should be left on each side.
- The thread goes down into the hole that is inside;
- Fasten the ends of the thread in the grooves on the body.
- The reel is assembled and the special button is pressed;
- After that the line itself for the trimmer begins to wander in the right direction.
It is necessary to carefully and accurately insert the cutting line into the machine, because not only the cleanliness of the garden area, but also personal safety depends on the correct winding.
The device in the mower
In the trimmer element, on which the string is stretched, very simply arranged. It is called the spool. It usually consists of a top and bottom part (grooves), between which runs a divider with a recess. It is on these grooves and it is necessary to wind the line for the trimmer. However, before it is pulled through the recess.
Before pulling out the spool should unscrew the special button, located directly on the body of the lawnmower. Before changing the line for the trimmer, it is necessary to remove the spool from the mower.
This is easy to do, but there are peculiarities depending on the configuration of the grass trimmer and the spool itself.
Smaller electronic mowers have the motor and spool on the bottom and buttons on the sides. If you press on them, you can get the upper groove of the spool and the part where you need to wind the line for the trimmer.
In bent-boom lawnmowers that don’t have a blade, the spools have special two-horned nuts. With these tools, you have to hold the bobbin so it doesn’t move, and you have to turn the nut in a nonclockwise direction. This holds the entire bobbin, which can then be easily removed.
Straight boom mowers that can be fitted with a knife have an opening right under the reel. To remove the spool, a screwdriver is inserted into this hole and the bobbin is locked in place. Then turn the spool clockwise and remove it from the machine.
Sometimes there may be clamps on the reel in the form of a latch. They must be pressed to disengage the parts of the spool. It is also possible when the top and bottom of the bobbin are connected by thread. In this case just take hold of the top and bottom and then twist in different directions until they are loose.
Cutter block attachment
The cutting unit is the main component of the Philips Styler. It has short, sharp edges and is used for quick, precise hair length trimming.
To remove the cutting unit from the styler body, check to see if there is an unhook button on the styler body. If it is present, press the button to remove the cutting unit.
If the styler does not have a release button, place your finger under the teeth of the cutter block and pull it out of the appliance. To re-install, insert the lower part of the cutting unit into the styler body, then push the part with the teeth in until it clicks into place. Do not use excessive force; this can damage the appliance.
If you can not install the cutting unit, check for foreign bodies in the body of the styler and try to clean it with a small brush or cotton swab.
No matter how well the electric trimmer for grass that we purchased works on the dacha plot or a country house. sooner or later there will come a time when we need to remove the grass trimmer head for replacement or prevention. I should say right away that you do not need to remove the entire trimmer head to replace the line. In this article I will tell you how to remove or replace the entire cutting head on the example of an electric trimmer for grass BlackDecker GL716.
Tips and recommendations on how to wind the line for a trimmer and what you need to know
There are some useful tips and recommendations that will be useful to know not only for beginners, but also for seasoned trimmers. These tips will help prevent negative consequences in the form of injuries and improper functioning of the mechanism. These recommendations state the following:
- Install the cover until it clicks into place. And it is 2 or more clicks, which depends on the number of clips. If one catch does not click into place, the reel may jump out when the tool is started and injure a person
- Do not coil the trimmer line too tightly or in more places than you can reel it in. It is better not to reel in more tooling than not to reel it in, as this will lead to negative consequences in the form of an inability to unreel it if necessary
- If you own the tool not with two lines, but with one (usually these are low-powered units), then the winding process is performed in a similar sequence as described above, only with the difference in the absence of the middle rim between the extreme bases of the spool
- After replacing the material, you must first check the functionality of the tool, and already after proceed to mowing the grass. If not checked beforehand, the fishing line can uncoil and injure a person
This is interesting!Choose proper quality material so you don’t get hurt when working with petrol or trimmers and brushcutters. In the process of mowing grass, small stones and other materials fall under the rotating parts, which can fly long distances, so, despite the fact that the line for the trimmer is not a knife, work with the tool should be carried out in a protective special outfit. The result of the work done is the following. after replacing the new material, the usual one is enough for up to 600 square meters, but taking into account the presence of a reinforcing layer on the line. Conventional nylon materials last less, which is important to consider when working. Do not try to mow thick-stemmed grass with a fishing line, as there are special metal discs or knives for this purpose.