How to connect a rotary mower to a power tiller
Rotary mower for tillers
The “Neva” power tillers are currently one of the most popular and widely used types of agricultural equipment for managing household and farm businesses. The rotary mower for the tiller is often used as an attachment that is installed on this machine. This type of device is a supporting mechanism and several rotating discs equipped with special blades. This design is highly reliable and easy to use, and it is the most preferred for intensive and safe work.
Haymaker for power tillers is designed for the following types of works:
- Mowing meadow grass;
- Mowing cereals
- mowing plants with thick stems;
- removal of weeds and small shrubs;
- lawn and roadside vegetation.
Types and construction
Depending on their design, there are two types of mowers: rotary and segment mowers.
Rotary
For these mechanisms working elements are disc devices. They are quite productive and safe in operation. Rotary mower for power tiller Neva is able to lay mowed plants in even rows, which greatly simplifies their subsequent drying and eliminates the need to use forks and rakes. The machine of this type is used for mowing vegetation on the roadsides and slopes, as well as for removing grass on the territories of private yards and estates. Rotary mowers are available as single- or double-disc mowers. They are attached to the power tiller at the front of the machine. How they work? The torque from the running engine is transmitted to the PTO shaft, which in turn interacts with the working tools through a V-belt. Then, under the influence of centrifugal force the discs legs contact with the surface of the grass and cut it. To protect the discs from rocks and solid objects the construction of the unit includes protective guards.
Segmental
Segment type mowers are devices, which consist of a frame and cutting components (tines), connected to each other by special fasteners. The principle of operation of such a unit is similar to that of classical shears: one part of the mechanism is stationary, while the other makes straight left and right movements. When the power tiller‘s torque is transferred to the mower, the clippers oscillate and the plants are cut quickly and cleanly between the tines. Intelligent design ensures that vegetation is cleared to either side of the machine. The result is an even swath that can be cleared without the need for accessories like forks and rakes. Segment mower for Neva power tiller is able to operate on areas with difficult terrain line when mowing grain and grass crops. The displacement of the mower’s working component relative to the power tiller may be up to 20 %.
Description of rotary mower for power tiller
Speaking about the rotary mower, we mean the device with the help of which the vegetation growing in the fields and meadows is mowed. These can be crops or weeds that need to be gotten rid of if herbicides are not used.
This is the closest to the quickest perception of the name, giving the idea that the principle of its operation lies in the functionality of the discs available on it, with which the mowing.
The rotary type of mowers connects to the motoblock in three main ways:
Similarly, there is a division of this type of mowers according to the way in which the cutting units are located in relation to the machine on which they are attached:
All about how to make an electric lawn mower with your own hands.
Looking here you can view a video of a mini tractor from a power tiller Neva.
General rules and recommendations for connecting to a power tiller
Assembling your own power tiller is a demanding and self-assembly task. But even a successfully made mechanism may not work as expected if the mechanism is not properly assembled to the power unit.
Recommendations on how to make a correct connection:
- Switch the power pack into reverse;
- Connect the mower to the PTO through the connection in the clutch socket;
- The trailed implement must be secured with a spring pin;
- Mower blades must be protected with guards;
- The mowing process should be started at low rpm;
- When operating the mower avoid sudden manoeuvres and turn the machine smoothly without jerking.
When choosing any of these mower types for your own use, first of all pay attention to safety of use, as they are risky and may cause irreparable harm to your health if used incorrectly or without following safety measures. Also check technical condition of all components during operation.
General rules and recommendations for connection to a power tiller
To assemble a mower unit for your power tiller yourself is a demanding task that requires a certain amount of care. But even a successfully made mechanism may not work as expected if the mechanism is not properly mounted to the power unit.
Recommendations on how to make the correct connection:
- Switch the power unit into reverse;
- Connect the mower to the power take-off shaft through the connection in the coupling socket;
- The trailed implement must be secured with a spring pin;
- Mower blades must be protected by guards;
- The mowing process should be started at low rpm;
- When driving the mower avoid sudden maneuvers and turn the machine smoothly without jerking.
When choosing to make your own any of the presented types of mowers should be guided primarily by the safety of use. these devices are high-risk and can cause irreparable harm to health if used improperly or not observed safety precautions. Also check the technical condition of all the assemblies of the machine during operation.
How the rotary mower works
The mower is started by the transmission of a power tiller and the movement of the wheels. The rotary mower is designed with a support wheel and one or more discs attached to a metal frame. When the land wheel starts moving, the cutting units that mow the crop are also moving.
Different models have one to three cutting devices on a metal frame. They can be attached in various ways, but the main advantage of increasing their number is to increase the productivity of the machine as a whole.
A rotary mower fitted with two or three blades, powered by a tractor or tiller, can mow large areas of farmland. Multiple cutting units also have a positive effect on mowing speed.
The characteristics of the machine are formed by several main indicators:
- Height of vegetation cut;
- the output (this indicator is based on the area of cultivated land for the duration of the work)
- Rotation speed of the cutting element.
How to choose a segment mower for your power tiller
An efficient mower on a single axle tractor must be reliable, durable and well mounted on the machine. As a drive in such a device is used belt transmission. To make the right choice, consider the following points:
- Segment knives should be made of hardened steel, so that they do not blunt for a long time and effectively perform the work.
- The important parameter is the working width. It determines how quickly you can cope with the task at hand. On average it is within 1-1,8 m.
- Average cutting height of the mower for power tillers. 40-80 mm. Match that value to the type of vegetation on your lawn.
- Although the segment mower is a hitch-mounted machine, it does exhibit such a parameter as working speed. It can be from 5 to 10 km/h.
- The working capacity of the attachment for the power tiller does not exceed 1 ha/h. often this parameter is 0,25-0,35 ha/h.
- Check which tillage implement compatible with your model. Some models are designed for specific models of equipment.
- Availability of accessories is important. That way you can quickly troubleshoot and replace parts when they break down.
- Pay attention to the weight of the equipment and its size in working and transport position. Last point is important for moving the segment mower from one area to another. Depending on the model weighs from 20-35 to 100-115 kg. Heavy models are designed for mini-tractors.
Segment and rotary mowers
How to tune up a CS: GO 2 1 Video
KSF-2.1 intended for mounting on mini-tractors and motor blocks. This machine is designed to mechanize haymaking processes, getting its own nickname because of the special kind of cutting parts. in the form of large sharp triangles. Also called “segment mower”.
Segmental mowers of the KSF-2 type.1 are produced by Lyuberetsky (Our Homeland, Moscow). This company is the successor of the factory Ukhtomsky and continuer of his long-term business. the creation of haymaking equipment of various types and designs.
KSF-2.1 mowers are excellent for mowing work mainly in flat areas. they mow various grass crops with placing the vegetation in the swath:
Mower is applicable for planned mowing on the territory of actually all weather zones. provides problem-free work with the exception of semi-desert and desert areas. Photo of KSF-2 mower.1
Apart from the ability to use in any weather, segment mowers KSF-2.1 have many other advantages, during which they are appreciated by many farm workers:
- Highest productivity, achieved by comparably high operating speed and large simultaneous working width. over 2 meters.
- Light weight of this suspended mowing equipment allows you to work even with small transport.
- Low power consumption of the device will help to save money and does not affect the increase in the cost of hay.
- Conventional operation without connecting hydraulics does not ask for additional operating personnel, not counting the pull tractor operator.
- Economical to buy the device and its spare parts, available everywhere.
- High quality of operation at high speed and long service life. at the end of the mower’s working life the blade can be replaced and it is ready for the mowing season again.
READ Changing a line in a Patriot Trimmer Video
Mower KSF-2.1 consists of the following main structural sub-assemblies and parts:
- a frame on which other working tools are to be placed and which is secured to the tractor’s hitch.
- A traction bar designed to link the working cutting tool with the frame of the device.
- Cutting blade with sharpened sectors (fingers).
Mower blade is running in reciprocating motion parallel to ground surface. In doing so, the blades of grass cuttings encountered on its path hit the non-moving segments of the blade and are pressed tightly into the apartment by the moving blades. The grass is cut like a normal shear. leaving behind a swath of finished cut. KSF-2 mower schematic diagram.1 1. head of mower blade; 2.4. blade head guide; 3. blade head cover; 4. inner shoe; 5. diverter bar; 6. outer shoe; 7. field board; 8. toe; 9. toe insert; 10. blade sector; 11. blade clamp; 12. blade back; 13. friction plate.
Attachment of the mower to the tractor is carried out by fixing the longitudinal tractor linkage arms, setting the distance from the ground to their back ends at about 40 cm and lifting less than 65 cm. This is done to prevent lateral displacement of the mower frame relative to the central axis of the pulling unit.
READ How to check mower ignition coil
When working with the machine observe the rules facilitating its continuous and nonhazardous operation:
- The mower’s cutting unit must be protected by a guard.
- The tractor must be stopped while the power take-off shaft is simultaneously actuated.
- What remains for our customer to do Adjustment and cleaning work with the mower itself and especially the cutting equipment is carried out at a work stop and plugging the tractor.
- The machine should be transported with its teeth covered.
Technical characteristics of the KSF 2 segment mower.1:
Preparing the discs with knives
The second step in the manufacture of a rotary mower to the power tiller is to prepare the discs with knives.
You need to take 2 disks from the planter. Four blades are attached to each of them. The blades are made of hardened metal. In order to save time and effort, you can use the rotor from the tractor. Only in this case remember that the length of the rotor has to be shortened by approx. 4 cm. This will improve traction.
To fix the blades on the disc, you need to prepare the holes. Each disc is drilled with a 6-mm drill bit. The blades are fastened by means of a bar. For correct work of the device, between a bar and a knife a gap is left, the height of which is a couple of millimeters (1-2 mm is enough) more than the thickness of the knife itself. In addition, the gap will allow you to perform 2 nuances at once. Blades will rotate 360 degrees. Because of this the blade will turn on impact with something hard, but will not break. Centrifugal force will be created as the disc rotates. Under its influence the blades will spread out and cut the grass.
The blades are mounted on an axle. It is made of carbon steel. And it is not recommended to make the axle too thin. The shaft must be at least 0.8 cm in diameter. To avoid unnecessary free rotation of the knives, the axle is tightened to the stop.
Segment mower
In order to make a fully functional and working with their own hands segment mower, you should take a metal pipe with a rectangular cross section 1200h50h15 mm or a piece of normal cloth mower for the grass, and drilled at the same distance twelve 10-mm sockets for the installation of mounting bolts M8. Subsequently a 890mm long strip of metal guide bar with teeth and blades, mounted on both planes of the rectangular tube, will be attached.
Blades have backs with segments and drive arm rims. On the tube on both sides are also installed clamps and slats. Mounted on the chassis of the mower support wheel. Working part of segment mower is driven by PTO shaft of used power pack.
Due to the use of the segment mower, you can make a quality mowing of fresh vegetation without shredding it. On the video you can watch the equipment working.
Photos of homemade mower
Homemade mini-tractor: development, design and construction. Step by step instructions and selection of optimal parameters (100 photos)
Twig shredder. the best models, selection tips, manufacturers and quality rating (video and 95 photos)
Homemade plow. types, drawings, projects, schemes, dimensions. 110 photos and video instructions for design and construction
Read more! Potato planter: types, setup, features of connection, care and aggregate (75 photos)
How to mount the mower on a single axle tractor
The newly purchased product must be competently installed on the technique to provide the desired performance and quality of execution. Let’s consider the approximate order of assembly and installation by the example of the rotary version:
- Check the delivery set (from model to model the set may differ, but, as a rule, it includes the drive belt, frame, fitting, fasteners, rotary cover, hydraulic hose, support skids, hydraulic cylinder, drive belt tensioning system, rotors with blades, spare parts and accessories);
To the mounts of the motoblock mount the frame so that it is 45 degrees with the vertical plane and so that the slotted parts look up;
Install the rotors on the frame, so that their blades are positioned at the bottom. It’s important that they are fully seated on the spline;
Attach the rotary cover to the same slot;
Secure with cotter pins and nuts attached;
Mounting the tensioning system by removing the cotter pin and unscrewing the lock nut on the pulley. The next step is to carefully knock out the pulley, so as not to lose the key. When the system is properly installed, its handle will point upward and be secured with bolts from the spares;
Next, bolt the skids to the frame from the spares so that their concave part looks inward;
Unfold the frame rings. they must be positioned outside the frame of the power harvester. After that connect it to the second mower;
Put the drive belt on the pulley as you drive. It is important that the single axle tractor and mower remain aligned;
Assemble hydraulic cylinder-hydraulic hose system (if any is planned on your power tiller).
After completing the assembly, the product must be prepared for work:
- To activate reverse on the machine;
- remove weights from wheels (if any);
- Set the engine on a small revolutions;
- make a test run on a flat area without interference, checking the quality of the result and, if necessary, adjusting blades and speed.
Proper installation of the mower on a single-axle tractor
The newly purchased product must be installed correctly on the machine to provide the right performance and quality. Let’s consider approximate order of assembly and installation using rotary version as an example:
- Check the delivery set (from model to model the set may differ, but, as a rule, it is a drive belt, frame, socket, fasteners, rotary cover, hydraulic hose, support skids, hydraulic cylinder, drive belt tensioning system, rotors with blades, spares);
Mount the frame to the mounts of the power harvester so that it makes 45 degrees with the vertical plane and so that the slotted parts look up;
Install the rotors on the frame so that their blades are at the bottom. It is important that they are fully seated on the spline;
We attach the rotor cover to the same slot;
We make fixation by enclosed cotter pins and nuts;
Install the tensioning system by removing the cotter pin and unscrewing the lock nut on the pulley. Next step is to carefully knock out the pulley so that the key is not lost. If properly installed, the arm will point upwards and be secured with bolts from the spares;
Then fix the sled on the frame with bolts from the spare parts kit so that its concave part is facing inside;
Unpack the frame rings. they should be positioned on the outside of the frame of the motoblock. After that we finally connect the mower to the second one;
Put the drive belt on the pulley in the direction of travel. It is important that the single-axle tractor and the mower remain aligned;
Assemble the hydraulic cylinder-hydraulic hose system (if the power tiller is equipped with one).
When the assembly is complete, the product must be prepared for operation:
- Activate the reverse on the moto;
- Remove weights from the wheels (if there were any);
- set the engine at a low rpm
- make a test run on level ground without any obstacles, checking the quality of the result and, if necessary, adjusting blades and speed.
Assembly
One assembly is not enough for the desired result, it is also important to correctly install homemade mowers for the power tiller. When installing the structure, you need to strictly adhere to these rules:
Switch the single-axle tractor to Reverse mode; 2. Place the assembly in the hitch socket, making the connection to the PTO; 3. It is important to make the connection by means of the kingpin and spring, otherwise this will destroy the unit; 4. The blades of the tool must be secured with a protective cover when installed; 5. Get rid of the auxiliary weights on the wheels of the motoblock, you will not need them for harvesting the grass; 6. It is necessary to mow the grass gradually, starting with small revolutions, engaging the clutch mechanism; 7. Turn smoothly and slowly.
It often happens that for whatever reason the manufacturer does not sell a special mower specifically for this model, or that it is not satisfied with its characteristics. In this case, it is not difficult to work on a homemade version. A complete production on the basis of your farm will be demonstrated on the example of a segmented variation.
Among the spare parts we must first take a rectangular tube 5×1,5 with the length of 120 cm. A normal piece of an old grasshopper will do as well. On the tube is drilled about 12 holes per centimeter at equal distances, as the drawings show.
It is necessary to prepare a frame from welded angles and pipes, the frame can be covered with plywood and attach wheels to it. The tape is made rubber ring-shaped. It is convenient to fix it with duralumin plates. Also on the frame are welded clamps for installation of the cutting strip. For the latter, a strip with metal blades is attached to the pipe with holes prepared beforehand with M8-bolts.
Making a mower for a power tiller with your own hands
Let’s see how you can make a rotary mower for the Neva power tiller with your own hands. The video provides detailed instructions on how to make and attach the knives when making a rotary mower with their own hands:
Т.е. the basic material is two discs from an ordinary grain planter, and from a chainsaw a chain and a gear.
It is necessary to put 4 knives on each disk. They are made of high quality tempered steel. This metal eliminates the possibility that the knife will break and fly off in a chaotic direction, and possibly even into a person.
Special bars are used to mount the knives. They allow the knives to be held securely in place. The gap between the bar and the blade should be about 1-2 mm.
When the motor is turned on, the centrifugal force will drive the knives in a perpendicular position, and they will cut the plants. The blades must be able to turn freely through all 360°. If they collide with a hard surface, they will turn the other way and remain intact.
Blades should be mounted on the axle. It is made of durable carbon steel. The axle diameter should not be less than 8 millimeters. This is to ensure that the discs have enough room to rotate freely.
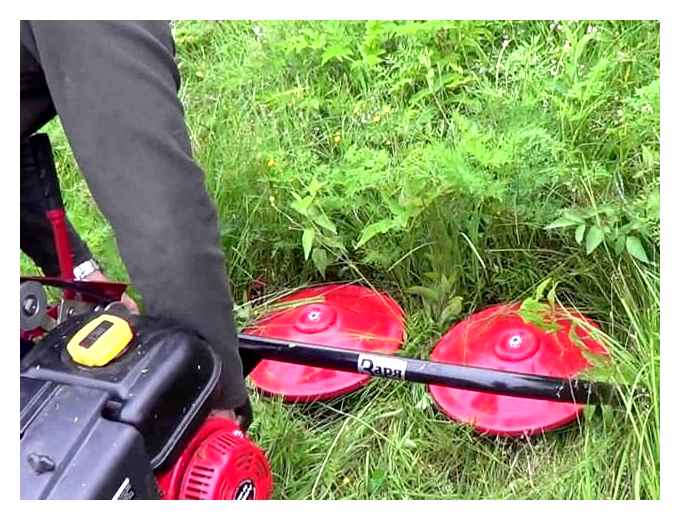
These discs are mounted on the frame and connected to the PTO drive.
The discs should rotate towards each other. The grass will eventually pile up neatly in a single row.
We would like to remind you that both factory-made and home-built mowers.Safety is the most important factor when assembling and operating the mower! Do not disregard the basic safety precautions
Before commissioning a home-made mower make sure that it is safe for you and other people. Unreliable blade attachment can lead to considerable damage to the health of the operator. This is why particular care must be taken when starting out for the first time.
Block: 6/7 | Character count: 1964
What the forums say?
There are lots of different reviews on forums about how the tillers for power tillers work. People here have a lively discussion of various models and give advice on their selection.
“It took me a long time to choose a mower. I studied the features of each model and its characteristics. I ended up going with a rotary mower. It’s more practical in terms of operation. After all, my area is not flat, and it has slopes and hillocks. So a single disc rotary mower was ideal. I decided to rely solely on official equipment from the manufacturer of my Neva power tiller. And this was the model KP-0,5. I haven’t had any breakdowns since. The only thing is that I’ve sharpened the blades a couple of times.”.
“I run a small landscaping company. And sometimes I have to tackle the most difficult and overgrown areas. I can’t imagine doing it without a mower and power tiller anymore”.
Number of blocks: 14 | Total number of characters: 22488Number of donors used: 4Information on each donor: