How to correctly sharpen a wood hacksaw
a course from a dilettante
To the beginner about the basics in the field of life safety, extreme and emergency situations, survival, tourism. Also useful for fishermen, hunters and other nature and outdoor enthusiasts.
How to sharpen a hand saw (wood hacksaw)
In constant use, the teeth lose their sharpness, the cutting edges wear out, degrading the quality of the cut and increasing the time for the task. Buying a new one won’t fix it for long. That is why it is usual to sharpen a hand saw. It is necessary to sharpen the hand saw to restore the geometry of the saw teeth (pitch, height, profile angle, angle of bevel of the cutting edges).
- when cutting wood the hacksaw sounds different
- It becomes visually noticeable that the tooth tips are rounded, lost their sharpness
- tooth color changes
- Sawing is heavy and irregular;
- the saw’s direction cannot be maintained properly
- the teeth jam frequently in the wood
- the cut is not straight.
Normal steel can be corrected by yourself, while teeth with pobedite tips can only be machined on specialized industrial machines. Some hobbyists at their own risk undertake hacksaw sharpening with angle grinder, but it is not a reliable and dangerous method. Hardened teeth cannot be sharpened. It is easy to identify hardened steel. it has a black color with a blue tint.
Necessary tools for hand saw sharpening
Additional lighting of the working area with electric lamps is recommended.
Throughout the sharpening process, the file / file must move without jerking, a constant pressure is necessary and the cuts must be made without deviations from the correct angle. The sharpening process is done only with backhand movements of the file. The file/nadfill should be returned by air, with no contact with the hacksaw.
After sharpening on the hacksaw, the saw’s teeth should have the right shape. This is shown in the picture below.
Saw riving
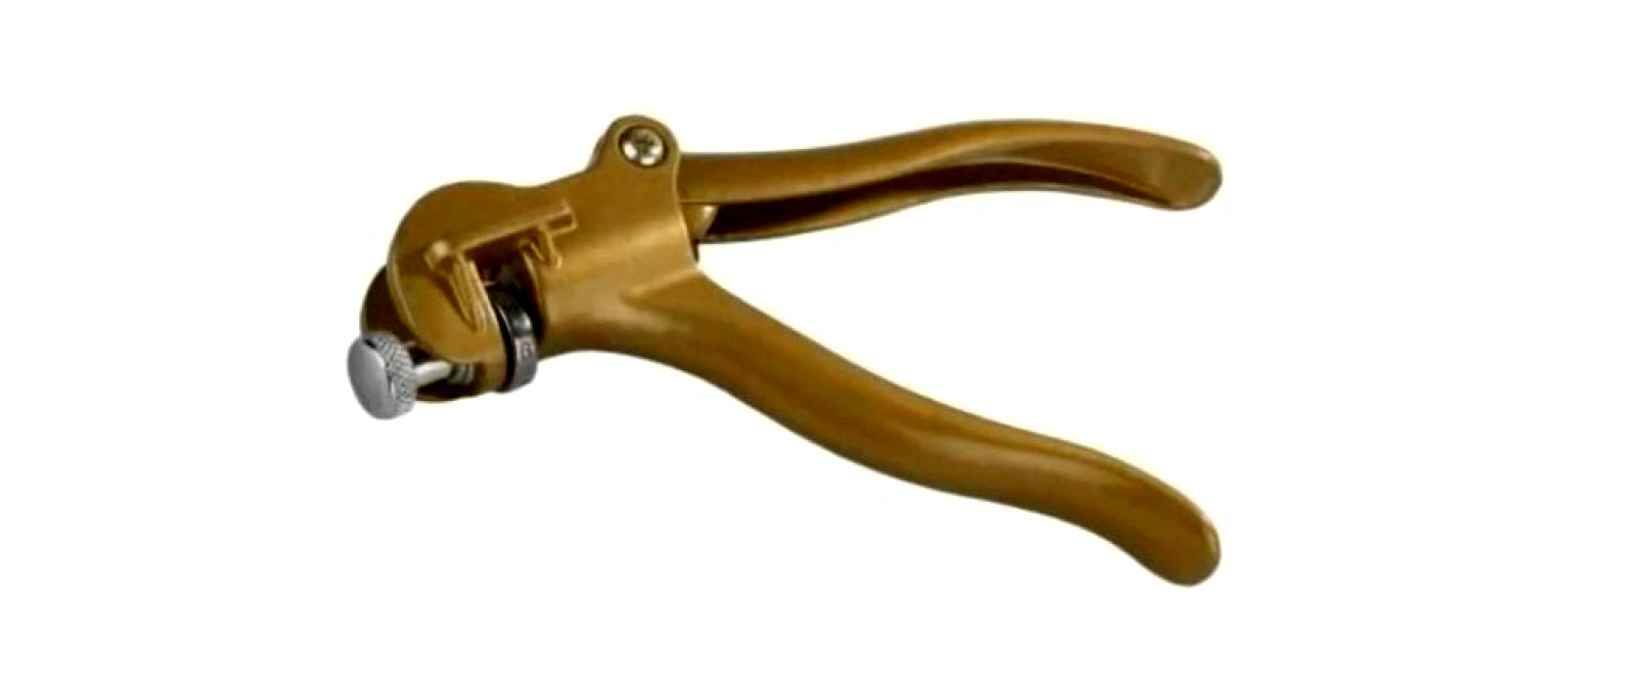
Tooth setting pliers are a good tool. It is very convenient to use, the saw’s tooth deflection to the side will be as it should be.
Sawsaw sharpening. Also a good thing and not expensive. the average The design is elementary: a few slots and an adjustable angle gauge. The tooth is inserted into a proper slot and the hilt is deburred by applying pressure. An adjustable angle gauge ensures evenness of setting.
I have neither of these at home, and do not want to run to the store? Then you can use the grandfather’s way. it has been used since the beginning of time. All you need is an axe and some skill so as not to spoil your hands (people who do not own the tool this method should not use. it is dangerous)!).
The technique is simple: the blade is inserted between the two teeth and the teeth are bent aside by turning the axe.
Saw sharpening can also be done with a self-tapping screw. This is safer. For this you need a long screw to make it easier to hold. Before working, it needs a little extra work. It is necessary to grind its head a little on one side, to make it flat. This is to ensure that when it will be applied to the tooth, it will not slip and deform the latter.
The saw blade lies flat on the soft wood (pine, spruce). Hold the self-tapping screw by its head and bring it to the tooth with the cap and hit it with a hammer. The tooth is bent. The operation is carried out through the tooth. After the saw blade is turned over, and the operation is repeated in the same way.
Sharpening process
To sharpen the saw, it must be rigidly fixed so that it does not vibrate when the file is applied. Otherwise the quality of the work is poor.
Fix the blade of the hacksaw vertically, often in a vice, in self-made clamps, but if there is neither of them, then you can do without them.
The method of fixation without special devices. “on the edge of the workbench. The blade of the hacksaw is put in such a way that only the teeth of the saw are hanging over the edge of the table. But the handles of the saw are always thicker than the blade, and therefore the place next to it can not be put tightly to the workbench. That’s why you have to use the angle of the table, and then the saw’s handgrip doesn’t get in the way.
If there is a clamp, it can be fixed like this.
And this is the way without clamps, the fixation is made only by hand of sharpener. This is quite comfortable and safe.
In the right hand one takes a file or file, and, holding the blade of the hacksaw with the left hand, proceeds to sharpening.
Grind the saw teeth one by one. The file is moved from top to bottom this way. The file is applied to the tooth to be sharpened and the progressive downward movement moves it with force.
The file has to be held with a two-dimensional inclination. horizontally it is about 30 degrees. Vertical. approximately 60 degrees. The angles of inclination are individual for each saw, because they can vary in both tooth shape and size.
Here’s how it should look: the teeth on the right side of the file gauge are shaped, and the ones on the left are not.
The right side of the file pointer has the teeth machined, and the left side does not
The tool used
Since saws are different in shape and function, so are their teeth. And to sharpen a hacksaw properly, you need different tools.
Single-side triangular file. Profile of this tool is not standard, if the usual triangular file all sides are equal and are working, then this file has one working side, and in form is an isosceles triangle with a very large base.
This one sided triangular handy file is perfect for breaking out fine or oblique teeth. When working, it only affects the surface to be cut, while others are only slid on. No risk of grinding on the adjacent tooth.
A regular triangular file. Compact tool for sharpening most standard wood hacksaws.
Triangular file. Perfect for sharpening saws with large teeth.
Height adjustment of the links
All teeth must be at the same height.
An uneven edge results in uneven loading and greatly reduces efficiency.
Checking the height of the hacksaw teeth
Check tooth height before sharpening.
To do this, place a sheet of plain paper on a hard and flat surface, and press the cutters firmly down until a clear print is obtained.
If teeth protrude from the row, their impressions will show on the print.
If there are higher teeth, they are carefully filed down to the general level with a flat file.
How to properly set the tines of a hacksaw?
Quite a common question is how to separate the teeth of a hacksaw for wood. If they are offset in one line, the cut is narrow and the working part gets stuck in one place. In this case, the metal is rapidly heated, so it begins to expand. To set teeth properly it is recommended to use special mechanisms. Recommendations for the work being done are as follows:
- The saw is clamped in a vice to securely hold it in place. Plywood can be used as a backing to eliminate damage to the working part.
- All cutting elements are bent through one by one to the recommended angle.
When looking at how to make the saw’s adjustable angle, we note that several elements deflected at a larger angle can cause a complication of sawing.
How to sharpen a hand wood hacksaw and set its tines
Sooner or later any cutting tool blade becomes worthless and blunt. There is no need to change the entire tool. It is enough to perform the correct sharpening. You can do it with the help of those devices, which are already available in the house (most often). Of course, nothing will work if you do not have the right technology to perform all the operations. In this article, the master plumber will tell you how to sharpen a hand hacksaw for wood and set the teeth.
To ensure a high quality cut you need to understand the mechanism of how the edges of the teeth of the hacksaw affect the material to be cut. Unlike steel and plastic wood is a heterogeneous material, precisely because of this quality and were developed several types of saws, different profile of the teeth, the angle of their sharpening and the degree of separation. All varieties of wood hacksaws, their characteristics and technical data are specified in GOST 26215-84.
Basic types of wood saw teeth: 1. for cross sawing Type 1; 2. for cross sawing Type 2; 3. for longitudinal sawing Type 1; 4. for longitudinal sawing Type 2; 5. for universal sawing
There are three types of hacksaws: cross, rip and universal. The main difference lies in the cutting principle: when wood is sawn crosswise, the teeth encounter fragments with different densities. On the one hand, this circumstance plays to the advantage: the generated chips have a smaller size and are easily removed from the contact zone, which allows the presence of the sharpening on both sides of the tooth for sawing, both in the forward and reverse direction of feed. On the other hand, cross-cutting cuts are partly impact cuts, so blunter angles of the cutting edges are required.
Sawing wood along the grain can be characterized as a repetitive cycle of micro planing. even pressure on the tooth, so the teeth are asymmetrical with the tip pointing in the cutting direction. The edge formed at the apex of the tooth is perfectly perpendicular to the blade plane. Sawing along the fiber generates elongated chips which are difficult to remove from the contact area. Also during longitudinal cutting, more moisture, resins and adhesive substances are released, which, in combination with the first factor, prevents sawing in both directions. Chips are removed with a straight cut: perpendicular cutting edge direction promotes sawdust ejection to the sawing side. The reverse movement removes residual chips and ensures that the edges are self-cleaning.
All types of hacksaw teeth are set and alternately tilted in different directions from the longitudinal axis of the blade. Due to this in the longitudinal profile of a row of hacksaw teeth a kind of dovetail is formed. two sets of cutting wedges formed by the tips of the cutting edges of the teeth. Accordingly on the bottom of kerf the hacksaw forms two grooves, what provides evenly stepped removal and effective diversion of shavings.
Qualified professionals know the following signs that indicate that the saw is about to fail:
- The hacksaw begins to sound differently when cutting wood;
- It becomes visually noticeable that the tips of the teeth are rounded, lost sharpness;
- The color of the teeth changes;
- The sawing force increases;
- The direction of the saw is poorly maintained;
- The teeth often jam in the wood.
Why to sharpen the blade on a hand saw and when to do it?
The hacksaw is subjected to a variety of stresses during use, which causes the teeth to become dull. In addition, they change their position. All this leads to:
- The efficiency of the tool is reduced;
- time and effort is required for the sawing process;
- The accuracy and quality of the cut deteriorates (nicks form);
- There is a danger of using a blunt instrument.
A saw with blunt teeth needs to be resharpened. Determine that it is time to sharpen the tool can be determined by the following factors:
About sharpening rules
Wood hacksaw has a low price, so true connoisseurs of quality tools prefer to buy professional wood hacksaws, which can be sharpened during operation. So, tool sharpening is a real art, so there are rules in this business:
- Fix the hacksaw securely. The blade is clamped in a vise or other wooden fixture, which is placed on a lighted and stable surface. On your knees, as well as on a stool or on a brick, it is impossible to perform a high-quality sharpening;
- the use of good quality tools. In this case it is not worth saving and buying cheap tools. In addition, you should not ask your neighbors or friends for a file. It is better to have your own, proven tool.
- to make the tool last longer, it is necessary to clean it with a metal brush and rub it with coal (wood), so that it does not get clogged and blunt;
- correct pressure. hold the handle of the hacksaw in your right hand, and hold the end of the hacksaw in your left hand, keeping the file on the teeth. The pressure on the teeth should be even and directed in a certain direction. Do not touch the file when returning it;
- Try to remove the metal from the tooth flanks so that it is evenly sharpened. Consider that the number of strokes should be the same and performed with the same amount of pressure;
- Remove burrs from the cogs with a file that has a velvet notch. the notches are removed from the side edges of the hacksaw with an arbor.
When you are finished, check the quality of sharpening and sharpness of the teeth. If the edge is well sharpened, but it is not shiny, and if it is already blunt, then there is a shine on the metal. In the same way, you can tell if one or more of the teeth are blunt.
How to easily sharpen a hacksaw and correctly separate the teeth
If the old hacksaw is dull, you need to update the tooth setting and sharpening on it. After that it will saw like new. Sharpening a hacksaw is much more profitable than changing it, so this skill is sure to come in handy.
What will be required:
The teeth must be set before sharpening. If you do not have a special tool for this, it can be done with a thin steel plate. If you have a large reach, a kerf is made on it to match the height of the tooth.
Then each tooth is clamped with a kerf on the plate and bent through one to one side, then skipped to the opposite. In general, each of them should bend in the same direction in which it was originally tilted, only with a larger outreach.
Even easier is the setting with just a smooth plate. It is inserted between the teeth and turned out so as to become parallel with the blade. From this movement, the tooth is bent. Then it is everted to the other side and bends the next tooth in the opposite direction. This way you get a narrower setting, but with the same reach on every tooth.
Then it is necessary to make the sharpening of each tooth bent away from yourself. To do this a triangular file is applied to the blade at an angle of 35-40°. Both ribs of the tooth are sharpened. The file is only guided upwards. For each edge 4-8 strokes are enough, it all depends on the degree of wear of the file.
Then the hacksaw is turned over in a vise, and the remaining teeth are sharpened. After that it will cut wood like butter. With infrequent use of a hacksaw this procedure is repeated every couple of years, or even less frequently.
How to simply sharpen a saw
A simple and accessible to everyone way to sharpen a saw or hacksaw on wood with their own hands. It is not necessary to explain how important a good tool for a real craftsman is. And in order to keep the saw constantly in operation, the master should not only know how to use it, but also know how to sharpen it, in case it suddenly becomes blunt.In some cases, the saw is supplied by the manufacturer without any sharpening at all:
Sharpening a saw with a file
To sharpen the saw we need a triangular file.Clamp the hacksaw blade in a vice, and at an angle of about 45 degrees start sharpening each tooth in turn. First sharpen one side after the other, then turn the blade over and sharpen the teeth on the other side.This is the most common and absolutely universally available way to sharpen saw teeth.
The work is painstaking and requires skill. But you will get the hang of it very quickly, and you won’t notice how you finish the last tooth of the saw. Now the saw is sharpened:
Also for sharpening you can use files.Again, it is a very laborious job and requires a lot of perseverance. I recommend that you get rid of all distractions so that nothing distracts you from your work.Of course, if you use a mechanized tool, the time and effort can be significantly reduced, but as already mentioned. this is the easiest and most affordable way to sharpen the hacksaw blade.