How to cut a ceiling plinth with a wire cutter
How to cut the corners of ceiling plinth: tips and detailed plan
In order to choose the right power drill, you need to pay attention to well-known, proven brands. For example, the model “Fit 41255” is made of hard plastic. Can cut wood, plastic and metal workpieces
The workpiece width to be sawed is 120 mm. Workpieces can be sawed at angles of 45, 90, 22.5 and 135 degrees. Equipped with a curved saw
It can cut wood, plastic and metal. Workpiece width to be sawed is 120 mm. Workpieces can be sawn at angles of 45, 90, 22.5 and 135 degrees. Equipped with a shoe saw.
- “Stanley1-20-112” is famous among craftsmen for its accuracy and quality of cut. Cuts are made at 22.5, 45 and 90 degrees in the vertical plane and 45 degrees in the horizontal. Eccentrics securely hold workpieces. The blade is made of impact resistant plastic.
- “Zubr15375-75” is also appreciated by craftsmen, allows making precise cuts. Made of durable ABS plastic, so it is strong and reliable for a long time.
- Chisel “Stayer 15402” is a professional carpentry tool, which differs from others by the fact that the workpiece can be sawn from 0 to 180 degrees, graduation step. 15 degrees. Locking screw holds workpiece securely in place.
- “Fit Pro 41321”.swivel saw supplied with the saw in steel. Workpieces are securely clamped with a clamp. It is made of steel, aluminum or plastic. Working length 60 cm.
- “Shampion180” has a length of half a meter. This is a rotatable unit that fixes 45 and 90 degrees, but can also work polygonal pieces (four, five, six, eight and twelve-corner pieces) The unit is equipped with an arbor saw 1,4 mm pitch. The maximum width of the workpiece is 20 cm. Working depth 20cm.
- Professional saw blade “Zubr-saw” works in horizontal and vertical planes. Swiveling attachment allows you to cut non-ferrous metal, alloys and steel workpieces. The scale defines the saw’s rotation by the required angle. Stiffness and durability of the rotary jig saw helps to cut the baseboard corner with filigree precision.
- The Stayer arbor saw blade allows to work without additional measuring tools, because its base is marked. The metal base is strong, the maximum width of the workpiece that fits on it-160mm. Cutting depth 600mm.Adjustment of saw tension, different tilt and swivel of saw blade facilitates precise sawing of workpieces.
- The “Kupper” sawmill has a wide range of functions. Not only does it swivel to a defined angle, but also the slide moves along the body of the machine on a guide. This ability to mount the carriage facilitates its positioning in the right place on the workpiece. Part to be sawn. remains stationary and is secured by removable clamps. There is a hinge with a scale when processing material in the vertical plane. Workpieces can be cut both horizontally and vertically at the same time. The right depth of cut can be obtained using this chair, which is useful in the manufacture of parts with spikes. The diameter of the workpiece can be up to 150 mm.
List of necessary materials and tools for work
It is not so difficult to make a crossbeam with your own hands, if you follow the recommendations of experts. To begin with, make sure that the materials prepared for the work are polished
It is important to choose wood, which must be dried, without dents, have a smooth surface without any defects. Do not choose plastic as the starting material, because it is not strong, and therefore can easily be damaged during the work. Boards made for the tool should be about 2 centimeters thick
Boards made for the tool should have a thickness of about 2 centimeters.
Before starting work, it is worth preparing such devices:
- A ruler and a pencil;
- chalk sandpaper;
- Metal hacksaw;
- vise;
- A drill with a different set of drill bits;
- Euro screws (screws);
- hacksaw with small teeth, designed for sawing the baseboard.
All of the above tools should be sufficient for the work. Among the additional devices can be useful hexagonal wrench, with which it will be easier to screw the screws. Also before starting work, it is worth preparing individual elements for the homemade tool
Before we proceed to the description of the instruction: how to make a jig with their own hands, let us pay attention to a detailed inspection of the manufacture of parts to the device
Tips and recommendations
There is a situation when you need to make a repair very quickly, but time, unfortunately, is not very much. In such a situation, you can use the method of orientation on the ground, but it must be competent so that the joint was perfect.
A protractor is taken and the corners of the room are measured. A good situation if it turns out that the angle is 90 degrees or 45. Unfortunately, this is not always the case. If the angle is correct, then use a jig. If not, then the marking goes on the spot. When marking on the spot is often the case that even after processing a knife corner is not perfect junction.
In such a situation, you need to cut off a piece of the first skirting board, which can cover the gap formed, cut it off so that the angle was perfect. This strip, is inserted into the gap and neatly closes it. And also this method will help round the corner of the baseboard, which is often required when repairing.
Types of angles
Corner docking and trimming of the baseboard differs depending on the type of angle, there are: internal, external and non-standard.
Inner corner, in other words, the corner of the room is less than 180 °, usually 90 °. When trimming an inside corner, the bottom of the ceiling plinth always protrudes over the top. The first thing you must still measure the angle between the walls, if it is standard and equals 90 °, then the strips are trimmed at an angle of 45 °. Baguette, which is glued to the right side should be trimmed to the left, and the left slat to the right.
Outer corner or outer corner is less common, it is more than 180 °, usually about 270 °. In working with such corners, everything is exactly the opposite. The edge of the skirting board that will be pressed to the ceiling must be larger than the bottom.
Non-standard angles. These most often mean the corners with degrees more or less than the standard of 90 ° and 270 °, and various kinds of curvatures. Trimming in this case is carried out “by eye” or with a marking on the spot. Areas with roundings are assembled from several small elements, each of which is fitted in turn.
Methods for trimming a skirting board
If the corners are standard, it is most convenient to cut the skirting boards with a stool or stencil. In other cases, resort to the method of marking on the spot.
Cutting a baguette with a wire cutter
Chisel. joinery tool, which is designed specifically for cutting baguettes. It can be made of plastic, wood or metal. Shaped like a tray with slots on the walls. The plier helps to determine the correct angle and evenly cut the slat at 45, 60 or 90 degrees. Some models may have more graduation guides.
When working with a jig, it is important to put the baguette correctly:
Cutting a baseboard with a stencil
A stencil is nothing more than a flat imitation of a jointer. It is not difficult to make a perpendicular line. To begin with, you should arm yourself with a ruler, a pencil and a protractor.
On a flat surface draw two parallel lines, the width between which must not be less than the width of the baguette. In the middle of the segments draw a perpendicular line. All angles must be equal to 90°. Further this piece connecting two parallels, divide in half and through a point spend two more lines at an angle 45° from the perpendicular. The baguette is placed on the stencil, as in the chair.
Cutting with pencil marks
This is another way to cut the baguette evenly, not having a chisel.
For the inside corner. The baseboard is placed against the ceiling as it should stand, to the left of the corner, and a trimmer line is drawn on the ceiling. Then a piece is attached to the other side, to the right of the corner, and also draw a fishing line on the ceiling for the trimmer. The two lines should form an intersection point. Again they enclose sections of the skirting board one by one and from the point of intersection lower a straight line for a trimmer to the bottom edge of the skirting board, it will be the cut line.
For the outside corner. Append a skirting board to the right of a corner and draw a line for a trimmer with a pencil on the ceiling further than the corner of a connection of walls. After that, attach the skirting board on the left side of the corner and run the second trimmer line to the point of intersection with the first. The point of intersection is transferred to the top edge of the baguette. The point where the corner of the walls and the inner bottom edge of the baguette converge will be the second mark. Connect the two points and cut the baguette along the line.
Cutting a wide molding with a pattern
If a large pattern on the surface of the border came just at the junction of the inside corner, it will have to adjust, otherwise the overall appearance will be spoiled.
Cut out the patterned area from the ceiling molding, leaving 5 cm to spare on the sides. The resulting section is divided in half, that is, make an even cut in the middle of the pattern. After that, trim the baguette alternately in a jig or by eye.
Necessary tools
For the trimming of baseboards use the following tools:
- For foam products and all types of Styrofoam. a sharp office knife;
- For polyurethane products. a metal hacksaw;
- For wood products. a jigsaw (hand or electric).
Although for the cutting of polyurethane baseboards most often used hacksaw, it can also be done with a box cutter. the fairly low density of the material allows it.
Instead of a clerical knife, you can take an ordinary kitchen knife. It is mandatory:
To cut wooden baseboards instead of a jigsaw, you can use a metal hacksaw. But the blade will have to take with the smallest teeth. Otherwise, the saw will crumble the wood and get stuck in it while working.
What is a saw
The chisel is a special device that is designed to cut the profile material at different angles (usually 45 o and 90 o). The tool is three rectangles connected to each other in the shape of an inverted letter U. The top 2 have slots for a saw, jigsaw, or knife. On the bottom rectangle put the material to be cut. Insert a hacksaw into the slots in the upper ones and cut the material. The result is a perfect cut at the desired angle.
The chisel is widely used for work on ceiling skirting boards. This is due to the fact that it is quite difficult to cut them at the corner joints. At the joints of the cut should have an angle of strictly 45 degrees. Otherwise, there will be gaps between the two baseboards, which later will have to be masked in some way (or re-adhesive, using a new cut).
How to properly join baseboards in corners
Corner corners that are properly shaped look attractive
As a rule, the design of corners, both internal and external, takes the bulk of the time. Due to the fact that the ceiling plinths are characterized by a very complex shape, it is not easy to just take and cut them at the right angle. It is necessary to cut so that they dock in the corner without visible gaps. To get the corners literally perfect, there are several ways.
Using a power drill
The chisel, as a tool, is suitable if the corners of the room are conjugated at an angle of 90 degrees. The tool represents a groove, in the form of the letter “U”, turned upside down. Notches are made on the walls of the gutter at different angles. To evenly cut a decorative element, it is placed inside the gutter, and then the element is cut at the desired angle with a hacksaw.
This is how the jig looks like. Can be plastic, wood or metal
Due to the fact that the skirting boards are complex in shape, they must be placed in the gutter so that they simultaneously pressed on the two surfaces. the bottom and side. Depending on what corner is formed, the plinth is pressed to the bottom and side, or opposite, or the near surface.
As a rule, the corners are trimmed at an angle of 45 degrees. The first thing to do is to determine the length of the baseboard by placing certain marks on it. After that, the decorative element is placed in the chair so that the mark corresponds to the maximum length of the element, and then the element is cut off. You must also remember that the left side of the baseboard is placed on the left side of the chair, and the right side. on the right.
How to cut a corner on a ceiling plinth: position it correctly in the jig
Ceiling baseboards one side is attached to the ceiling, and the other to the wall, so the part that is attached to the ceiling, laid on the underside of the chair. It is very important to hold the skirting board firmly and firmly during cutting, because otherwise the cut surface is unlikely to be flat and smooth. Having cut in this way the left and right part, you get either the inner or outer corner.
How to cut a corner on the ceiling plinth: properly install it in the jig
First of all, both parts are attached to the place of attachment without glue, so as to check the quality of work. If the corners do not match, they are corrected with a suitable tool. The advantage of polystyrene ceiling skirting boards is that small errors can be hidden by smearing them with putty.
After a final check, a thin layer of special glue is applied to both surfaces of the baseboard.
How to make the inside corner of a ceiling plinth using a wire cutter
Technique fit ceiling skirting boards in the corners is almost the same, regardless of what it is a corner, inside or outside. After applying glue, the baseboard is pressed against both the wall and the ceiling. Naturally, the effort must be controlled, especially if the decor elements are made of foam. Not only that, it is necessary to work with gloves, so as not to smear the surface of the skirting boards, which easily gets dirty.
How to trim a ceiling plinth?
Finishing finishing work in the house, many homeowners are faced with the problem of cutting ceiling baseboards, especially their corners. After all, the attractiveness of the interior depends on them. Without these decorative elements premises look unfinished. It is not difficult to guess how to cut a ceiling plinth with an angle, a metal ruler or a flat bar, because it is only necessary to maintain a right angle.
But in finishing works requires trimming of baseboards and at other angles, such as 40 degrees. Therefore, the installation of these plastic elements is fraught with certain difficulties. To get the appropriate angle, you need to be extremely careful. One of the problems is to cut the ceiling plinth in the corners with further docking.
The following materials are used in the production of baseboards:
- Wood. Wood is considered the most labor-intensive material to work with. Wooden skirting boards are sawn with a joiner’s hacksaw.
- Extruded polystyrene foam. Finishing material of high density. It does not absorb moisture. In combustion it does not emit any toxic substances. It is rather difficult to work with, but easy to cut. Only a carpenter’s knife is needed for this.
- Styrofoam. It is fragile, the cheapest and easily workable material. Its fragility is not a disadvantage, because the skirting boards are located under the ceiling and mechanical effects are not afraid of them. It is possible to cut the ceiling skirting board from the foam without any effort.
- Polyurethane. It is distinguished by plasticity and flexibility. Due to these qualities, it is used on uneven surfaces. It has water repellent properties and is resistant to temperature fluctuations.
- Polychlorvinyl. Difficult material to fit because of high rigidity. Manufacturers offer different finishes from it: imitation stone, metal, wood and uniform coloring. Becomes brittle in cold.
Decorative elements made of aluminum look no less attractive under the ceiling. True, to process and cut metal is much more difficult than the materials from the list suggested. Increased demand for aluminum skirting boards is due to the fact that they are cable channels, in which it is convenient to hide wiring and cables
Important is the aesthetics, unresponsiveness to aggressive environments and detergents
Aluminium ceiling skirting boards are cut with a metal saw. In order not to break the cloth, reciprocating motion should be smooth and even.
Regardless of manufacturing material, ceiling skirting boards can be considered the best solution for creating a unique interior. They are mounted on the most difficult area, which is the junction of the wall and ceiling. Those who know how to properly cut the corner on the ceiling plinth, quickly make the interior of the room completed, which will give it more attractive. With these elements you can partially hide minor defects.
The tool for cutting choose depending on the material and the necessary angles. In rooms of standard shapes with perfectly flat walls and ceilings, to cut the corners of the ceiling plinths use a plier. Wood is sawn with an ordinary carpenter’s hacksaw, but for other materials a jigsaw should be purchased. You can also use a metal saw. To fit the corners manually, you will need additional tools: ruler, angle, protractor, pencil.
Trimming without a joiner
If you can not get a squeegee, or the angle of the wall is much larger or smaller than 90 degrees, then you have to do a little drawing. This job will require you to concentrate as much as possible, but rest assured, you can do it.
Shape and cut corners
For the outer corner, we attach the ceiling edgings, one by one, each to its own side, and trim the trimmer line along them to the ceiling and walls. That way you can even make the junction of the three baseboards at once, as in the photo. As a result, we get several intersection points, as in the photo below. Further we transfer these points on the moldings and draw lines from top to bottom. These lines will give you an idea of how to cut the ceiling moldings correctly.
Please note: You will need to start trimming and fitting the skirting boards before you can start with the finishing work on the walls and ceiling. So we can safely make the necessary marks on the walls and ceiling, without fear of spoiling the coating How to properly file the ceiling skirting for the outside corner
How to cut the skirting boards for the outer corner
For trimming the inner corner we will also have to “draw”. As in the previous case, we put the skirting boards and draw lines along them, looking for intersection points. We put them on the ceiling moldings themselves and draw trim lines. Look at the red lines in the picture, the black lines are for the joints between the walls and the ceiling.
How to cut a ceiling plinth in an inner corner
How to cut a ceiling plinth. Video on how you can saw out the corners of the baseboard with a construction angle and a piece of paper.
Putting the finishing touches on the baseboard
Now all we have to do is to check how precisely the trim is done. To do this, we take in hand the left and right parts of the ceiling plinth, and then join them in a corner. If there are no gaps. you can glue, if there are any defects. trim with a hacksaw or utility knife. Checking is performed equally for both the outer and inner corner.
Note: Marking the top and bottom of the moldings is best done with masking tape. It is easy to remove after trimming, whereas pencil or marker marks will have to be masked
This is especially important if the skirting board is not going to be painted in the future.
We dock the corner elements of the ceiling plinth and check the quality of the trimming
How to cut a ceiling plinth?
The answer depends on the angle in question. Internal and external joints are slightly different.
Internal angles
The easiest way to work with a wire cutter, but it is possible to cope without this tool. In this case, the fishing line for the trimmer cutting angle (45°) is drawn using a protractor. The second option. laying the skirting board to the place where it will be located, and marking points for cutting.
The 45° cut is not the only operation. To be able to easily join the two elements, a slight bevel is made on their outer side. This step requires the repeated fitting of both workpieces, because such a correction can only be made by eye. Baseboards made of polymeric materials are trimmed with a sharp office knife. For wooden baguettes do not use a hacksaw, but another tool: bevels are better to create, turning the edges of the products with a coarse rasp.
Outer corners
In this case, the difference is that you do not have to mill the outer sides of the bars, but the inner parts. Otherwise, the procedure is no different. First, using a wire cutter make cuts at a 45° angle, then both blanks are sent to the fitting. on the wall, then neatly make a bevel on the inside.
If the outer corner of the wall should be at a small distance from the inner corner, there is often another problem. She’s a billet length selection. Here you need maximum accuracy, so you have to do a lot of testing, as the rule about “measure seven times” works here.
Improper wall geometry is another obstacle that can be difficult to get around. Their unevenness is one of the most common problems. In this case, the skirting board is applied to the base, mark the defects of the wall on the product, then it is further processed.
How to cut a ceiling skirting board with a wire cutter?
You can not say that the use of this tool makes the task elementary. Baguette must be firmly held in place, otherwise the result can be defects. If the width of the product is small, it must be pressed to the near side of the chair.
For the outer corners
Before you start the operation, make a cut on the workpiece (45°).
- The tool is fixed in the most convenient position. This preparation gives a chance to accurately determine the position of the baseboard. Or rather, that its edge, which will have to be at the ceiling. As a rule, the right side piece is placed to the right, and the left side piece to the left.
- The skirting board is pressed to the bottom and side of the jig so as to avoid any movement. The kerf begins to do from itself.
When finished, both workpieces are placed against the corner (without glue), check the alignment of the parts. If correction is necessary, it is done with a knife.
For inner corners
In this case, first determine which surface of the plank will be “adjacent” to the ceiling.
- It is placed on the bottom of the tool.
- The other side is pressed against the nearest wall of it.
- After completing sawing, the strips are checked at the place of their subsequent fixation. If there is a need, then also carry out the correction.
The last stage of the work is the gluing of the skirting boards. If small gaps remain, they can later be closed with a suitable material.
How to do the work with a drawn jig?
Using a “notch without a jig” is another answer to the question of how to cut a ceiling plinth. Paper, cardboard or a fairly large wooden board would work as a template. First draw three parallel lines on the material, then finish drawing a square, then its corners connect the diagonals, obtaining angles of 45 °.
Since not all houses and apartments have absolutely correct wall geometry, in this case, for the accuracy of the cut, you must first check the corner to be decorated. If the walls do not match, then from the use of normal tools, you need to give up at all. It can be successfully replaced by a homemade paper (cardboard) device.
How to cut the edges without a chisel?
If there is no desire to make a homemade skirting board, then there is an alternative. But in this case, the result will depend on the accuracy of the work. The operation consists of several steps:
- The first plank is attached, then on the ceiling in the corner with a pencil to draw a line for a trimmer;
- this plinth is removed, then the opposite workpiece is attached, which is also marked;
Despite the lack of special tools, the quality of work does not suffer, but in this case, accuracy and flawless cuts are important. Work on the blanks for the outer corner is carried out similarly, but in this case the lines are drawn (and continue further) from it.
Alternative to cutting the skirting boards
If there is no desire to conduct an independent docking of blanks, you can use a simpler solution. to purchase special corners, greatly facilitating this stage of the operation. However, this option is not always available. The reason is the limited range of such products. They can not be matched to every skirting board.
A few recommendations
Any work has nuances, but they can not be taken as trifles. For trimming to go neatly and without problems, you must pay attention to a few things.
- Correct measurements are the most important thing in any work. To mark the blanks for the inner corner, the measurement begins precisely from it.
- Before cutting the two strips for the outer corner, do not forget that they will “peek out” over it to a length equal to the width of the products.
- Fixing the ceiling baguettes begin only after several checks. When the edges of the skirting boards fit perfectly, then you can begin to glue them (fixing screws).
- You can use files or files to correct the workpieces to be joined. For foam plastic and both types of Styrofoam, you need to take thin, sharp-sharpened blades.
As any debut rarely passes without mistakes, it is recommended to start with training on scraps. Therefore when buying, it is better to add 10-15% to the length of the products. In this way, you can guarantee that the material will be sufficient not only for the preparation, but also for the entire room, even in the event that imperfections in the process do appear.
Selection of tools for cutting ceiling plinths
To properly and accurately cut a ceiling plinth, you need to use a suitable tool for cutting. It is chosen depending on the material from which the fillets are made:
-
Styrofoam. Characterized by low strength and costs relatively inexpensive, and therefore foam models are becoming increasingly popular. Their durability does not affect performance, because usually the ceiling plinth is not subjected to mechanical stress. An ordinary office knife is suitable for cutting.
You can buy it in a construction store or make your own hands according to these instructions:
-
Three 5015 cm boards are nailed with a long rib in the shape of a three-sided, rectangular box. Note the angle of 90 degrees between the side planks and the cross-cutting board.
To work with this homemade device was convenient and safe, planks should be well sanded before binding.
Technology of cutting ceiling plinths
For prompt and quality work to select the tool in accordance with the material of the plinth and choose a way of cutting. If you have a plier, then there will be no special difficulties in the process. If you do not have it, then you have two options: to cut according to the template and measurements on the ceiling, or to make this tool yourself.
Features of cutting ceiling plinths in the jigsaw
Work with this device should be extremely careful not to blunt the tool and not to leave cuts in unnecessary places. In the process, stick to the following instructions:
-
Fix the baguette in the jig the way you plan to place it on the wall. The side, which will be pressed to the ceiling on the jig, should adjoin to a sidewall.
When cutting and trimming foam and polyurethane products, remember that these materials crumble and squeeze, so tools must be sharp enough, and strong mechanical action on them is undesirable.
Technique of a cutting of ceiling plinths on a template
This method can be used if your corners are straight, and you want to trim the baguette exactly 45 degrees. To do this, before you cut the ceiling plinth in the corners, you need to draw a jig on heavy paper. Draw two parallel lines and mark corners at the required degrees, using a protractor.
We place the fillet in this case in the same way as in a traditional mortiser. Keep in mind that you need to cut the skirting board, keeping the tool in a strictly vertical position.
Rules for cutting ceiling skirting boards by marking
This method is used to cut the skirting boards in cases where there is neither a plane, nor parts from which it can be made.
To do this, you need to make a marking on the wall in this order:
-
Apply the baguette in the corner to the place of attachment.
When cutting in this way, it is important to accurately draw all lines and mark points. A mistake of even a few millimeters will cause a gap. This method is suitable for cutting and docking both the inner and outer corner of the ceiling plinth.
How to cut a ceiling plinth without a jigsaw
To accurately dock in the inner corners of the skirting boards, you can do without a pencil saw.
-
We put the end part of the baguette to a sheet of paper and trace the contour of the convex side. convenient to use a small section of the skirting board (if available).
Tools for cutting a baseboard
When installing friezes, you need to prepare the necessary tools to perfectly cut the plinth and fit the ceiling frieze in the corners of the room. To cut the baguette is used and cutting tools: knives (carpenter’s and ordinary knives), hacksaws, saws. When you handle each of them, you need to take into account the peculiarities of the device and subtleties of application.
A chisel is a fixture that guides the blade of a cutting tool at the desired inclination. It is specifically designed for cutting materials that are then mounted at a specific angle. Structurally, it can be either regular or tilted, or precision. They differ visually, but the principle of operation is the same.
Different types of the crossbar Plastic crossbar with clamps
An ordinary chisel is a U-shaped tray, most often made of plastic. It also comes in metal or wood. Its walls have slots to guide the cutting tool at a given angle to the base. This variety is of the template type and is not adjustable: the material is cut at standard angles (normal or negative), which are structurally set in the slots. When selecting a crosscut saw it should be wider than the workpiece to be sawn. To fix the material in the device can be used clamps or special pins. if the design has a hole for their installation. Usually the workpieces are just supported with the free hand.
Regular plastic frameCustomary wooden frame
Pivoting or precision miter saw. it can be set at any angle and makes it possible to make sawing at an angle and get simultaneously a cut in two planes. This is a professional tool, rarely used in usual conditions.
Rotary Jigsaw with HacksawPrecision (rotary) Jigsaw
Band saw. recommended primarily for hardwood baseboards. It is not always good to use the saw on soft materials like Styrofoam and polystyrene. A cut from the saw is rough and requires additional grinding with sandpaper or a file.
A hacksaw is a commonly used cutting tool for cutting baguette. It is necessary to choose it with care: the blade must be adequate to the size of the baseboard cutouts. thick and wide enough. When working with a hacksaw, make sure the inclination of the tool is correct so as not to damage the jigsaw and to keep the right direction. In this case the cut of the detail is often not very smooth and sometimes requires smoothing and sanding.
The construction knife. makes it easy to cut a soft foam strip. It is easy to work with, and the cut is smooth and even. Instead of a construction knife, it is acceptable to use an ordinary knife. the main thing is that it must be of sufficient sharpness and length.
Block: 3/4 | Number of characters: 2820
Baseboard saw
Carpenter’s plane. it is a device for cutting at a certain angle. It is used with a hacksaw. In principle, you can make a crosscut yourself by assembling a guide from boards and making cuts in the walls. And there are different models on the market that cost anywhere from 15 to a few hundred dollars. They differ in capabilities, materials, although they are all called a “plinth“. Professional models are made on the basis of a good hacksaw, have a scale that allows you to set the saw properly. With such a tool it is not a problem to set any desired cutting angle to cut the skirting board properly for a perfect junction.
The professional carpenter’s mitre saw is a tool with a wide range of uses
The simplest jointing tool is a plastic U-shaped profile with slots in its walls. These slots are used as a guide for the hacksaw. They keep the blade from deflecting. There are two cuts in any variant, straight and 45-degree. Some may have a couple more options.
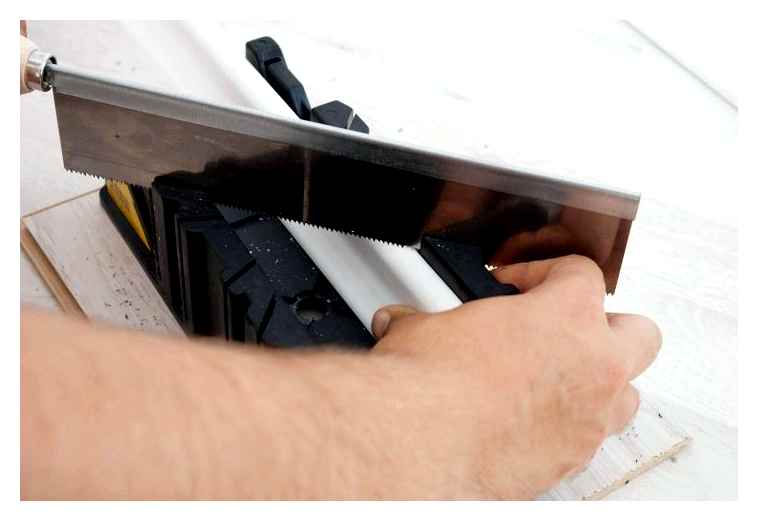
How to cut a skirting board at 45 degrees? One way to do this is to use a power drill
Sometimes a hacksaw is included, sometimes it is not. Usually the ones in the kit are not too good. Any saw can be used, selecting the blade for the material to be cut. It is important that the blade moves freely in the slots.