How to cut the corner of a ceiling plinth with a jig saw
How to cut the corners of ceiling plinth: tips and detailed plan
To choose the right saw blade, look for reputable, quality brands. So, the model “Fit 41255” is made of hard plastic. It can saw blanks of wood, plastic and metal
Width of part to be sawn is 120mm. Workpieces can be sawn at 45,90,22,5 and 135 degree angles. Equipped with a shank saw
It can cut wood, plastic and metal workpieces. Width of the part to be sawn is 120 mm. blanks can be sawn at angles of 45,90,22,5 and 135 degrees. Equipped with a sharpening saw.
- “The Stanley1-20-112 is known among craftsmen for its precision and quality of cut. Cuts are made at an angle of 22.5, 45 and 90 degrees in the vertical plane and 45-degree horizontal. Eccentrics securely hold workpieces. The chair is made of impact resistant plastic.
- “Zubr15375-75” is also appreciated by craftsmen, allows to make precise cuts. Made of strong ABC plastic, so it is strong and reliable for a long time.
- Stayer 15402″ the chisel is a professional carpentry tool, which differs from the others by the fact that it is possible to saw the workpiece from 0 to 180 degrees, the graduation step is 15 degrees. The fixing screw firmly fixes the part.
- “Fit Pro 41321”.Swiveling jigsaw provided with the steel saw. The workpiece is securely clamped with a clamping clamp. Made of steel, aluminum or plastic. Working part length 60cm.
- “Shampion180” is half a meter long. This arbor-mounted mitre saw makes 45 and 90 degree cuts, but can also cut polygonal pieces (four, five, six, eight, and 12-angled) The mitre saw has a 1.4 mm pitch arbor saw. The maximum width of the workpiece is 20 cm. Working depth. 20 cm.
- Professional saw blade “Zubr-saw” works in horizontal and vertical planes. The swiveling attachment allows you to saw off blanks made of non-ferrous metals, alloys and steel. The scale determines the saw’s rotation to the required angle. Stiffness and durability of the saw blade of the rotating plinth cutter helps to cut the corner of the baseboard with filigree precision.
- The Stayer panel saw allows to work without any additional measuring tools, because its base is marked. Metal base is strong, the maximum width of the workpiece, fit on it-160mm. Cutting depth of 600 mm.Adjustment of the saw tension, its variable rotation and tilt contributes to the accurate sawing of workpieces.
- Kupper” the chisel has a great functionality. Not only does it rotate by a certain angle, but also the carriage moves along the body of the skirting board along the guide. This ability of the carriage facilitates its fixation in the right place of the workpiece. The piece to be sawn. remains stationary and is secured with removable clamps. When processing the material in the vertical plane, there is a hinge with a scale. The workpiece can be machined simultaneously in vertical and horizontal planes. The right depth of cut can be obtained with this jigsaw, which is useful for workpieces with cleats. Workpiece diameters can be up to 150 mm.
List of materials and tools required
It is not so difficult to make a cross cutter with your own hands, if you follow the recommendations of experts. To begin with, make sure that the materials prepared for work are polished
To make a cross cutter, it is important to choose wood, which must be dried, without dents, have a smooth surface without any defects. It is not necessary to choose plastic as a base material, because it is not strong, and therefore can easily be damaged during the work. Boards made for the tool should be about 2 centimeters thick
Boards made for the tool should be about 2 centimeters thick.
Before starting work, it is worth preparing the following devices
- ruler and pencil;
- chalk sandpaper;
- hacksaw for metal;
- Vise;
- a drill with a different set of drill bits;
- Euro screws (confiermats);
- hacksaw with small teeth, designed for sawing the baseboard.
All, the above tools should be sufficient to carry out the work. Among additional devices can be useful a hex key, with which it will be easier to screw screw-fasteners. Also before starting work, it is worth preparing individual elements for the homemade tool
Before proceeding to the description of the instruction: how to make a jig with your own hands, let’s pay attention to a detailed inspection of the manufacture of parts for the device
Tips and tricks
There is a situation where you need to make repairs very quickly, but unfortunately, the time is not very much. In such a situation, you can use the method of orientation on the ground, but it must be competent, so that the joint was perfect.
Take a protractor and measure the angles in the room. A good situation if it turns out that the angle is 90 degrees or 45. Unfortunately, this is not always the case. If the angle is correct, then the plier is used. If not, then the marking is in place. When marking on the spot is often the case that even after treatment with a knife corner is not perfect junction.
In such a situation, you need to cut off a piece of the first skirting board, which can seal the gap formed, cut it off so that the angle was ideal. This strip, inserted into the gap and neatly closes it. And also this method will help round the corner of the baseboard, which is often required for repairs.
Cutting with a wire cutter: outside corner
Most often, when installing ceiling plinths home craftsmen are interested in how to properly make the inner corners of the room. Cutting outer corners is done less often, but with a certain wall layout and it is necessary. Let’s consider how to properly make the inner corner of the baseboard, using a special tool (plier).
First you will need to buy a plane. This tool is a tray, in which the part is fixed, and its trimming is performed. To measure the length of the necessary product, you need to put it on the ceiling. Next, you will need to install the skirting board in the chair. Its positioning should match the position it will occupy on the ceiling.
Chisel
Important! When cutting it is necessary to hold the left hand to the fillet. It must fit snugly against the wall of the tool. The part of the product to be connected to the ceiling must be at the top. The other part is pressed tightly to the bottom of the working tool.
How to properly cut the inner corner of the ceiling plinth. not a simple question, to answer which the corresponding photos help. Specialists recommend that you study them, and only after that should you get down to work.
Once you make sure that the product is located in the tool correctly, you can proceed to the cutting itself. The hacksaw must have a certain angle, viz: 45 degrees. During the work, it is not recommended to put a lot of pressure on the cutting tool, as it is possible to damage the surface of the jigsaw. Then the adjacent fillet is trimmed, which is done in a “mirror” way.
Cutting with a power hacksaw: inside angle
To get the right inside angle, it’s easier to use a professional tool. Of course, such work can be done without a chisel, but, in that case, you will need to make more effort. Consider the sequence of operations for cutting an inside corner with a power drill.
The first thing to do. determine the distance from the corner on the outside to the nearest wall. Next, you need to mark the skirting board, thus preparing it for cutting. On the outer side of the fillet you need to draw a fishing line for the trimmer along the length of the measurement. It is worth noting that in this case the upper part of the plinth must protrude slightly.
After that you can start trimming. To do this, the ceiling plinth is placed in the cutting tool and pressed firmly against the wall. After trimming the first piece, you can start processing the counter piece.
Ceiling skirting board. fillet
To do it correctly, it is important to strictly observe the existing recommendations and rules of finishing works. And then you will be pleased with the result
There are no difficulties in fixing files (this is the name of the element): practically all varieties of elements are fixed with a reliable glue.
In order to. Even inexperienced repairmen have no difficulty. Worries them quite another thing: how to properly trim a ceiling plinth? Virtually every room, no matter how intricate shape it was, is equipped with corners.
And so in these inner corners of the individual elements of the skirting board must be beautifully and evenly docked. And in rooms of especially complex configuration will have to fudge over the outer corners. Let’s try to figure out how to be in each of these situations, and how to cut the right part with the available tools.
Baseboard materials and cutting methods
First of all, let’s try to determine what the baseboard can be made of, and what specific material is better to cut.
On sale today you can find products made of foam (polyvinyl chloride), wood, polystyrene foam and polyurethane.
Perhaps one of the cheapest are baseboards made of foam plastic, which is a fragile, soft and brittle material.
Even the fingers of the hand can leave dents, creases and defects on them easily. It is rather difficult to cut a nice and even corner of a PVC skirting board.
An inexperienced craftsman can throw away a large amount of purchased material for this very reason. Also, this polymer has high electrostatic properties, which explains its ability to collect dust.
It is more convenient to cut such a skirting board with a hacksaw or a sharp construction knife.
Products made of polystyrene foam are also inexpensive, although this material is more durable analog of traditional foam.
It can also be processed with a sharp tool.
Skirting boards made of extruded polystyrene foam are a little more expensive, they are somewhat denser and more difficult to cut. But they are much less likely to crumble and break.
That is why it is more convenient and easier to cut them. For this purpose it is convenient to use a hacksaw or a sharp knife.
Polyurethane skirting boards for the ceiling are currently probably one of the most expensive.
But they are worth their cost: moisture-resistant, quite strong and tight, quite elastic.
Placed over the kitchen stove, the skirting boards can warp and even crack a little.
They are perfectly cut with a special knife, without producing crumbs. But these products are very sensitive to temperature changes.
Wooden skirting boards for the ceiling are quite heavy and dense products, hard and durable.
They lend themselves well to processing with a special fine-toothed hacksaw. You can also use a reliable metal blade. So how do you trim a ceiling plinth correctly??
Prefabricated factory corners
Note that every craftsman has an opportunity not to pore over the precise cutting and fitting of corners.
In a construction store you can buy a prefabricated corner piece, in which it is easy to insert the prepared edges of the baseboard.
It is enough to measure the required length of the workpiece, and cut it at right angles.
All defects and imperfections will hide this special element. But such a convenient way to use is not always possible, since the standard sizes of these factory corners may differ markedly from the size of the baseboard itself.
Such corners will stand out for their disproportionality, and it will not look very neat. But if the design of the room and the size of the blanks allow you to use this method, then you should not neglect it.
Those who have to use one of the methods of trimming a ceiling plinth, the following tips will be useful.
How to calculate the line for the trimmer connection of parts on their sides
On the back upper side of the skirting board, set aside a distance equal to its width. It is measured from the edge and draw a line for the trimmer, parallel to the end. On the upper edge it forms with it a square, on the side if its dimensions are different. an elongated figure.
When finishing a column or an open aperture, the marking is applied as follows: from the corner of the plank facing the room, from above, draw the hypotenuse that divides the square in half. Its projection is transferred to the face facing the wall. To do this, the space measured on the edge, also divided in half diagonally, drawing a line from the hypotenuse. The excess piece is cut off at the two resulting diagonals.
If the joint faces inwards, the diagonals are drawn in the opposite direction.
How to make a smooth corner: ways
The most difficult thing to cut a corner so as to get a perfectly flat: the surface of the materials used is not easy to cut, in addition, it is necessary to observe a good docking, preferably without huge gaps. How to make an angle on the ceiling plinth? You can use several methods: with a jigsaw, without a jigsaw, using decorative corners, as well as an alternative method.
How to properly cut a ceiling plinth without a joiner? For work a well sharpened pencil, a small piece of a plinth, a box cutter (for polystyrene or polyurethane) or a saw on metal (for other materials), a ruler are required.
You need to put the baseboard to the corner and draw the trimmer line with a pencil along the outer edge, then put it to the other side of the corner and also mark. As a result, the ceiling will be a cross, the center of which will mark the place where the ceiling plinth strips must converge.
Place a section of the skirting board where you will glue it. With the end of the piece against the wall, transfer the desired marking to the wall. You can cut the corners of ceiling plinths this way without a joiner.
Making corners with the use of a wire cutter
If the walls and corners in the room are flat, you can use a wire cutter for the work. In order to properly cut the corner, you should put the part in which a person will make a cut, then insert the saw into the guides.
That way the workpiece will be held in place and you can cut it at the right angle. For quality cutting of the skirting board, it must simultaneously adhere to both surfaces, so it should be pressed against the wall of the wood chisel. Press the ceiling skirting board to the side that is closer to you.
You will need to cut a 45-degree angle with the jigsaw. First determine how to position the skirting board in the jigsaw. To avoid confusion and cut correctly, place the right-hand slat on the right, and the left-hand slat on the left.
Follow these instructions:
- Press the part of the jigsaw that will be on the ceiling against the underside of the jigsaw. The second side will be raised and come closer to you. It can be leaned against the wall of the tool, and then it will not wobble when sawing.
- Determine the direction of the kerf, as shown in this diagram, and then cut the corner piece.
Put it on the ceiling and check the geometry. If it is not straight enough, you can fix it a little with a knife, and in the case of minor defects and wide gaps, you can use putty.
Joining skirting boards with decorative corners
If the walls are perfectly prepared, and external and internal corners are equal to 90°, it is possible to use special decorative elements to join the skirting boards. The advantages of this method:
- ease of installation: there is no need to “get the hang of it” by perfecting the technique of trimming parts of the skirting board;
- saving time: to dock the elements you just need to cut them at right angles and attach the decorative part.
The decorative pieces themselves are designed to join the skirting boards:
This method of connection is the only option in the case of plastic baseboard installation, which can not be trimmed without gaps.
Caulking the joints of ceiling skirting boards
No matter how neatly the job is done, the joints between the baseboard fillets will be visible. This defect can be fixed in the following way.
- Adhesive is applied to the baseboard joints.
- After joining the elements, remove excess glue with a clean rag. Do it after the glue dries completely.
- The gaps between the skirting board, the ceiling and the wall are grouted with a mixture of gypsum putty and water-based paint with a rubber spatula.
This method is suitable for masking defects in the connection of wooden skirting boards, as well as skirting boards made of polyurethane foam, foam plastic, polystyrene foam. In some cases, you can use a white sealant.
Using the tips outlined in the article and the necessary tools, you will be able to trim and dock the ceiling plinth trim yourself.
How to cut the corners of ceiling skirting
How to trim a ceiling plinth correctly. Important little things
The measurements needed to trim the baseboard to the ceiling should be made in a special way. To determine and mark the inside corner, the length must be measured from the corner itself. To mark the outer corner, be sure to take into account that deep into the room the baseboard will protrude at a distance that equals its width.
It is not desirable to fix the skirting boards until their exact position is verified and the counter skirting is cut. Only when the two mating strips are perfectly aligned in the corner can they begin to be mounted and fastened. If you work with polyurethane or wood baseboards, defects and flaws can be corrected with a file or file. To fit the foam product, you should arm yourself with a sharp knife.
If even after finishing the baseboards, even a small gap remains, do not rush to get upset. it is not difficult to patch up with an ordinary putty. It is not that difficult to cut a ceiling plinth accurately and neatly. But to acquire at least a small skill, first try to practice on small blanks.
Block: 4/4 | Number of characters: 1115
How to properly cut a corner on the ceiling plinth
Most often in dwellings you have to deal with cutting at 45 degrees. You can cut corners on ceiling plinths using several different methods.
How to make the corners on a ceiling plinth using a wirejet
This method is the easiest and most reliable. The chisel allows you to cut as precisely as possible.
Before performing the work, it is necessary to properly mark the element. This is done in two ways.
- On the skirting board with a pencil mark the corner of 90 or 45 degrees. Then the product is inserted in the jigsaw and cut along the marked line.
- Put the element in place and mark the outer edge. On the opposite side, too, install the fillet and also mark the edge. The place where the marks cross is the outer edge, and the end of the wall is the inner edge. On the product mark the outer and inner edge, and then cut the baguette.
Important! The harder the material, the sharper and more reliable cutting tool must be used. For foam products suitable and ordinary knife. To cut the ceiling plinth in the corners of wood, you need an electric saw or an electric jigsaw.
How to make the inside corner of the ceiling plinth
It is most common to deal with interior corners in the home. Carry out the cut quite easily.
- To begin with, the material is placed on the joint between the wall and the ceiling in the position in which it is going to be fastened. Mark the required length on the product.
- The ceiling plinth is placed in the chair in the same position, that is, the part of the plinth that is mounted to the ceiling, should be facing upwards, and the part facing the wall should be adjacent to the wall of the appliance. Align the edges of the product with the outermost 45 degree corner mark.
- Unfold the blade at a 45 degree angle and remove the excess fragment. The knife should be sharp, and ideally it should be cut in one motion. The second part is prepared in the same way, but from the other side.
Important! Cut the plastic should be from the front side to get an even, beautiful cut.
How to make an outside corner on the ceiling plinth
With external corners it is necessary to deal if there are niches, bay windows, protruding boxes or columns in a room. Here too, the ceiling skirting boards should be cut at 45 degrees.
- In fact, the difference between the two cases is only in the correct measurement. The strip is placed along the joint and the mark is made on the inside.
- The piece is inserted into the mortise in the same way as tried on, that is, with the ceiling part upwards. The edge of the skirting board is placed so that the mark on the inside coincided with the slot, but the outer part of the skirting board somewhat protruded over the edge.
- A hacksaw is inserted into the kerf and cut. The second piece is prepared in the same way, but in a mirror image.
For cutting a solid baguette, such as a wooden one, it is better to use a jigsaw.
How to make the corner of the ceiling plinth without a notch
When trimming, it is sometimes possible to do without a joiner. In some cases, this method is even more effective, since the jigsaw is designed for high evenness of the walls and ceiling. In reality, this does not always correspond to the truth.
- The element is placed so that its edge rested against the junction of the two walls. Mark the position with a pencil. Do the same with the skirting board on the opposite side.
- At the junction of the wall and the ceiling connect the points of intersection and lay a diagonal. Then it is marked on the product itself. This is the mark for the cut.
- Cut along the marked line with the blade. At the junction perfectly aligned. The same technique can be used to cut material for exterior corners.
Decorative corners for ceiling skirting
Cutting wide variants is much more inconvenient. The product is difficult to fit into such a compact tool as a chisel, and complex embossing can be ruined.
For such models, special corners are available. You can only find this option for products made of PVC, foam or polyurethane. Elements have the same design, the dimensions are easily corrected, because such a lightweight material as foam is easy to cut.
The technology is very simple: the corner is fixed in the joint, and to it attach the fragments of the ceiling plinth.
Block: 5/7 | Number of characters: 3918
Selection of tools for cutting ceiling plinths
To properly and accurately cut the ceiling plinth, you need to use the right tool for cutting. It is chosen depending on the material from which the fillets are made:
-
Styrofoam. Characterized by low strength and costs relatively inexpensive, and therefore foam models are becoming increasingly popular. Their strength does not particularly affect performance, because usually the ceiling plinth is not subjected to mechanical stress. For cutting a normal office knife is suitable.
It can be purchased in a construction store or make your own hands according to these instructions:
-
Three boards 5015 cm nailed a long rib in the form of a tripartite, rectangular box. Pay attention, between the side planks and the cross plank should be observed angle of 90 degrees.
To work with this homemade device was convenient and safe, the planks should be well sanded before binding.
Cutting technology ceiling plinths
For prompt and quality work, you need to select the tool in accordance with the material of the baseboard and choose the method of cutting. If you have a jig, there will be no special difficulties in the process. If you do not have it, then you have two options: to cut by the template and measurements on the ceiling, or to make this tool yourself.
Features of cutting ceiling plinths in the jigsaw
Work with this device should be extremely carefully so as not to blunt the tool and not to leave cuts in unnecessary places. In the process, follow the following instructions:
-
Fix the baguette in the jig the way you plan to place it on the wall. The side, which will be pressed to the ceiling on the jig, must be adjacent to the sidewall.
When cutting and trimming foam and polyurethane products, remember that these materials crumble and squeeze, so the tools must be sharp enough, and strong mechanical action on them is undesirable.
Technique of cutting ceiling plinths on a template
This method can be used if you have. even corners, and you need to trim the baguette exactly 45 degrees. To do this, before you cut the ceiling plinth in the corners, you need to draw a jig on heavy paper. Draw two parallel lines and mark the angles at the right degrees, using a protractor.
We place the fillet in this case in the same way as with the traditional jigsaw. Take into account that the skirting boards must be cut keeping the tool in a strictly vertical position.
Rules of cutting ceiling baseboards according to the markings
This method is used to cut the skirting boards in cases where there is no jigsaw, or parts from which it can be made.
To do this, you need to make a marking on the wall in this order:
-
Put a baguette in the corner to the place of attachment.
When cutting in this way, it is important to precisely draw all lines and mark points. A mistake of even a few millimeters will cause a gap. This method is suitable for cutting and joining both the inside and outside corners of the ceiling plinth.
The way to cut a ceiling plinth without a chisel
To dock neatly in the inner corners of the boards, you can do without a pitchfork.
-
We put the end part of the baguette to a sheet of paper and trace the contour of the convex side. It is more convenient to use a small section of the skirting board (if available).
Trimming the baseboard
Trimming with a Jigsaw
How to evenly cut the corner of the ceiling plinth with it?
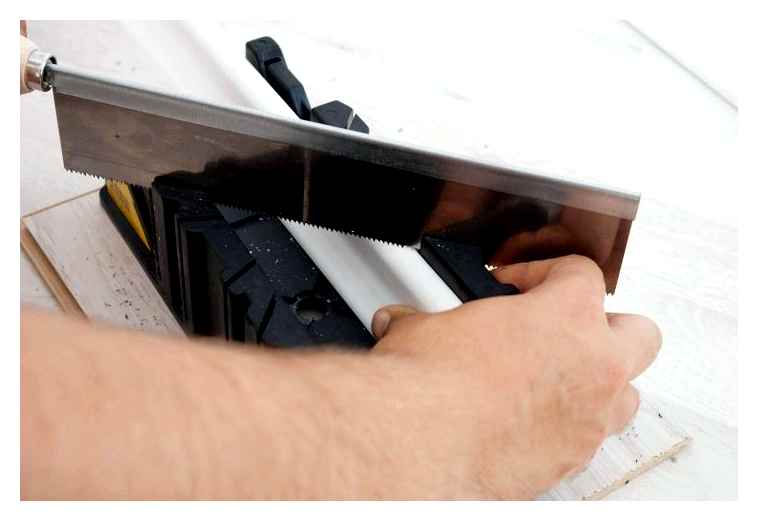
The plier is a simple tool used by carpenters. With its help, you can cut any workpiece at the right angle.
It is usually a wooden, metal or plastic tray, which are made to cut at an angle of 45 ° and 90 ° special vertical slots.
There are complex designs, which in addition to the named corners also have a hole to make a 60-degree cut.
For professional work a special plane is available. Its swivel mechanism allows you to fix the cutting blade in relation to the workpiece at any given angle.
Inside angle
The prepared skirting board is placed against the ceiling, the required length is set aside.
Then this same skirting board is inserted into the mortiser exactly as it will be positioned on the ceiling. It must be pressed against the far wall of the fixture. Hold the skirting board in this position with the left hand.
The blade of the hacksaw should be in such a position so that its angle is 45 degrees, and the handle is as close as possible to the hand. Trying to avoid exerting pressure on the saw, we carefully cut the workpiece.
Then the skirting board is cut off a mating strip. It is also placed at the far wall of the tool, held and pressed, this time with the right hand.
The same position as in the previous procedure. the handle is close to the hand at an angle of 45 degrees. The baseboard is cut.
Then the pieces of trim which have already been cut are joined together. this is the point at which the fitting is checked. It is believed that for better orientation, when making an inner corner, it is better to start cutting from the front side of the product. The cut places usually have to be further trimmed with a file.
External corner
The correct way to observe more accurately the dimensions, first begin to measure the inside corner, and only then proceed to the outer.
Otherwise, it may happen that the entire length of the strip is not enough.
The strip is attached to the ceiling, to the size made marks. Holding the left hand, the ceiling plinth is pressed to the closest wall, the handle of the hacksaw is close to the hand. The workpiece is cut off.
The answer bar is pressed against the nearest wall, holding it in place with the right hand. The blade of the hacksaw should be at a 45° angle, with the handle of the tool close to the hand of the craftsman. A piece of the workpiece is cut and the corner is neatly stitched together.
Such edge trimming with a mash is good if the angle between the walls is even and straight (90°).
If its performance leaves much to be desired, it is worth using another method.
Marking on the ceiling
The method with the marking on the ceiling allows you to cut a corner exactly and straight. It has one drawback. it is rather inconvenient to hold the baseboard slat in the balance during the procedure.
For all the rest with this method you will be able to mark the angle for cutting even more accurately than other.
When the skirting is applied to the proposed place of installation, all size deviations and inaccuracies are immediately visible and accounted for.
Cutting a corner
First take a pair of blanks, then cut them at right angles. Pressing the end of the slat against a perpendicular wall, we apply one slat. Let’s mark the trimmer line on the ceiling, following the contour of the skirting boards. We remove the first piece, then in the same way, pointing to the wall end, attach a counter piece. Mark the contour of the trimmer line in the same way.
The intersection point of the two separate lines is the mark at which to cut the workpiece. Each slat is placed against the surface again, and the point of the future cut is marked on both slats. From the point found to the other edge of the baseboard plank, draw a line for the trimmer. The skirting boards are cut to the marks made earlier, accurately joined, and positioned in the place where they will be installed.
Such way allows to process internal corners more accurately.
How to trim a ceiling plinth correctly. Important details
The measurements needed to trim the skirting boards on the ceiling should be done in a special way. To determine and mark the inside corner, the length should be measured from the corner itself. To mark the outer corner, remember that the skirting boards will protrude into the room by a distance equal to their width.
It is not desirable to fix the skirting boards before their exact position is verified and the counter skirting has been cut. Only when the two mating strips match perfectly in the corner can they be fitted and fastened. If the work is done with polyurethane or wooden baseboards, defects and flaws can be corrected with a file or file. To fit the foam product, you must be armed with a sharp knife.
If even after finishing the skirting boards even a small gap remains, do not rush to get upset. it is not difficult to seal it with an ordinary putty. It is not that difficult to cut a ceiling plinth accurately and neatly. But in order to acquire at least a small skill, first try to practice on small workpieces.