How to make an adapter to a power tiller with a steering wheel
Front (rear) adapter for a power harvester with steering: how to make with your own hands, video, drawings and dimensions
With this method, the power unit will be located behind the driver’s back and rigidly attached to the front adapter. Consequently, the coefficient of traction of the driving wheels with the soil will increase. This, in turn, will increase the tractive force, which will make it possible to work with any attachment. For such experiments, the lightweight single-axle tractor “Salyut” with a mass of about 75 kg and a capacity of 6.5 liters is best suited. с.
In this case you need a steering column with a gearbox. But this is for this case, if you dare to make a single-axle tractor with front steering. This procedure is much more complicated and laborious than a simple articulation, but the result will be enjoyable. you will get a single-axle tractor with a steering wheel and seat, and all the necessary levers will be at your fingertips.
Not only will you need a steering wheel and gearbox, but also steering rods with coulters. Gas, clutch and brake pedals, located under the feet, are a must. They are connected to the standard controls with homemade rods or steel cables.
On the right side of the seat is installed a lever to raise or lower the attached equipment, as well as the handle of the parking brake. On the front wheels they put fenders with headlights. And miniekhnika finally gets the finished look of a power tiller with a front adapter.
It should be noted that the adapter has good technical characteristics, which allow you to fully appreciate the advantages of working on their mini-equipment.
The single-axle tractor is a mechanized helper for the gardener, which reduces labor costs and the health of the user. If such a device is supplemented with a steering adapter, it increases driving comfort and further reduces physical strain.
In fact, the adapter allows you to turn a single-axle tractor into a kind of mini-tractor. From the material of this article you will learn the structure of the adapter, its purpose, varieties, nuances of installation and subtleties of operation.
Design features
The design of this device is very simple. In essence, the adapter is a cart, which is attached to a power tiller. It includes a frame on which the driver’s seat or the body is attached. The frame is installed on the two-wheeled chassis. Another indispensable element of this equipment is the drawbar, with which the cart is attached to the main unit. It pulls the trailer, and this force is transmitted to the wheels of the adapter. Many different attachments can be attached to this machine: a cutter, ploughshare, harrow, potato digger, and more.
This ensures the reliability of the device
If you make such equipment yourself, pay close attention to the attachment strength of the adapter to your power tiller, because it is the weakest point of the machine. The coupling must be made of steel or cast iron. As a rule, it is made by welding, and special attention should be paid to the welds
It is generally welded, with special attention paid to the welds. Modern models of this equipment also include a control panel, conveniently located near the driver’s seat
From this panel you can control the vertical movement of various equipment, which is attached to the adapter. The angular displacement of the attached implements can also be varied
Modern models of this equipment also include a control panel conveniently located near the driver’s seat. From this panel you can control the vertical movement of various equipment, which is attached to the adapter. You can also change the angular movement of the attached devices.
To do this, the device is equipped with a system of levers or hydraulic units.
In addition to the set of equipment that is sold with the adapter, various additional devices can be used to facilitate gardening work. Some of them are purchased in the store, others can be made independently if you have the appropriate devices, materials and skills.
Buying a new one-axle tractor adapter is easy. There are many different kinds of this equipment on sale. The more functions this equipment performs, and the more convenient it is to use, the higher its price. Even the cheapest adapters have a considerable cost, so many owners of power tillers decide to make this trailer with their own hands.
In this case it is necessary to carry out a preliminary calculation of strength and mechanical characteristics of the device.
What is an adapter for?
The adapter for a power tiller in a classic form is a trailer with a seat on two wheels attached to the power tiller and to which attachments are mounted. It is the adapter that allows you to install additional equipment as easily as possible. The adapter turns a single-axle tractor into a mini tractor and makes it not only versatile but also as comfortable as possible.
The adapter lets you sit while you work, thereby making it easier to do the job. The Adapter also gives your power tiller more stability, which makes your work easier and simpler. It’s also convenient that immediately adjusted attachments won’t go too deep or rise too high. Manual adjustment of the attachment on the adapter. Even light tractors like the Neva and Kaskad are safe to use with the adapter.
Maximum comfort is achieved when using a steering adapter or a front adaptor for a power tiller. In this case, the steering wheel allows you to not use the handles of the motoblock to control it, which, of course, is much more convenient. Thanks to such a device, you can get the perfect minitractor. multifunctional, easy to operate and has a working speed of about five kilometers per hour.
The dimensions of such an adapter for a power tiller are usually about two meters in length, eighty centimeters in width and one and a half meters in height. The adapter with a steering wheel is not small in size, because it is practically the front part of the mini-tractor. This adapter is also suitable for the Neva, the lightest power tiller on the market today.
Taking all of the above into account, the adapter can be called a necessity for a power tiller.
How you can modernize a homemade single axle tractor?
Arkhipova multifunctional. It can be used as a plough or as a cultivator. For this purpose it is enough to exchange removable parts for the plough with parts from removed mouldboards for the cultivator. the single-axle tractor will deepen the furrows into the ground as it goes along, and place the potato tubers in them. To plow your tubers, just set the mouldboard in place and plow between the planted rows.
The machine is also comfortable during harvesting. Variable working widths available with different mouldboards. The machine is not bad, because it can collect skipped potatoes and leaves after harvesting crops. For this, it can be equipped with a rake or a harrow.
The versatile construction can be used not only for agricultural work. In winter, it is successfully used for snow removal. A faithful assistant is also needed for sweeping paths in the yard. With the single-axle tractor mounted with a round brush roll and an auxiliary star, the owner is able to clear sidewalks more easily.
Tools and materials needed
You can make a manually operated adapter or a dumper adapter yourself, or even without outside help. Therefore, first of all it is necessary to determine the type of additional equipment. The next step is the drawings. You can use ready-made, based on the instructions for the same brand of motor blocks, but implemented already with adapters, or you can create it yourself. Making drawings with their own hands, careful attention should be paid to the main elements:
When the diagram is ready, you must take care to have the following tools on hand:
- welding machine;
- drill;
- grinding machine;
- two wheels with an axle;
- lathe;
- a ready-made chair of a suitable size;
- metal profile for the frame;
- steel angle and beams;
- Fixing elements;
- screws, self-tapping screws;
- electric screwdriver;
- control levers;
- a circle of steel with special holes. the basis for coupling;
- bearings;
- means for lubrication and priming of the finished construction.
All necessary materials and tools can be purchased at your local hardware store. If there is no chair that is the right size, it is necessary to purchase a frame, upholstery and base for the seat, and subsequently make it with your own hands. All that is needed is to lay the padding or filling tightly on the frame, with a stapler on top to fix the upholstery. Or you can buy a prefabricated plastic seat in a hardware store. After all the preparatory work is finished, you can proceed directly to the construction of the adapter itself.
Rotary mower for a power tiller Ugra
Block: 3/4 | Character count: 50
The structure of the power tiller
By design, the 4×4 adapter, which is designed for the Neva power tiller, is a rather simple device. It includes several fundamental parts:
- frame construction, on which other components of the device can be installed;
- the seat for the driver;
- Wheel base, including the wheel axle;
- Mechanism of connection of a power tiller and including.
In other words, the adapter is an ordinary cart with a seat that is connected to the tiller.
There are different brands and designs of power tillers. Russian users know, for example, Caiman, Proab, VIKING, Crosser, Texas, Patriot and others. After hitching the tractor and adapter, the received device can be compared to a mini-tractor in terms of functionality, however, such a comparison is somewhat relative, because the power will remain the same, because the engine is still the same, and it is from a power tiller.
over, it is possible to attach an auxiliary attachment to the adapter, which further expands the potential list of works. Some adapters are equipped with special compartments for loads. There are also models that are equipped with a lifting arm, which greatly simplifies the work with the additional device.
Block: 3/7 | Number of characters: 1292
The structure of the power tiller
By design, the 4×4 adapter, which is designed for the Neva power tiller, is a rather unsophisticated device. It includes several fundamental parts:
- The frame structure, on which other components of the device can be installed;
- seat for the driver;
- wheel base, including the wheel axle;
- Mechanism of connection of the power tiller and including.
In other words, the adapter is an ordinary cart with a seat, which is connected to the power tiller.
Motor blocks come in different brands and designs. Russian users know, for example, Caiman, Proab, VIKING, Crosser, Texas, Patriot, and others. After the coupling of the power tiller and adapter, the obtained device can be compared to a mini-tractor in terms of functionality, however, such a comparison is somewhat relative, because the power will remain the same, because the engine is still the same, and it is from a power tiller.
over, it is possible to attach auxiliary attachments to the adapter, which will expand the potential list of work even more noticeably. Some kinds of adapters are equipped with special compartments in which you can put some weights. There are also models that are equipped with a lifting lever, which greatly simplifies the work with the additional device.
Block: 3/7 | Number of characters: 1292
The fabrication process
Such an attachment of any kind is not just a seat, but an entire device consisting of several parts. Depending on the type of adapter, these parts are attached to each other in different numbers and in different order. So, the rear and front units are made almost identically, but they differ in the way of final attachment and the method of coupling itself.
With movable joint
This type of adapter is easiest and fastest to produce at home with your own hands.
- On a square profile with a length of 180 cm should be welded across a piece of the same steel plate, but the size of 60 cm.
- Install the struts on the frame and wheels and fasten them with bushings. To strengthen the main frame, an additional steel beam is welded to it.
- Use a No. 10 channel to create an additional beam. It is made according to the drawings and with a welding machine.
- The frame created in the previous step is welded to the wheel axle. Use a small piece of square metal girder or steel angle as a connecting element.
- The first control arm is mounted on the frame, and has 3 knees. On the given lever install an additional one, but smaller in size. All the work is performed using a welding machine.
- Both arms are firmly connected to each other by bolts.
When the main lifting mechanism of the adapter is ready, you can assemble it directly and connect the equipment to the power tiller.
- The support for the future seat is welded to the central frame from a piece of steel tube.
- On top of it, with the help of a welding machine, two more sections of the same pipe are fixed perpendicularly. This design allows the seat to be attached to the power tiller as securely as possible and minimizes vibration and shaking when the machine is in operation.
- Next, the pieces of pipe are attached by welding to the frame, and the seat itself is attached to them with self-tapping screws or bolts. For extra reliability, the bolts can also be screwed into the seat support, not only into the frame.
- To the front of the resulting adapter is welded ready-made hitch.
After completing these works, the adapter is completely ready for further use. If everything is done correctly, you should get a four-wheel drive mini-tractor, easy and convenient to work.
With the steering
Such a homemade adapter is even faster to make than its previous variant. But you should know that this variant needs a lot more various angles and tubes. One more thing. such attachments are made on the basis of the frame with a ready-made fork and bushing. Exactly its presence will allow in the future the free rotation of the power tiller from the steering action. The sequence of operations will be as follows.
- the frame is made of steel of the chosen length and thickness. Using an angle grinder from the plate cut blanks of the required size, and then fasten them to each other with bolts or screws.
- The creation of the running gear should be based on where the motor of the machine is located. If it is in front, the main criterion is the size of the main wheels. That is, the track size should be based on it. The wheels are attached only to the rear. They are welded to the axle. If the motor is in the back, the distance between the wheels should be wider. Here, the standard ones are removed from the motoblock, and in their place are installed the same ones as on the adapter.
- The axle itself is created from a pipe, and on its ends pressed bearings with bushings.
- Steering wheel. either as in a car, or the same as in a motorcycle. There is no fundamental difference. Experienced craftsmen recommend removing the ready-made steering wheel from the vehicle and already fixing it on the adapter base. It is quite difficult to make the steering control yourself, especially for a beginner. It is worth noting that the motorcycle steering wheel creates great inconvenience when turning the back of the motoblock. And this factor should definitely be taken into account.
- If an all-metal frame is used, the steering control will be connected to the front of the machine itself. If you make a special additional support. articulated-jointed, the control will rotate the additional frame completely. In this case, two gears are used: one is installed on the steering column and the other on the upper half-frame.
- The next step is to install the seat. As in the case of making the previous type of adapter it can be ready-made as well as made by your own hand. It must be attached with a welder to the rear frame of this attachment.
- If the upgraded single axle tractor is later planned to be used for installation of exchangeable attachments, one more bracket must be attached using a welding machine. An additional hydraulic system should also be created. The easiest way is to remove it from any kind of small agricultural equipment and weld it to your own single axle tractor.
- A towbar must be welded to the rear of the main frame. It is necessary in those cases when it is planned to use a single-axle tractor for transportation of some small loads. If there are no plans to use a trailer or semi-trailer, this step can be skipped.
- The final stage is hitching. To do this, small holes are drilled in the steering column, into which self-tapping screws and brackets are inserted. It is with their help the hitch itself is attached under the steering column.
Perhaps the step-by-step description of making such a device with your own hands may seem complicated. However, if there are detailed diagrams and drawings, this problem disappears completely. For the created adapter to be functional and durable in use, it is necessary to weld all the main elements correctly and pay special attention to the normal operation of the brakes.
Types of adapters for motor vehicles
Adapters on a single-axle tractor are divided depending on how they are attached.
There are the following types of devices:
- Rear adapter for power tiller. The coupling is located in the front of the device, so after connecting the adapter will be located at the back of the unit;
- Front adapter for power tiller. Accordingly, the clutch is located at the rear. The adapter is located in front of the motorized machine and will necessarily be with a steering wheel for steering. Devices with steering is more complex constructional type, so their price in the market is much higher.
By area of use there are the following adapters:
- Shortened. Small size for use with a lightweight tiller. The low weight allows you to attach the adapter directly to the wheel of the machine;
- Extended. Cope with agricultural equipment of a heavy type. They are characterized by considerable size and relatively high weight.
Depending on the availability of the body, the following designs are distinguished:
- Body. The body allows transportation of various loads over long distances. They are actively used for everyday tasks and harvesting;
- Bodyless. They are only used to connect with a power tiller.
When choosing an adapter, you should pay attention to the design features of the device. It must fully meet the owner’s needs.
The preparatory stage of making an adapter
The adapter has a simple design, but the procedure of making it can not be called simple. Initially, you must take into account the drawings and dimensions, which will help to create a device without defects.
The following materials and tools are needed:
- An electric drill;
- Welding;
- With an electric hacksaw;
- File;
- Angle;
- A sheet of steel with a thickness of five millimeters;
- Several square tubes with a diameter of one inch;
- A set of fasteners.
The key elements of the design are made as follows:
- Coupling. Mounted on the frame and secured with bolts. A hitch is two welded pieces of square tubing and a piece of plumbing pipe. The latter is inserted into the rod with a welded tee;
- A node for securing the wheels. Two pieces of pipe length of 10 centimeters are welded at right angles. Insert the horizontal arm into the mounting tube and fasten it securely with a bolt. An axle and bearings with wheels are attached to the vertical workpiece.
When all the tools are prepared and the main parts are made, you can assemble the adapter.
How to make one yourself
Of course, the purchase of an adapter to the motor block, ready to work. this is the best and easiest way out of the situation. However, they are really quite expensive, so not every farmer or dacha owner can afford them. No wonder why many people wonder how to make an adapter with their own hands.
It is certainly possible, and you can find quite a few recommendations on the web, which relate to the self-made adapters. over, there are many drawings that give the opportunity to consider this device more clearly and in detail.
Using them, it is quite possible to create such a unit in domestic conditions, using minimal tools and materials. To make a homemade adapter will need:
- welding machine;
- wheel set;
- Steel corners and sheets;
- a driver’s seat;
- fasteners; iron pipes.
Before you begin to work on the device, it is necessary to at least consider the finished scheme as a whole. It should take into account and indicate the degree of load for the different parts of the frame and the overall dimensions of the device. Now you can proceed directly to the construction of the structure.
The whole work will consist of several steps:
- Take a square section of metal, about 1800mm long. Across it, we weld the same iron flap, only smaller. about 600 mm. To this profile web, the wheel struts, which should be about 300 mm high, will be attached later on.
- After that, you need to attach the struts. They are attached to the central frame and the wheels. The angle of the wheel hubs in relation to the frame can be whatever you want. A beam is additionally welded to the metal profile. This is necessary to reinforce the frame.
- The frame for additional equipment is welded from a channel 0.
- It is aligned with the wheel axle by means of a piece of square tube, and the seams are welded with a welding machine.
- Now we weld the control arm to the frame with three knees (200, 350 550 and millimeters).
- Fix another one to the lever (size 800 mm), it will adjust the force.
- The levers are connected to each other with ordinary bolts.
The first stage is passed. Let’s proceed to the next one.
Working with the construction of the adapter
Now starts working with the adapter. To do this we do the following steps:
- To the central frame you need to weld a piece of 300-millimeter tube. this will be a support for the driver’s seat.
- On top perpendicular to the stand in the same way weld 2 pieces of pipe. This is to keep the seat from falling off during the work and to make it more stable in the process of shaking during the work. The seat can be ready-made, or you can make it yourself from a piece of plywood and foam rubber, it’s at the discretion of the master.
- Fix the seat to the cross pieces of pipe that are welded to the stand and to the stand under the seat. In the role of the fixing element we use ordinary bolts.
- At the front, weld the hitch mechanism to the tiller, and then the work is done.
As you can see, this case is quite simple. The main difficulty lies only in the need to have at least basic skills with a welding machine, because there is simply no other method of connecting each component.
Adapter with steering control
If you have the skills, then if you want the design can be somewhat complicated, making more and self-made adapter to the tiller, which you can attach more and steering.
To implement this idea, you will need to prepare the following materials and tools:
With this design the adapter frame must be firmly connected to the power tiller, otherwise the device will be, as they say, “led sideways”. For the construction you can take any ready-made steering wheel, even from old “soviet” cars (from the same from VAZ, for example).
Adapters for any power tiller, including the Neva, make it possible to significantly increase the comfort of the operator when driving a mini-tractor. In fact, the driver will no longer have to constantly be dragged behind the machine. Now he can just sit in a comfortable seat and do the same thing, only in comfort and in more heat.
The design of such units is quite simple, and self-manufacturing them at home is quite possible. Here we have to take into account that home assembly presupposes at least basic skills in welding work, as well as with the accompanying tools. You will also need to stock up on plenty of angles and metal pipes, so you don’t have to stop working because of the lack of material. In general, it makes sense to assemble the adapter by hand, especially since it saves a lot of money.
The composition of the adapter for the power tiller
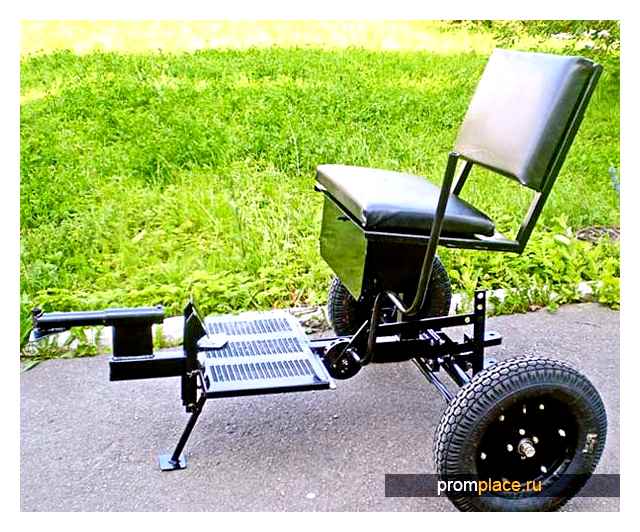
Visually, the device is similar to a cart attached to a power tiller. Someone calls such a machine “tractor”. The mechanism includes:
- frame;
- seat;
- the wheels, thanks to which it moves around the garden. The wheels can be rubber (with tread, allows driving on a rammed road) and iron (used to work with large amounts of arable land). In most cases, the wheels are sold as a set, but if you want to change them, remember that there are options;
- cast-iron or steel device for fixing with a working unit. This element is the most important component, it allows the vehicle to be stable.
Instructions for making an adapter
Now let’s talk about how to make your own front adapter with steering for your small tractor.
To make an adapter for a power tiller with steering, you will need the following materials:
Two identical wheels on an axle. The wheel radius ranges from 15 to 18 inches. Even an old Soviet Volga wheel will do.
Before you start it is important to consider that the wheels should not have a very large or small radius
Algorithm of actions
Let’s proceed to making attachments for the power tiller.
Drawing of the scheme of the adapter to the tiller
To make a steering adapter for a power tiller you’ll need a frame with a bushing and a fork. This will ensure the free rotation of the motor-block by means of the steering wheel.
Everything begins with the frame. It can be made from chopped pieces of selected steel of the required length. You can separate the metal with an angle grinder and fasten the elements with electric welding or bolts.
This concludes the installation of the front adaptor on the single-axle tractor type “Neva”. After completing the assembly it will only be necessary to lubricate the mini-tractor and subject it to test operation. After this, the adapter assembly can be considered as completed. Now you can safely engage in the required work on the land plots with the new equipment.
Making a device with a movable joint
This is the simplest device. The adapter itself will be behind the power tiller. It’s not hard to build, but the process requires a lot of focus and attention. The quality of work determines the service life of the mechanism. Such an adapter is suitable for heavy power tillers, for example, “Neva. It has an engine power of more than 7 liters. с. and weight from 105 kg. It allows, without slipping, pulling not only the adapter, but also the farm implements.
The following materials and tools will be required for manufacturing:
-
an electric drill with the necessary set of drills;
- DC welding machine and electrodes;
- angle grinder with a set of cutting and grinding discs;
- hammer, file, angle, various hardware;
- sheet metal at least 5 mm thick;
- Several profile tubes of size 40 x 50 and 50 x 50 mm;
- round water pipe with thick walls with a diameter of 30-45 mm;
- steel rods with a diameter under a round tube;
- channel 40 x 50 mm;
- two wheels from “Zhiguli” or “Oka” with bearings and hubs;
- driver’s seat.
The size of the adapter can be chosen, but it is based on the needs of minitrucks. The frame itself can be made slightly above or below the axis of the power harvester. For the wheels, the optimal suspension is the portal suspension, which provides a decent ground clearance. It is not necessary to install shock absorbers on the adapter. this complicates the design. The easiest way is to take a seat with built-in elastic elements.
Next, proceed directly to the manufacture of the individual components.
-
Coupling. this is a welded mechanism, which is a hinge that works in two planes. It is then installed in the base of the adapter frame and bolted to it. It consists of two pieces of pipe, size 40 x 50, welded together and a piece of round water pipe. A welded tee is inserted into it. The tee itself consists of a rod and part of the same tube. This is the most critical unit, so the welds must be perfect.
- The adapter frame. You’ll need a sectional tube and a channel. They are welded together, reinforced, and then make the posts for the wheels. Further, the struts are fixed by the struts welded to the frame and the wheel bushings. Mount and secure the wheels.
- Several pieces of pipe are welded to the main frame to install the seat.
- Fixing and adjusting the seat. It is placed so that when you turn the steering wheel, the operator’s back does not come off the back. The controls for the power tiller do not need to be removed. this is done when the power plant is located behind the driver.
- The ready coupling device is installed.
- Hook it to the tiller.
Bracket for attachments is made. The seat is installed on the back crossbar of the frame. To do this, several levers and rods are added, which will change the height of the lifting of farm implements.
Next, a wheel locking mechanism is made. To do this, you use a ready-made braking system from any passenger car and fit it to the installed wheel hubs.
single-axle tractor with steering control
With this method, the power unit will be located behind the driver’s back and rigidly attached to the front adapter. Consequently, the traction coefficient of the drive wheels will increase. This, in turn, will increase traction, which will make it possible to work with any attachments. For such experiments the light single-axle tractor “Salyut” with weight of about 75 kg and power of 6,5 liters is the most suitable. с.
In this case, a steering column with a gearbox is needed. But this is for this case, if you dare to make a single-axle tractor with front steering. This procedure is much more complicated and laborious than a simple articulation, but the result will please you. you will get a single-axle tractor with a steering wheel and seat, and all the necessary levers will be under the hands.
Not only the steering wheel and gearbox, but also the steering rods with coulters will be needed in the fabrication. It is necessary to have gas, clutch and brake pedals, located under the feet. They are connected to the standard controls with self-made rods or steel cables.
On the right side of the seat install a lever for raising or lowering the attachment, as well as a parking brake handle. Fenders with headlights are placed on the front wheels. And the mini-machine finally gets the finished look of a power tiller with a front adapter.
It should be noted that this adapter has a good technical characteristics that allow you to fully appreciate the merits of working on their mini-equipment.