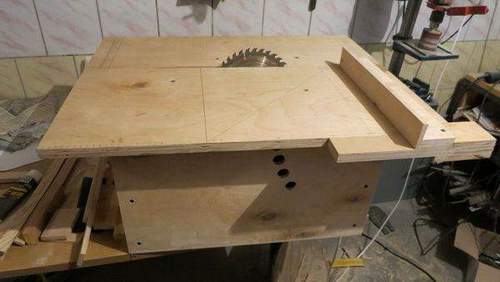
How to Make Sawing from Circular
For cutting wood, plastic, a circular saw is used. Its cutting base is a flat disc made of metal with a serrated outer edge. Choosing such an instrument, everyone decides for himself which variety he needs: desktop, manual, stationary. Many prefer the manual option. However, in some situations it is necessary to fix the saw. In this case, you can make a table for a circular saw with your own hands, having the opportunity to fix the tool if necessary.
Preparation of tools and materials

Having decided to make a table for a manual circular saw yourself, you need to take care of the availability of all the materials necessary for the work:
- laminated plywood (9 or 11 mm), size 800 mm by 800 mm;
- LDSP 16 mm or other sheet material suitable for the manufacture of the body, sheet size 400 by 784 mm. 4 pieces;
- bars 40 by 40 mm (the length depends on the installation method);
- self-tapping screws;
- bolts.
For such a table, any hand-held circular saw is suitable. It should be remembered that when attaching to the table, the depth of cut is reduced by 10–20 mm. So saws with small discs for such a table will not work.
Step-by-step instructions for assembling a table for a circular saw
1. The manufacture of the housing. Sheet material for the body is cut in size: 400 mm to 800 mm. Parts are fastened with self-tapping screws and bars. It is better to carry out the assembly by pre-drilling the external details of the box. The result is a rectangular box without a bottom and a lid. The upper part of the bars is subsequently used to secure the plywood sheet.
2. Preparation and fixing of the upper part of plywood. Slot holes. First, a 800 mm by 80 mm part is cut from a plywood sheet. Next, measure the support shoe of the saw, which will be mounted on the countertop. On the back of the plywood, they mark up. 2 central axes will be required. Without them, you cannot perform accurate marking. Then, plywood is marked with marks corresponding to the dimensions of the support shoe. Then they take such measurements that the circular has: the diameter of the lower protective casing, its thickness, the maximum distance from the edges of the support shoe. In accordance with the obtained dimensions, they mark and cut a rectangular hole with a jigsaw.
Video: How to Make Sawing from Circular
3. Attaching the saw to the plywood worktop. First, 4 holes are made in the shoe. Diameter. 10 mm. Next, install the tool so that the working part comes into the cut hole. When the saw is aligned, mark the location of the holes. Tags are made in the central part. In order for the tool to stand reliably, for fastening, you will need ploughshare bolts having a countersunk head cone (M8). To install them, you will have to take care of a qualitative deepening of the cap, it can protrude a maximum of 1 mm in a loose state.
The plywood is drilled from the outside, the diameter of the holes obtained should be 8 mm, and then a countersink should be made under the head. When the holes are ready, the saw itself is installed on the sawing table for the circular saw, the bolts are tightened from the inside using nuts with plastic grovers or spring washers.
4. Fastening the countertops to the body. Start button. First, holes are made in the corners of the plywood worktops at a distance of 30 mm. Then a hole is drilled in the central part of the bars. The parts are connected using an 18 mm M8 steel sheath. On the side of the set the usual button "Start. start". An electrical network is laid inside the housing, and the button on the instrument itself is clamped.
5. The manufacture of a thrust beam. A simple table for a circular saw will become much more convenient if you equip it with a resistant BAL-KOy. The drawings contain all the necessary dimensions. The beam can be made of plywood, and secured with furniture rails full extension. The resulting beam should slide above the surface at an angle of 90 ° to the cutting plane with a slight gap.
6. An emphasis for longitudinal cuts. It is made of aluminum cornice. At 150 mm from the edges, holes for the bolts are first drilled, and then 2 lines are drawn from the bolt attachment point to the center line. 12 mm holes are made at the intersection and further towards the bolts at a distance of 30 mm. Bolts from the bottom are tightened with nuts. And on the drawn fishing lines they make a tonic of the slot, their width can be seen in the photo.
Information on how to make a table for a circular saw can be seen in the video. This will help you quickly and without much difficulty improve the equipment of your workshop.