How to remove the chuck from a hitachi electric screwdriver
Instruction: how to remove the chuck from an electric screwdriver
Some people wonder how to remove the chuck from an electric screwdriver. It is required for preventive and repair work. You can save money by doing the necessary work with your own hands. There are several kinds of chucks, each with its own characteristics.
This is a hollow cylinder made of metal that contains a special ring with an adjusting sleeve. This element is mounted directly on the shaft. Drill bits are fastened with a tapered or threaded surface.
To disassemble the chuck, you need a screwdriver, a hammer and some wrenches. If there is a vice, it will be easier to perform the task.
Types of fastening
It is required to study the marking to determine the type of attachment. If 1. 6 B10 is specified, the Morse taper is used. The numbers indicate the diameter of the shank and can be different.
Marking 1.0. 11 M12x1.25 indicates that a threaded method of fastening is used. There is no fundamental difference in the method of attachment, it all depends on the convenience of the user.
Types of chucks
Now there are two types of this part:
The first type has additional categories:
- Double coupling. it is possible to unscrew and tighten with two hands, one coupling is held, the second one is twisted to remove the nozzle;
- single-coupling. all operations described above are performed with one hand, this is facilitated by the system of locking the shaft during the removal of the nozzle.
A common characteristic of the quick-change varieties is the change of tooling without the help of special tools.
The material from which the chuck is made:
Plastic products are lightweight, but are not shock resistant. Quick-clamp variations are used both in everyday life and in production.
The cam versions are more reliable, offer greater shock resistance and are robust, but the disadvantages are the relative weight of the part.
Dimensions and deciphering
In order to choose the right variant for replacement, it is necessary to know its size. There is a special marking on the cone where:
- The first numbers (through the dash) are the variants of shank size, which is possible to install on the article in millimeters.
- The letter and number next to it are the calibration of the cone. There are 9 different indicators.
- in some cases, on the cone after the letter may be written numbers in the form of “1×1” (numerical values depend on the model), thus indicating the parameters of the thread. The value is in millimeters or inches.
Some products come with slightly different markings (e.g. 4. 15 mm ½. 22 UNF). In this case, it is understood that the figures 4. 15 mm is the diameter of the allowable for the use of bits, ½. thread size in inches, and 22. the number of turns in an inch.
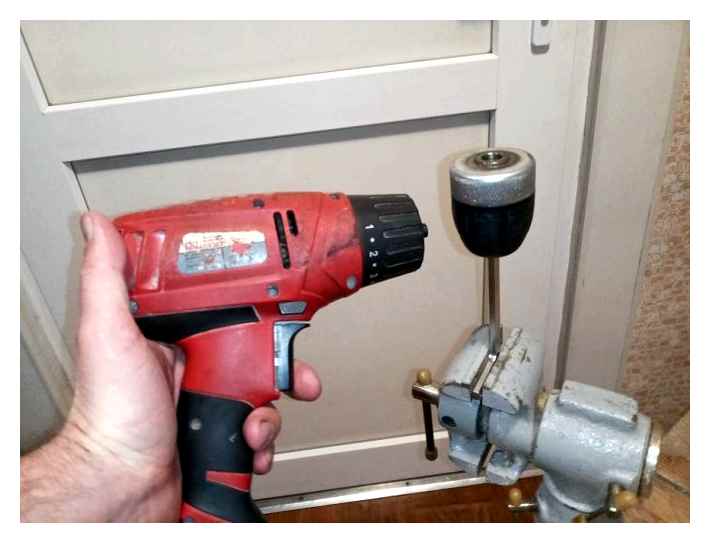
Vise may be needed in serious cases
Sizes and decoding
In order to choose the right option for replacement, you need to know its size. There is a special marking on the cone where:
- The first numbers (separated by a dash) are the shank size options that are allowed on the product in millimeters.
- The letter and number next to it are the cone calibration. There are 9 different indicators.
- In some cases, the taper may have numbers in the form of “1×1” written after the letter (numerical values depend on the model), thus indicating the parameters of the thread. The value is stated in millimeters or inches.
Some products are marked a bit differently (e.g. 4. 15 mm ½. 22 UNF). In this case, it is assumed that 4 to 15 mm is the diameter of the allowable bits, ½ is the thread size in inches, and 22 is the number of threads in an inch.
Vise may be needed in serious cases
The first mandatory step! Unscrewing a retaining screw
The first necessary step in removing a chuck from most household screwdrivers is to unscrew the fixing screw located at the end of the spindle between the cams. This fastener is designed to prevent the quick-clamping unit from unscrewing itself while working under load in reverse (counterclockwise) mode.
For example, when unscrewing old fasteners when more torque is needed. In all this, the chuck can remain stationary, fixed bit in the work surface, and the spindle will perform a rotation “left” (counterclockwise) and without assistance from others will unscrew from the mounting assembly screwdriver.
- Spread the cams so that the tip of the screwdriver goes through freely.
- Unscrew the screw by turning it to the right, because it has “left-hand” threads.
READ How many volts does the electric screwdriver charger have to deliver?
Warning! Grooves on the screw heads come in different sizes and shapes (straight or cross-shaped). It is therefore necessary to have screwdrivers with different tips.
Unscrewing the quick-action chuck from the screwdriver spindle If the retaining screw with “left-hand thread” has been unscrewed from the end of the spindle, it is possible to remove the quick-action chuck from the screwdriver.
Because the clearance between the socket and the housing is a few mm, it is not realistic to fix the spindle with a vise or pipe wrench. Therefore, there are several other ways to remove the cartridge.
Removing from known models
There are a lot of different models of screwdrivers on sale, which are produced under the wing of numerous companies. Many of them customers have not even heard of. But there are models that are always on the ear. To be sure to understand how you can make a chuck removal, you should study examples of the removal of this part on the most famous brands of screwdriver.
Having typed in the Internet, you can see the result, where the phrase will certainly be written: how to remove the chuck from the Makita screwdriver. And this is quite understandable, because the brand is very well-known, and therefore it is worth considering.
Makita screwdriver
In most cases, the Makita company makes such screwdrivers, which are equipped with a threaded fastener. It also has an auxiliary fixation in the form of a screw that has a left-hand thread. To disassemble such a device, you need to adhere to certain actions.
First you need to unscrew the fixing screw clockwise. After that, you need to press the spindle stop button. The body should be wrapped in a very thick cloth and then squeezed in a vise. The cloth is required in order not to damage the elements of construction. In the cams you should clench the hexagon, hit with a hammer on the free plane of the wrench, and then unscrew the chuck and remove it from the shaft.
This method should definitely help. The fact is that Makita screwdrivers are made by the same technology, and therefore the instructions for disassembly are universal.
Bosch machines
Those people who wonder how to remove a chuck from a Bosch screwdriver, you should definitely learn that a fixing screw is installed on such a machine. That is why all the actions with the product of this company should be performed in a certain sequence:
The key must be placed in the cams of the Bosch machine, and then tightened until a few clicks are heard. The tool should be placed on the edge of the table. It is necessary to press the stop button, and then remove the retainer, which is located on the shaft. The chuck will need to be unscrewed counterclockwise.
It is worth noting that when disassembling the equipment, you must be very careful and follow a certain sequence. Reassembly is done in reverse order. It is important not to forget to put all the parts back.
Theoretical knowledge about the disassembly of the mechanism on the two machines should give sufficient skills to make with their own hands repairs and other types of screwdrivers, for example, Hitachi Metabo (Metabo), Zubr. The question of how to remove the chuck from the Interskol screwdriver, too, should fall away, as well as there should be no problems with other manufacturers.
How to remove and change the chuck
If you are faced with the replacement of the cartridge, you should first deal with the way of its attachment. To carry out the procedure with a minimum of effort, experts do not recommend overloading the electric screwdriver in everyday use. If you work with the tool for fifteen minutes without interruption, the rotating parts can overheat and become firmly embedded in the socket. Then it will be more difficult to perform the replacement. Experts recommend the proven ways to remove the chuck described below:
- Unscrew the threaded fastening by means of the L-type hexagon, which you will surely find in the possession of every customer. Then insert the hexagon (size. 10 mm) put the short edge into the chuck and squeeze tightly in the cams. After that, start and immediately turn off the device at low speed so that the free edge slightly strikes the table, so the threads will loosen and you can unscrew the chuck.
- If the chuck is threaded with a fixing screw, then:
- Unscrew the screw with the left-hand thread in a clockwise direction.
- Then insert the hexagon into the cams, and with a quick movement of the hand or hammer turn the free edge counterclockwise. Now the chuck can be unscrewed.
- If both methods do not work:
- Take the shaft, on which the gearbox and the cartridge are located, out of the open housing. Use the pipe wrench to remove the chuck.
- To remove and change the chuck with Morse taper you need to have a hammer to loosen the shank from the socket.
Block: 4/6 | Number of characters: 1515
How to change the chuck on a screwdriver
The chuck on the “Interskol” tool is fastened to the shaft by the threaded method and the counter bolt that must be previously unscrewed by loosening the jaws to the maximum with a wrench in order to get access to it
On a Makita screwdriver, the chuck is also removed in the following order:
To loosen the screw clockwise, loosen the cams to the maximum before doing so. After removing the screw, you need to find a hexagon eight and insert it into the shaft, clamping the cams afterwards. Then put the screwdriver in reverse and, holding the hexagon with one hand, press the button to start the screwdriver with the other hand.
Note: The chuck will rotate and unscrew quite easily if it is not used too often and for a short period of time, then it will not have time to tighten too much. If it has been in use for a long time, you have to make a small effort to unscrew it.
Once you have unscrewed the old chuck, it is quite easy to install a new one. You have to switch the screwdriver to normal mode, when the rotation is counterclockwise, put it on the shaft and with short spins tighten. Then the counterbolt should be tightened.
The Bosch screwdriver has a reputation on the market of high quality because all parts of the tool are resistant to wear and tear and, what is important, are firmly locked into each other. When removing the cartridge, the last of these features can make it very difficult and time-consuming to unscrew the locking bolt, due to the fact that it is securely bonded with sealant.
For this reason you may need an electric wrench when disassembling the chuck on this screwdriver.
Block: 5/7 | Number of characters: 1732
How to choose a new chuck
The chuck for an electric screwdriver is selected based on a number of aspects. When selecting a suitable part, the following recommendations should be followed
- If the bits have to be changed frequently, it is better to prefer quick-change or self-clamping cylinders; otherwise the work will be slower;
- toothed-ring design. the choice of those who seek maximum reliability of the chuck; if the priority is one hundred percent fixation of the bit, it is better to buy a key chuck;
- when selecting a part, it is necessary to consider its characteristics; the parameters are regulated by the relevant GOSTs; the larger the clamping cone, the greater the number, by which it is marked;
- it is necessary to take into account the country of manufacture. the alphanumeric designations of foreign models differ from domestic ones.
If it is difficult to determine the type of “clamp” independently, it is better to consult with a specialist.
The wrong choice equals at least incorrect operation of the tool.
In the worst case, not only will you have to spend again on a new cylinder, but you could replace the entire electric screwdriver.
Removing the chuck: Makita electric screwdriver
Makita brand power tools are generally equipped with a threaded mount with an auxiliary fixation by means of a left-hand threaded screw.
- Unscrew the retaining screw (clockwise).
- Activate the spindle stop button.
- Wrap the housing with a thick cloth and squeeze it in a vice.
- Clench the hexagon in the cams.
- By hitting the free plane of the wrench with a hammer, the chuck is twisted and then removed from the shaft.
Features of chucks removal
The chuck can completely disintegrate, becoming unusable. the cams in it are not able to perform their task, it is impossible to clamp the drill bit. or begin to backlash. The unreliability of the element makes it impossible to hold the bit tightly. Drills are constantly being thrown out of the chuck.
There are threads inside the chuck or a special cone for attaching it to the shaft. Structurally, the element is divided into three types:
Quick-clamp chucks are considered the most popular: the tail is clamped by manually rotating the sleeve of an electric screwdriver. The main difference between the types is that in one case the tools are fixed by hand, in the other. you can not do without a wrench. Manual clamps can save a lot of time, because the user does not have to pick up a wrench. The main purpose of the chuck is to ensure tight contact between the working bit and the rest of the mechanical parts of the tool. The key type copes with this better, so it is considered more reliable.
Quick-clamping
The design does not imply the function of clamping the bit when screwing in the chuck. the bit is not so reliably fixed in it, unlike the self-clamping type. The quick-action chuck consists of:
The quick-clamp type is divided into two more types:
If the user buys the first type, then in the box with a screwdriver there should be a special blocker. it allows you to change the tooling without scrolling the chuck. The two-move types allow you to install the bit without additional attachments, which is more convenient in conditions of frequent need to change the drill. The chuck can be removed by pulling on one ring of the chuck by hand and twisting the other.
Self-clamping
This type is noticeably different from the quick-change chuck. It’s all about an interesting feature that allows you to additionally clamp the bit while cranking the electric screwdriver. The self-clamping and quick-clamping types can be distinguished by a distinctive click when relaxing or tightening the jaws.
How to remove the chuck
There are enough screwdriver manufacturers. each has little secrets for disassembling the chuck mount. However, the general design is the same. So, there are several ways to disassemble the chuck.
Holding the chuck by hand
There is always a screw inside the chuck. It must be unscrewed clockwise to the right with a screwdriver because the threads are reversed. The tool is inserted into the chuck hole. If the screw doesn’t give way you will need to:
When you give in to the ratchet, you have to put it in reverse and clamp the chuck. If you’re going to pull by hand, it’s best to choose a second speed. Then with clockwise jerks the chuck can be removed from the electric screwdriver.
Sometimes the screwdriver head can’t be disassembled. Then switch to first speed, select reverse mode and clamp the chuck with your hand. Then press start and fix the head by hand. This is enough in 30-40% of the cases, in the other 60% you have to make some fuss and try to disassemble the electric screwdriver.
The way to remove from a disassembled electric screwdriver
Sometimes the gearbox of the tool fails. to repair it, the chuck has to be removed from the shaft. The process:
- Find and unscrew the counter bolt inside the chuck.
- Prepare the head (19mm in most cases, but sometimes you have to size it individually).
- Put the head on the back side of the gearbox and fasten it tightly.
- Use the other hand to gently unscrew the cartridge counterclockwise.
That’s all, by simple manipulation we managed to remove the element from the disassembled gearbox.
Using the hexagon
First of all, unscrew the screw inside the chuck. clockwise. Next:
- Use cams to clamp the hexagon.
- Set the torque for drilling. it is recommended that the battery is clamped to maximum.
- Set the reversing mode.
The essence of the method is that the hexagon must hit something hard. It can be a table, stone, metal, etc. Bring the tool and press start. The hexagon will start to hit the surface and the chuck will twist from the shaft.
How to screw in the chuck after replacement
Screw in the chuck and secure it by hand. The electric screwdriver is switched on for a short period of time. Turn the fastening screw counterclockwise. The screwing process is done.
Many situations arise where it is necessary to remove the chuck. Most often, the causes lie in problems that arise during operation, it can be backlash, bit falling out, etc.д. Some people want to change an existing part for a different design or size. It must also be replaced if the drill starts to move sideways. You must use another chuck if it becomes cracked because it has been dropped or kicked. If the tool is used a lot, the part should be replaced every 2 years.
After the cartridge has been disassembled, all parts should be brushed and lubricated. Then the head must be assembled in the reverse order. It is important to follow the safety rules for its removal and installation. If you can’t do the job yourself, you should call in a specialist.
How to change?
Now that we have removed the chuck, we can change it. However, the cartridge must be replaced according to the recommendations of specialists. For example, you have to change the chuck so that you take into account the power of the device.
Read also: Handles for files gost
In addition, if the bits change quite often, it is better to use quick-clamp variants, which are quite easy to pull out, which will seriously speed up the work. You can also choose a key chuck. But this should only be done when the diameter of the bits or drills is large.
If a tapered version is chosen, you should take into account its characteristics, which according to GOST are denoted by markings from B7 to B45. If the chuck is made abroad, the marking will be different. It is usually marked in inches.
It should be said that different chucks for an electric screwdriver differ from each other by thread, shape, purpose and appearance. They are all made of steel.
If it is difficult to determine the type of clamping, it is better to consult a specialist. Otherwise the work of the device may be unreliable and incorrect.