How to set up a disc coulter for a tiller
Principle of operation of disk hoes for the tiller
Hiller helps to preserve soil fertility, increase growing efficiency, and cut fertilizer and irrigation costs. Harvesting a rich crop of some vegetable plants, especially potatoes, is impossible without this procedure. But it is long and tedious to manually hoe. It’s quicker and more economical to use a single-axle tractor with a planter. Such a device can be made by yourself. Let’s consider what are the potato riders for the power tiller and how to make them with our own hands.
A tiller is a mechanism used to plow and cultivate soil of varying length and complexity.
Hillers are used to till crops, loosen, dig over the ground, and control weeds. The device is made of metal, has blades or is equipped with rotating discs that are attached to the frame.
Mounted on a single-axle tractor with special mounts. Adjustable tool offers different working heights and penetration depths. Rifts and aerates the soil at the desired height along with topsoil loosening. Ripping width, height and angle varies depending on the model.
Disc tip
The efficiency and power of the planter is influenced by the working speed of the cultivator, where less is more. With the disc tedder, the life span of the machine is extended, With its simple design and straightforward operating principle, the tedder requires little effort to operate. Also requires very little maintenance. Ideal for use before planting potatoes. Disc models are considered the most popular, if only because there are several types. There are the following disc coulters:
- With a constant working width. the average constant width is 20-30 cm, set by the manufacturer. Recommended for use with low-power and low-weight power tillers.
- With variable width. used extensively for mowing different crops, adjusting the working width will adjust the mowing for potatoes, and after changing the width it is possible to mow beans with a smaller width. The maximum working width is 70 cm, so it can be perfectly adjusted to the different processes.
Many people also ask how to set the disc coulter?
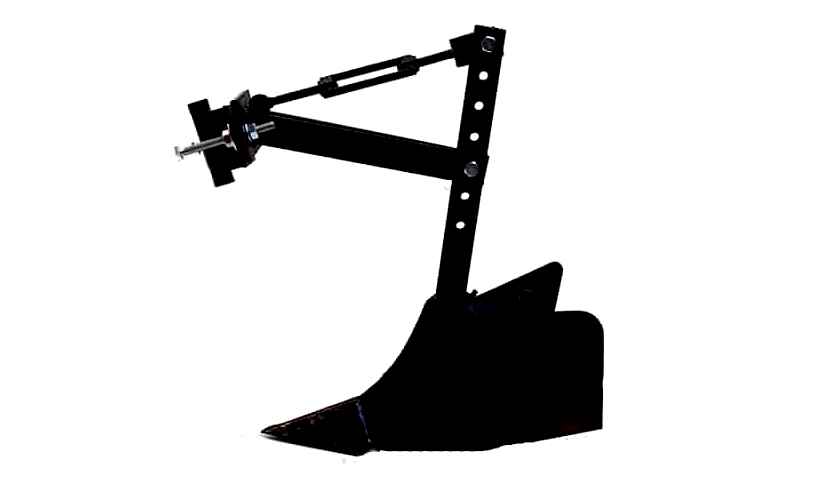
The design of the disc coulter
The disc disc array looks like a two-wheeled frame with two discs attached to it. These devices can perform several tasks: pre- and post-harvest soil cultivation, inter-row cultivation, hilling. It is possible to install such a toolbar on a single-axle tractor or cultivator.
The disc coulter includes:
- T-shaped lever;
- Two screw turnbuckles (they adjust the angle of the discs around the vertical axis);
- Two uprights;
- two discs.
The distance between the edges of the discs can be adjusted thanks to the adjustment of the tines. It allows to set the width between the rows as needed (from 35 to 70 cm).
It is also necessary to set the discs to the same angle of rotation (this is done by adjusting the turnbuckles). Without this, the tool would pull to the side. The tilt of the discs to the vertical is not adjustable and is almost always constant.
For the wheels on your power tiller we recommend a diameter of approx. 70 cm and a width of 10-14 cm. This way, the wheels won’t damage the plants when ploughing.
How the disk hoe works
This toolbar is attached to the tiller on the hitch bracket without the riders. This is done with a stopper, two bolts and flat washers. It is easier to work with the tiller on the power tiller in first gear. This will increase the traction by reducing the forward speed.
The principle of the disk hiller is simple: the discs lift the soil and roll it up, covering the plants with soil. The rotation of the discs allows additional crumbling and loosening of the ground.
The disc mower has some advantages over its counterparts: the ridges are flatter and higher, it is easier and nicer to work, and it requires much less energy. It is easier for the operator to work with this tool.
Not everything is perfect, of course. You always have to pay for comfort. And the of the disc coulter are just another proof of that. It costs about three to four times more than the other types of disc coulter to enjoy the comfortable and easy-to-use disc coulter. The price of this tool depends on several parameters. Among them:
- The diameter and thickness of the discs;
- material of manufacture: plain steel or alloy steel;
- Either sleeve bearings or anti-friction bearings are used;
- adjustment mechanism.
When buying a disc planter for the tiller it is worth taking all these factors into account. Choose a unit that’s priced right and performs as well as you want to be comfortable working with it.
Given that these machines aren’t cheap, it’s understandable to ask if you can make your own power tiller discs?
How to mount an arrow on a single axle tractor?
Installing and adjusting the potato hill for the power tiller is not a very complicated procedure. Bolts and washers to attach it to the hitch. A simple rocker arm has to have the angle and depth of the tool. The tilling depth of the planter is shallower than that of the plow, so you don’t need to put the single-axle tractor on an elevated position for adjustment. Simply adjust the rocker arm vertically. The desired angle of attack is determined by how far the rocker reaches into the ground in the working position. This depth should be about 15 cm.
If you find that the share is sinking too far into the ground while working, turn the tine towards the front. Otherwise, if the disc coulter is not deep enough, the bar is tilted backwards.
Setting up and adjusting the disc mower is a little more complicated. First, the distance between the bottom points of the disk discs on the weeder bar must be adjusted. This will be 40-70 cm, depending on the work to be done. Next, the angle of the discs relative to the horizontal axis is set.
The settings of both discs must be identical, because otherwise the single axle tractor could drift sideways.
Motor or yourself?
Mowing may be done in half-row (top right in fig. in the beginning), when each bed is covered with earth in 2 passes, and immediately in a row (bottom left there). Ploughing in 2 passes per half-row is only useful for certain crops grown on thin topsoil with insufficient moisture: A dip in the mouldboard ridge acts as a water retention trap. Efficient potato hoeing only works in rows.
Manual plowing by one person is only possible in half a row on light, loose, lightly moistened soils, up to 30-35 cm wide. It already takes at least two people to plow potatoes on regular garden land without mechanical traction (pos. 1 in Fig. below): the front one creates the actual pull, and the back one keeps the furrow and the working depth. A perfect exercise for feminists who want to prove themselves no worse than vile male harassers. But the liberal-tolerant ladies prefer public action, on the Internet or in kind. Maybe because there is no useful work to be done? And for the useless one, you can bargain for more pay, t.к. 100% reliable criteria for evaluating unproductive labor are impossible in principle. But back on topic.
Manual and mechanized plowing options depending on the source of traction
Having a power tiller from 0.5-1kW will give you the opportunity to do the potato ploughing in rows, pos. 2 in fig. Neva single-axle tractor, etc.п. can pull a 2-row mower on a tractor up to 0.8 m wide, pos. 3, 0.5 rows 1 row 0.5 rows. On any mini-tractor, you can attach a 3-horse rocker of the same type (pos. 4), for tillage 0,5 1 1 0,5, or 2-tines for tillage 1 1. Productivity of labor in this case increases, per 1 pass, by 2-3 times in comparison with roundup, but the cost of special equipment rises several times. Therefore, next we will focus on how to make an arrow for a power tiller with his own hands, with the possibility of using the same “self-propelled”, and how to make a handheld arrow for small areas, approx. up to 20 acres.
Note: Although the mounted implements for mini-tractors in general is not the topic of this article (mini special equipment get competent owners who have already disposed of), but if you got a tractor suddenly-unexpectedly, below give the video, how to make a 3-row mower for mini-tractor itself:
disc or ploughshare?
There are no less than 10 types of planter in use in a large variety of farming operations. There are hundreds of patents for this type of mounted tillage tool, and more are being added. But considering the possibilities of home technology and the requirement to work with human traction as well, the choice of either the general purpose ploughshare or the potato disc coulter is narrow. For more on both, see. Let’s see which one is best suited to which conditions. The determining factor is the soil’s particle size distribution and physical properties. If your plot on loose not sticky sandy or sandy loam soil (which is known to be the best for potatoes), then you can, without being sly, build a manual mini-plough for light soils, which can be worked with one person, see. e.g.
or a hand-held planter for light soils, which may have to be pulled by two people:
In all other cases, you will have to take into account the peculiarities of the tools of the pre-selected types. For the plow plow, they are as follows:
- The required pulling force depends relatively little on the soil type. two medium-sized people pull the single-hoe plough with body type 2 (cf. The plough has a wide range of implements that can be fitted to the frame (see following) in medium-humid black earth but is big enough that it would be hard to pull on its own.
- The person leading the furrow has to be very experienced, otherwise the share could “dive” and get stuck in the ground or get sideways and misshapen.
- The ploughshare is multifunctional, t.к. and a large variety of implements can be fitted to the frame, see Catalogue 33. Figure.
Replaceable working elements on ploughshare
The disc coulter has a track. features:
- The qualifications required of the operator are minimised: A correctly fitted disc coulter (see drilling template and operator manual) is the easiest way to set the disc coulter in the field. further on) automatically maintains the set cultivation parameters.
- On light, free-flowing soils, less tractive force is needed than with the plough.
- On soils of medium and heavier severity the situation is the opposite.
- On silt, heavy alluvial, etc.п. To the sticky ground, the disc coupler will not hold the tractor. the engine will stall, the coupler will break or the implement will break.
- On potato-friendly soils, a high high hill in one row with a sharp prism is possible by hand.
- Up to 630-650 mm working width with the single-row disc coulter.
- High ridging in 2 rows is possible: discs that are close to the root coma either roll over the roots or damage them insensibly to the plant.
- When encountering an obstacle, the implements roll over it. A small fault is possible, but this does not mean that work must be interrupted.
- With winch pull, electric or internal combustion engine, works just as well as in direct pull.
- For making it, you need a purchased or made-to-measure unit. further.
Finally, you should also consider the fact that potatoes are an excellent insurance crop in a farm of any direction. Potatoes can not be called a record breaker in profitability, but the demand for the “second loaf” is stable, and the storability of potato tubers makes it possible to sell the crop with the highest possible profit. This is why on complex farms a large proportion of the total area is planted with potatoes. Which one, it’s a matter of local economic conditions, but the first thing that makes sense is to make a disc tip. The exception is if you have an above-average severity on the ground and you haven’t yet got a mechanical pull.
How to install an implement on a single-axle tractor
Installing an arrow on a single-axle tractor requires proper adjustment of the angle of attack and depth of plow, which should be less than that of a plow.
Before you work with the dipper, the following work should be done:
- On a single-axle tractor should be installed wheels and hitch, then attach the perch.
- the single-axle tractor is placed on an even surface, and the coupler is lowered to the ground and secured to the hitch.
- When setting up the equipment, make sure the rake is upright, so you can get the right angle of attack.
- Then lower the equipment to ground level, or go slightly deeper into the ground so that the equipment is below the tines.
Do a test bury and see if the equipment is sinking into the ground, tilt the stand forward by raising the toe slightly. In case of leaving the ground, the stand is deflected back by lowering the toe. It’s important to consider the row spacing by adjusting the active part of the machine.
Block: 3/4 | Number of characters: 969
Practical adjustment of the rocker arm on the tiller
The theory of the operation of the implement is described in the textbooks for gardeners in such detail. that even a person who is not familiar with agriculture can understand the settings. But in practice, the saying “if it was smooth on paper, let’s forget about the ravines!”.
Features of the soil, the current weather, the quality of sharpening of ridges. this is not the whole list of factors affecting the quality of plowing. Not to mention the characteristics of a power tiller. That’s why it is necessary to drive over the “virgin soil” before driving into the seedbed.
It is desirable that the characteristic of the soil is the same as that of the cultivated soil. In the course of “work” you, firstly. feel how the attached equipment behaves, and secondly. set the correct angles and depth of treatment.
It is equally important to choose the right speed of plowing (plowing) Above described the relationship between speed and power when using disc attachments. The same applies to other devices. Sometimes a small homemade couch potato, with the right speed, can work wonders. And an expensive active loosener just scatters the soil around.
A detailed story about setting up the potato planter and installing it on a single axle tractor KADVI, see in this video material.
Block: 3/3 | Number of characters: 1279
About the device
The mechanism of the disk mower for the power tiller consists of a leash, a pair of stands, discs and tensioning devices. The last one adjusts the angle of attack of the parallel angled discs. Comfortable use of the machine is ensured by correct installation of these discs: the distance between their lower circles should be equal to the distance between the rows. The desired diameter of the most okochnik. 340-390 cm, its wheels. 75 cm, width. up to 10 cm. Following these parameters, it is possible to protect plants from mechanical damage.
Appearance of the disc rocker for the tiller. two-wheeled frame with a pair of discs suspended by a chain. Its functions are presowing, post-harvest cultivation, intercropping and as a cultivator.
Hiller for power tiller with his hands
It is not so difficult to make a homemade planter for power tillers. It will consist of such basic components as 2 disks, 2 stands, 2 screw adjusting turnbuckles, a T-bar for fixing the structure.
Before you begin, prepare the necessary blanks:
- metal sheets for making discs (or prefabricated discs);
- square metal profile for making the boom;
- parts for making the harlep adjustment.
The picture below shows exactly how the adjustment of the vertical axes of the rocker arm will be carried out with the aid of the harleps. The letter “B” marks the adjustment screws, the letter “C” marks the posts:
If you have the necessary blanks, you should make the rocker arm according to the drawings below. Do not forget to adhere to the specified dimensions in order to obtain a quality product.
The rocker arm will be attached to the tiller by the bracket, and the arm will be attached to the bracket by bolts with a stopper.
We also suggest you read the video, which tells about the intricacies of making homemade planter for power tillers: This kind of planter will be compatible with such models of power tillers as Neva MB-1, MB-2, Agro, MTZ, etc. д.
Hiller for power tiller with your own hands
It is not so difficult to make a homemade planter for power tillers. It will consist of such basic units as 2 disks, 2 stands, 2 screw-adjusting turnbuckles, T-bar for fixing the structure.
Before you begin, prepare the necessary blanks:
- metal sheets for making the discs (or prefabricated discs);
- A square metal profile for the manufacture of the boom;
- d the parts for making the adjustment rams.
The photo below shows exactly how the adjustment of the vertical axes of the toolbar will be done with the aid of the tarleps. The letter “B” marks the adjustment screws, the letter “C” marks the posts:
If the necessary blanks are available, the construction of the mower should be made according to the drawings below. Don’t forget to stick to the dimensions in order to get a quality product.
The tool bar will be attached to the tractor with a bracket, the leash in turn is attached to the bracket with screws with a stopper.
We also suggest you read the video, which describes the intricacies of making a homemade rocker for power tillers: This kind of rocker will be compatible with these models of power tillers like Neva MB-1, MB-2, Agro, MTZ, etc. д.
Rules of Use
The equipment will allow you to enjoy your work
The disc coulter for the power tiller is easy to use. It is important to set it properly before ploughing. The distance between the lower and upper corners is increased by 2 times, moving the stands and bolts from the discs into the recesses of the guide. To maintain the balance of the machine, turn the single-row clamp at the same swivel angle.
- Adjusting the width between the discs. To make it easier to turn the clamps, a large washer is placed between their ears and the leash bar. A bolt is threaded through it, and another washer is used to tighten the angle of attack. Lower the second half turn and cover with the third.
- Attaching the clamp and the bar on the disc coulter. Attachment is connected to the power tiller via the hitch without the string bar. The lever is held in place by a stopper and flat bolts that hold the lever to the outer tube of the attachment piece; the bolts hold the lever to the outer tube. In this way the arm is swiveled longitudinally to the required level.
- Attaching the disc coupler to the tiller. The optimum operating gear is provided at a reduced speed. Traction is increased. To prevent the wheels from spinning, they are paired beforehand.
The principle of the automatic disk hoe is based on the principle that the discs lift the soil as they turn and form a ridged ridge as the soil is tilled and mixed with the soil. The advantage is compactness, operator comfort, less energy required for hoeing, even ridge treatment. The price of the device varies, depending on the size of discs, material, adjustment mechanism, equipped with either a hole form Cascade, or roller bearings.
Let’s look at the features of each of them.
These have a fixed width for working the soil and are used on very light tillage machines with up to 4 horsepower. Able to cultivate seedbeds 25-30 cm wide, equipped with two side wings and a thin stand. The rack protects the equipment from overloading and mechanical damage.
This implement can only be used on dry soils, as clogged soil will impede the operation of the moving elements. Available with adjustable width of the working width. They are mounted on heavier machines with horsepower starting at 4 hp. Such implements can also be used on wet ground with no fear.
Propeller
The working principle consists in the activity of propeller parts. Under their action, first of all, the soil is dug up and weeds are removed, and after that the beds are loosened. These modifications are mainly used for front-drive two-speed rotary cultivators. This is because power is increased to 180 rpm on the second speed.
Double (2-row)
Makes two furrows before planting and is also used for hoeing and loosening. Includes a frame that holds two ridging tools. Saves time when cultivating the soil because it has two working elements. Is attached to the power tiller with a hitch. Because this unit requires more resistance to work, it is often used in combination with power tillers.
Rotary Active
This tool is equipped with rotors with helical tines instead of wheels. Demonstrates high productivity in the creation, loosening and hilling of potatoes. Suitable for use with 3-speed units (two forward and one reverse). In first gear the tool plunges the beds and in second gear it also shovels the soil off the space between the rows of seedlings.
Single Row
The most common type. Applicable for operation with light soils. Trenching is done after the preparatory loosening of the soil by the cultivator.
Mechanized maintenance of potato seedbeds
For better growth of potatoes it is necessary to carry out its dip, t. е. Covering the stems with loose soil. During the season this procedure is performed 2-3 times:
- The first mowing should be done when the height of the bush is 15cm. е. in mid to late May. The ridge should not be higher than 10 cm.
- The second dip is done when the height of the plant reaches 20-25cm, t. е. Two weeks after the first planting.
- After 10-14 days, you can repeat the procedure again. Now try to spread the soil as high as possible.
The most convenient way to dip potatoes is with a power tiller with a disk hoe
Experienced vegetable growers recommend using a single axle tractor only for the first burying. There is a risk of damaging the tubers if the plants are re-machined.
Hillering potatoes with a power tiller significantly reduces the amount of time spent on this type of work. It can be done in the following way:
- The single-axle tractor is fitted with an arrow, the angle of attack (rotation) of the implement is adjusted, and the depth of its plunge is adjusted.
- The rubber wheels are replaced by the grousers.
- The machine is set exactly in the center of the row spacing.
- Travel at the slowest tractor speed.
Making your own weed whacker
Of course, the manufacture of an okuchnik can not be called a simple activity. Here you need the ability to carry out welding and locksmith work. But it will allow you to save a pretty decent amount of money and make the device most convenient for the user.
For the work you may need the following tools:
- Arc welder.
- Electric drill with a set of reliable drills of different diameters.
- angle grinder and several tools and discs in the kit.
- Electric sledgehammer.
- A gas torch, designed for heating the metal when hardening it.
- Workbench with a vice.
- Various files.
- Consumable fastening material (bolts, nuts, rivets).
Making a lister-type butt
To make such a device it is necessary to cut two identical parts from a sheet of steel 2 mm thick. Then it is necessary to bend these plates so that the bending radii coincide. After that these surfaces are welded and the seams are processed to get a perfectly flat plane. The quality of scraping significantly affects the ease of movement of the device and the absence of clogging of bad joints.
Particular attention needs to be paid to the strength of the buttstock, as it bears the brunt of the device’s operation.
After making two of these devices and connecting them in a peculiar way, we get a device for two-row cultivation.
If you make such a device with an adjustable system of wings, based on an articulated joint and installing movable rods on the end of the device, which regulate the angle of the structure, you will get an adjustable two-row rocker.
The disk hoe for the power tiller
Manufacturing a disc device can be made with improvised material, which will significantly reduce its cost.
Key steps in making the disc device:
- Cut two round discs from 2 mm thick steel plate and sharpen their edges to reduce the resistance when plunging into the soil.
- Use the hammer to bend the elements: one side should be concave, the other is convex. This shape of disc makes it easier to rake the soil and cover the plants.
- Using special fastening bolts and welding we connect struts, turnbuckles and T-shaped leash with each other.
- The wheels of the disc machine themselves are connected by adapters.
- Spacing between discs must be identical to row spacing.
- The discs’ vertical swivel angle is adjusted by the turnbuckle.
- Then attach the complete implement to the power tiller mounting bracket with bolts and locking devices.
How to use
Even if the steps of making the mower have been followed and everything is done correctly, it is important to learn how to use it, properly adjust and sharpen the parts. After assembly, the implement is put to the test on the field. Quality of work will depend on soil conditions, climate and weather on the day of plowing.
Adjust the mechanism as follows:
- Drive the head over the ground, setting the angle of inclination and depth of penetration. It must not exceed the total length of the product.
- The implement should not scatter the earth around or obstruct the furrow.
It is forbidden to use the equipment if there are animals and children nearby. Do not use the machine if it is not in working order, or leave it unattended.