Tension pulley on a single axle tractor with their own hands
Types of belts for power tillers Neva
Basic devices of the most popular agricultural machines of the Neva brand include two working shafts at once. crankshaft and camshaft. To operate each of them, the factory design of the models includes belts, which are divided by the method of torque transmission into regular and chain transmission.
To maintain the function of the chain system on the MB-1 and MB-2 motor blocks there are factory sprockets. The friction force in the device of these agricultural machines is responsible for the continuous operation of the normal gear.
The belts used in the factory design of Neva MB-1 and MB-2 power tillers differ from each other by the following factors:
- belt arrangement. depending on this factor, there are elements for the drive part, as well as for the forward and reverse parts;
- the shape of the cross-section. according to this factor, V-belts, rounded, toothed and flat belts are on sale;
- The type of location of the belt and shaft between each other. by this criterion, angled, semi-crossed elements, and open gear are distinguished;
- manufacturing material. most often the manufacturer of equipment uses parts from reinforced fishing line, covered with dense technical rubber and additional coating that protects the line for the trimmer from wear and tear;
- thickness. depending on this factor, there are belts on the market that are differentiated according to the diameter of the inner and outer circumference.
Each of these parameters directly affects the gear ratio. It determines the torque that the element is able to withstand during its operation in the power tiller device.
Pulley on a single axle tractor: characteristics and self-made
The pulley is the part of a walking tractor that is responsible for transferring engine speed to the implement. The power transmission is usually by means of a belt. With the help of a pulley you can also control the rotation of the attached mechanisms of a motor-block. About some of the technical characteristics and the independent production of this part we will tell you more in detail further.
Recommendations for assembling a power tiller
First, it is worth saying that by creating such equipment yourself, you can take into account the nuances that commercial serial devices simply can not have. For example, it is possible to combine the functions of a plow and snow clearing in one device, it is also possible to complement it with a useful trailer.
All the key parameters usually show the drawings of the motoblock with their own hands, which is worth doing in maximum detail.
As a rule, there are no uniform dimensions for a power tiller. You can meet models, where it barely reaches 10 kg.
Such, as a rule, create for a small amount of work on small plots of land. And there are others, which are already similar in power to minitractors. Such equipment is capable of developing speed comparable to a full-fledged vehicle, up to 60 km/h.
Scheme templates are widely available in different sources. It is enough just to choose the one that will be as similar as possible to the expected and the result and to edit it depending on the needs.
To create a technique you do not need to be an engineer or have a special technical education, just carefully study the examples of videos that are in the public domain, as well as choose the most suitable drawing.
Main materials
Considering the different options on how to make a single-axle tractor with their own hands, you can see that the most common is the recommendation to use engines from old motorcycles or mopeds.
But in addition to this basic component, several other elements will be needed, which include a tube of steel used as a frame.
It’s also worth stocking up on sheets of iron. It is used to make the cladding, as well as body parts. The axle, which will be load-bearing in the design, is made of either a solid bar of steel or a pipe.
The technique will not be able to function without the wheels, which have tires with the widest possible tread.
Among others, the gearbox, bearings, transmission elements. Creating a single-axle tractor Neva with their own hands owners, as a rule, want to minimize costs.
To do this, before you start designing, you need to assess what is available, perhaps in the garage just lying idle and useful for such equipment elements.
single axle tractor with their own hands
Homemade single axle tractor from improvised materials: photo and description of the homemade machine.
A village handyman, built with his own hands a simple single-axle tractor for working the garden and towing a trailer. The engine was purchased, other parts were already available.
The single-axle tractor is equipped with a four-stroke, one-cylinder air-cooled Sadko gasoline engine rated at 6.5 hp. Trolley wheels R14 from a passenger car, gearbox from Zaporozhets.
The torque is transmitted from the engine to the gearbox by belt drive, and a homemade clutch was also made from a belt clamp roller.
On the walking tractor is installed gearbox from ZAZ-968.
There is also a removable guard for the belt drive.
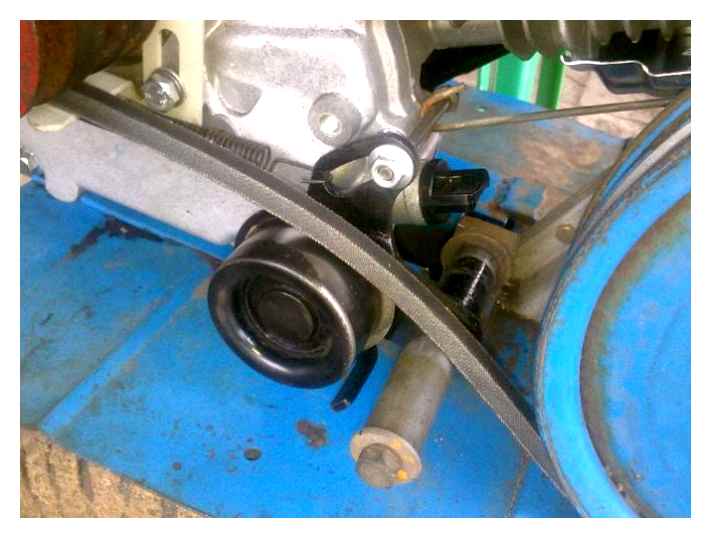
The picture shows the mechanism of the belt clutch pressure roller.
The craftsman made a hitch and trailer for his homemade power tiller. On the steering wheel. clutch and engine controls.
The single–axle tractor has good traction and accelerates up to 35 km/h in fourth gear with an empty trailer.
The engine is still being run-in, but soon there will be a video of the power tiller.
Belt dimensions for Neva power tillers
Another important factor when choosing drive belts for the Neva motoblock is their dimensions. Determine which part is suitable for your agricultural machine, will help a special table. Before using the table, you should make measurements between the pulleys and rollers, on which the new part will be installed. This will help determine the exact length of the new element.
In the design of the Neva MB-1 and MB-2 motorblock, the location of the belts is slightly different. Consequently, the installation algorithm for both models will also have certain differences. To tension the belt on the Neva MB-1 motoblock, you need to follow the following procedure:
- First remove the guard from the V-belt mechanism;
- Then carefully remove the back bar from the pulley;
- Use a wrench to loosen the spring-loaded roller;
- Dismantle the old belt and tension the new element;
- After that, install all the previously dismantled parts of the power tiller.
Belt tensioning for “Neva” power tillers: carried out at home
After the belts are installed on pulleys, pass to the final action in their service. tensioning, presented in detail in the video-instruction. There is almost always some slack in the new cords that you can feel with your hand. It is unacceptable if the belt “hangs”, sagging in different directions by 1 cm or more.
- strengthening of vibration on a certain side of the motoblock;
- The effect of “slippage”, due to which the motor will not be able to develop the necessary traction for plowing, okrakivanie and other difficult operations;
- stalling and heavy smokiness at idle, after which a bluish residue may appear on the pulleys.
Clutch adjustment
It should be noted that during the work it is necessary to follow certain recommendations in order to avoid premature breakdowns and unnecessary problems caused by improper handling technique. It is necessary to press the clutch pedal and release it smoothly, without sharp movements. Otherwise, the engine may simply stall, and then you will need to spend extra time and effort to start it again. Your power tiller can have the following problems with the clutch mechanism.
- When the clutch is fully depressed the machine rapidly begins to accelerate. In this situation just turn the adjusting screw.
- The clutch pedal is released but the machine does not move or does not move fast enough. Slightly loosen the adjusting screw and check your machine for correct traction.
If unusual noises, cracking or knocking noises are heard from the gear unit, stop the machine immediately. The most common causes are a low oil level or poor oil quality. Check the amount and quantity of oil before operating your power tool. Change / top up oil and start the machine. If the noises do not stop, stop the single axle tractor and have a specialist inspect your machinery.
If you have trouble shifting, check the clutch, readjust it. Then inspect the gearbox for wear and tear and check the shafts for possible rubbing of the splines.
General information
The clutch is based on the action of the friction clutch (sliding friction force). This powertrain component is designed to:
- torque transmission;
- torsional vibration damping;
- smooth shifting of gears;
- shockless connection of gears;
- connect and briefly disconnect the engine to the gearbox;
- disconnecting the transmission from the flywheel.
The mechanism makes it possible to temporarily separate the power transmission of the power tiller and the crankshaft of the motor. In addition, the single-axle tractor with the clutch without jerking starts the action. Important for farm machines when driving, the clutch makes it possible to move the tractor from a standing start (though it is possible to do without it, but very difficult).
Centrifugal clutch has proven to be a reliable transmission component. It is used in automatic transmissions. Its main working elements include: flywheel, pulley, hub with key and keyway, flange, shroud, bushing, bearing, snap ring.
The differential also plays an important role, directly connected to the clutch. It is tasked with improving the maneuverability of heavy-duty tractors and ensuring smooth rotation. Clutch and differential in “symbiosis” regulate the rotation of the wheel part of the power tiller at different speeds. In addition, power transmission mechanisms are equipped with wheel locking functions. However, on some models, the differential is replaced by a special device that disconnects one wheel when driving.
Modern single-axle tractor models usually use a friction clutch. It is installed between the gearbox and the engine. In a friction clutch, the driven elements are closely connected to the transmission intake shaft (or the other, following the clutch, unit of the transmission), and the driven elements are connected to the engine crankshaft. As a rule, driving and driven elements are made in the form of round flat discs, sometimes manufactured in cone variation (for example, motor blocks BChS-735 and Kataisi Super-600) and shoe (Gutbrod, Mepol-Terra).
In the case of production of these working bodies in the form of pulleys of V-belt transmission additionally introduce tension rollers, allowing to set their position, the degree of tension from the belt control bar, planarly disconnect and connect to the transmission engine.
1.1 Design and principle of operation
The friction-type clutch consists of:
The driving part is formed by the end face of the motor flywheel and the pressure plate which rotates together with the flywheel. However, the drive can also move axially with respect to the flywheel. The friction disc is located between them and the hub is on the slotted machine shaft. The pressure plate has cylindrical springs on its circumference that are preloaded and compressed.
the role of the springs is to press the pressure plate into which they rest with one end and the other end against the housing together with the flywheel end face. As a result of these actions, the clutch is permanently engaged.
The actuation unit includes the release levers that are connected to the pressure plate via rods and a foot pedal diverter. When disengaging the clutch, the operator sends a force from the foot pedal or lever via a fork or cable to the release levers through the release bearing. The levers, with their outer end connected to the pressure plate with bolts, divert the clutch slave from the pressure plate during spring tension, thus disengaging the clutch.
The bearing reduces friction by eliminating contact between the stationary crankcase and the rotating arms. Usually there are three levers, placed at an angle of 120 degrees to each other. With the help of a spring, the parts of the control mechanism return to their original position. The gap between the clutch and the levers must be as large as necessary to release the clutch completely. If this distance is not respected, clutch slippage and friction lining wear occurs. When the gap exceeds the required distance, the clutch will not fully engage.
Block: 6/7 | Number of characters: 3963
The process of making a potato harvester
To make the mechanism work, it is necessary to make an eccentric. To do this, the end of the shaft from the bearing housing is bored to the diameter of the existing sheave, off-centre. Also a hole is drilled in the end and a thread is cut. On the reverse side of the shaft, a slot is made to connect it to the adapter sleeve that will connect to the splines of the power take-off shaft of the power tiller.
An adapter is pressed onto the flat end of the shaft and mated with a slotted bushing. The joints are fitted with pins to prevent rotation.
From the pipes is welded coupling to connect to the shaft of selection. You can simply cut off this part from the unnecessary hitch. The coupling is mounted on the single axle tractor, and the slotted bushing with an eccentric is connected to it.
The remaining part of the hull is assembled in relation to the measurements obtained. For this purpose it is convenient to use 2 pieces of channel. The body of the eccentric mechanism is screwed to it. The channels are then welded to the coupling bars and brackets. Bottom and top bearings are bolted to the side of the channels for the vertical shaft.
Next you need to install the pulley on the eccentric, and connect it to the sole of the vertical shaft. A knife is welded to the sole for pulling tubers.
Then a fan is welded on the foot from a 12 mm bar. On the sides of the channels adjustable stands are made, on which the wheels are attached.
A simplified potato harvester is ready for use. It works the same way as the more bulky and complex rumble, but it is done faster, requires less material. It is desirable to move the wheels as far back as possible to make it easier to control the tiller, because because of the short wheelbase it tries to turn sideways out of the row.
Operation and maintenance of the Neva MB-2
Changing the oil in the engine
The manufacturer recommends using such well-known brands of engine oil for the motor-block as LUKOIL SAE 10W30 API SF/CC standard, as well as RAVENOL SAE 30 API CD/SF.
At temperatures above 4 degrees Celsius to use thickened varieties of oil (for example, brand 10W30) will lead to increased consumption of this type of fuel, so in the cold season is recommended to check the oil level in the engine more often, preventing its lowering below the mark.
Change the oil after the single axle tractor has recently been in operation while the engine has not yet completely cooled down. It should be warm, but not hot. Drain all the oil from the tank and top up with new oil until the oil level is at the appropriate level. the drain plug must be screwed in tightly and wiped dry.
First start-up and running-in of the Neva MB-2 power tiller
The first start-up should be performed in accordance with the following scheme:
- make sure that the single axle tractor is in complete condition (the height of the steering bar and handles must correspond to the height of the user);
- only start the engine if the single axle tractor is positioned on a level surface;
- Check oil and fuel level in the tank;
- also check the places of threaded connections;
- then you may start the engine by gently turning the ignition switch;
- Allow the tractor to idle for about 10 minutes (no load or travel) and then move off and operate the tractor.
The first 20 hours of work are considered the run-in period of the power tiller, after which you need to change the oil. During this period it is most important:
- Do not operate at full throttle;
- Work only on previously prepared soils (not virgin land);
- for cultivation use only the number of cutters that are included in the kit;
- The single–axle tractor “Neva” MB-2 during the running-in period can be loaded only ¾ of the power;
- to change gears in the gearbox can be made only when the rotation of the driving pulley is completely stopped;
After the first 20 hours of operation after the first start-up change the oil in the engine.
Making the pulley with your own hands
There are several methods to make a spline pulley for a power tiller yourself. The easiest way is to grind out the part. Select a suitable workpiece and turn it on the lathe. If you do not have a specialized machine at your disposal, the manufacture of the part can be ordered at a lathe. However, it should be taken into account that the pulley for the motor-block. an element is quite large, so it will be quite difficult for the master to find a suitable workpiece for turning out the element. In that case you can make the pulley yourself and order the flange from a workshop.
The second method is more complicated in the performance. For work it is necessary to prepare in advance a sheet of plywood, an electric jigsaw, a drill and a hand router. The procedure is as follows:
- First of all, cut out a piece of plywood with a suitable diameter;
- Take a compass and draw a circle on the workpiece. In the center of it, make a hole;
- Use an electric jigsaw to saw out the disk. The distance from the edge of the disk to the edge of the plywood should be about 2-3 cm;
- To give the cut disc a perfectly round shape, fix a drill with a screw previously put on the drill, and grind the workpiece with fine-grained emery paper in its center hole;
- Next, form a place where the belt will be stretched. This is very easy to do with a hand router. Securely fix the disk on the workbench with self-tapping screws, and select a groove for the belt, having previously selected a cutter suitable for the work;
- After making the pulley, measure its seating on the motor shaft and drill a hole of the desired diameter inside the part.
Pulley on the engine of a motor-block: how to make it with your own hands
In order to perform this seemingly difficult task at home and do without buying this part, there are a number of ways. We will focus on several. the simplest and most universal, which will help to replace a worn spline pulley as on motor blocks of the “Neva” series, and others. such as “Salyut” and “Kentavr”.
1st method
The trick to the first method is to directly grind the part on a previously made blank on a lathe. The lack of home turning equipment is not an obstacle to the successful implementation of the project, because at any time turning products can be ordered from specialists. If the pulley is large in diameter, it may be difficult to find a blank.
2nd way
Requires more skill and diligence.
The material and technical base of the homemade machine will be:
Consider the sequence of work:
- determine the diameter. information about the size of the pulley can be found in the instruction manual for the power tiller or directly by measuring the pulley removed from it;
- We measure with a circular saw the necessary length, equal to the radius of the pulley;
- We put it on the workpiece and outline the circle;
- Take an electric jigsaw and cut the circle;
- To eliminate roughness, grind the circle with sandpaper;
- Mark a hole for the inside diameter of the pulley and drill it with a drill. To enlarge it, use a pain put on the drill bit;
- mill the place, where the belt will be put on. To this end, the circumference with self-tapping screws fix to the workbench, choose a router for a hand router and make a groove for the belt gear;
- Before mounting the pulley we measure its seating directly in the engine compartment. Only after that you can proceed to the drilling of the circumference;
- fasten the pulley on the motoblock gearbox by means of a flange.
How to properly maintain pulleys to keep them in good condition for a long time?
To ensure that your 20mm or any other diameter pulley will last a long time, you need to follow a few important simple rules:
- Don’t forget to check the protective covers. They protect the product from falling objects (both large and small) as well as dust and dirt.
- You must not forget to double-check on the strength of the seats on the motor axle. This will avoid failure of the element and prevent the pulley from coming loose.
- Always keep in mind safety precautions.
- Be sure to externally inspect the pulley for motor-block 25 mm diameter (three-strand) or any other part to detect possible cracks and chips in time.
Block: 4/6 | Number of characters: 742