How to correctly assemble the cutters on a Brait single axle tractor
Cutters for power tillers: selection, operation, self-made
A tiller to a power tiller is one of the most common types of additional equipment for tillage. This is a set of special blades fixed on an axle. With their help it is possible to quickly and easily get rid of weeds, to make ground cultivation on a site. In order to choose the best type of cutter for your power tiller, you should classify them a bit.
According to the location of the cutters are lateral and hinged. Side mounted on both sides of a single-axle tractor, working from the drive shafts of the wheels. In fact, with this arrangement, these cutters replace the wheels and put the machine in motion.
The second type. a power tiller, working from the PTO, is located at the back of the machine and does not participate in the movement. Power tillers of Celina, Neva MB-1 and MB-2 brands, MTZ have exactly this kind of unit.
By the design of blades there are two types of milling machines. saber (active, standard) and the so-called goosefoot.
Active cutters
Active milling unit consists of a set of four powerful blades, which are set at an angle of 90° in relation to each other. There can be two or more such sets on one axle. The number of additional outlets and the size of their blades depend on the power tiller’s output. Blades of this cutter in the form of curved strips, bent alternately in different directions. Their design and ruggedness allows you to safely work virgin land and areas where there are stones and roots.
Goose feet
The second type of a milling cutter is the gooseneck. The product got its name for the unusual shape of the cutting elements, reminiscent of the feet of a goose. They are triangle-shaped and located on the edges of the legs. The number of cutting elements and the size of this module also depend on the power of the power tiller. tines with more blades means better cuts.
This cutter is able to process heavy virgin and clay soils, but in areas with increased vegetation and roots, the product is likely to be blocked.
How to correctly assemble the cutters on a single-axle tractor?
Assembly of the mill can cause some difficulties, especially if you do it for the first time and by yourself.
To begin with, you should get acquainted with the structure of the milling cutter.
The drawing below identifies its main constituent elements:
- Rotary axis (comes in different lengths, can be solid or split);
- pin with locking device;
- blades (right and left);
- The elements fixing the structure (nuts, washers and bolts).
Also do not forget to take into account the fact that the movement of the blades during work is directed counterclockwise. Be careful when assembling the module. any deviation in the design will lead to the fact that the balance of the axle will be broken, the unit will be skidded to the side when working.
We also suggest reading the video, which details the process of assembling the cutters to the motoblock:
Auxiliary equipment for a power tiller
Among the necessary improvements to the motoblock in the form of attachments, it is recommended to make, in addition to all of the above, the following elements:
For designs of wheels used as propulsion of motor-block on arable land use wheels with rubber tires. How to make wheels for a power tiller with grotootsebs himself will prompt experience and ability to work with ready-made structures, such as steel discs from autowheels.
Angle is cut into sections of 35-40 cm. The rims of the disk are marked out into equal segments. It is best if there are. marks are made and the angles are welded at the marks.
The elevator with his hands for a power tiller is better to do from a piece of pipe diameter of 100 mm. The elevator itself is made in the form of a roller on a bracket. It changes its position if necessary and makes it possible to lift the single-axle tractor on the support. In normal position the shaft-lift is in front of the machine and is used as a supporting roller when overcoming ditches and potholes.
Bucket for a power tiller with your own hands is recommended to assemble in the case if you plan to use it as a snowplow.
- made of sheet metal 1,5-2 mm thick;
- rigid plastic with a knife at the bottom of the metal strip;
- Plywood 8-10 mm or OSB 10-12 mm thick.
The bucket is firmly attached to the frame of the power tiller. To make work easier, you can make a rotating device to change the angle of the cutting plane to the road surface.
It is possible to improve the home motorized tractor to meet your requirements without great expense. After all, you can assemble all the attachments on a single-axle tractor by yourself by doing everything with your own hands.
Preparing the power tiller for the cultivation of the plot
For soil cultivation on a single axle tractor instead of transport wheels, a set of cutters should be installed on each left and right side, as shown in photo 2 (cutters are installed on the right side). One set of cutter includes eight blades. Such a number and location of knives on the axle gives the most effective result of tillage.
Note that when installing the blades, the cutting part must face forward, in the direction of travel of the power tiller. Pay attention to the fact that the working part of the blade should not be sharp, because then the single-axle tractor will not move forward, and will constantly bury itself in the ground, because the cutters will not loosen the earth, providing a grip on the soil, but simply cut it
Picture 4 shows how to mount the single axle tractor with the clevis in the upright position.
Picture 5 shows the coulter. What is it and what is it for?? The opener is a strip with vertically arranged holes, through which we can adjust the depth of the tiller of the power tiller when cultivating the field.
The coulter is installed in the earring and secured with a bush and cotter pins in the second hole (counting from the bottom of the coulter). When mounting the coulter in this way the depth of the tiller on the power tiller will be about 20 cm. This depth is quite sufficient for good tillage of the ground for further planting of cultivated plants on the plot.
In order to change the working depth, the coulter can be attached to the coulter bar in the following way:
- To increase the tillage depth, lower the coulter down and attach it to the clevis through the upper holes.
- To reduce the depth of cultivation we lift up the coulter and fix it to the clevis through the holes below.
Tines and coulter are in place and the single axle tractor is ready to go. To check the quality of the tilling adjustment a test drive should be made on the property to make sure the single axle tractor operates without load during cultivation and the tilling depth meets our requirements.
Goosefoot
These models have appeared on the market relatively recently. With their help any virgin land can be processed, they are also effective in the cultivation of hard and difficult soil.
- Continuous design that ensures high working accuracy;
- The equipment is good at fighting weeds;
- Easy to operate, parts can be replaced at home.
Such models, unlike saber-shaped cutters, are made of carbon steel, which in terms of strength is slightly inferior.
Homemade tillers for power tillers
Manufacturers offer different versions of tillers for power tillers. You can use one set of cutters or buy two different types of devices, changing them depending on the soil processing conditions.
Some craftsmen prefer to use homemade products, which, if properly assembled, will be no worse than the factory ones.
The main advantage of making a self-made tiller is that it can be adjusted to the specific features of the plot.
Features of tiller blades
Cultivator tiller (tiller for tillage). device for soil treatment. On light cultivators they are installed instead of wheels. For heavy models of power tillers or minitractors they are made according to the type of attachment. Power tillers are used for breaking, loosening or leveling. Tillage attachments have proven themselves well in the development of virgin land. It can also be used to apply fertilizer and plow up green manure.
How to choose a tiller blade for your power tiller
First of all, the design features of the blades determine the depth and type of cultivated soil. For dense and stiff earth and celenium use thicker. If deep tillage is planned, long blades are used. Cutting tool has a curved shape for better grip. Direction of bend can be to the right or to the left.
There is an opinion that working in the countryside is a rather tedious activity, which takes a lot of effort and time
Cutting organ by the method of attachment to the cutter body can be dismountable or monolithic. The latter is an all-welded construction without the possibility of replacing damaged parts. The collapsible version is more practical. In such construction it is possible to change component that has gone out of order. In addition, having a set of interchangeable knives of different lengths, you can quickly make a tincture of the device to work the soil to different depths.
Material for making knives
In order to withstand hard work load, as well as to be resistant to abrasion, a milling blade is made of quality carbon steel. Such material tolerates heat treatment to increase strength and hardness. Hardening increases tool wear resistance by an order of magnitude. Some manufacturers make the cutting part by forging. Such part has a longer service life.
Exposure of steel to pressure during forging causes a nucleation effect in it. hardening of the surface layer of the metal. This makes the cutting edge harder, and such tools need less sharpening than forged tools.
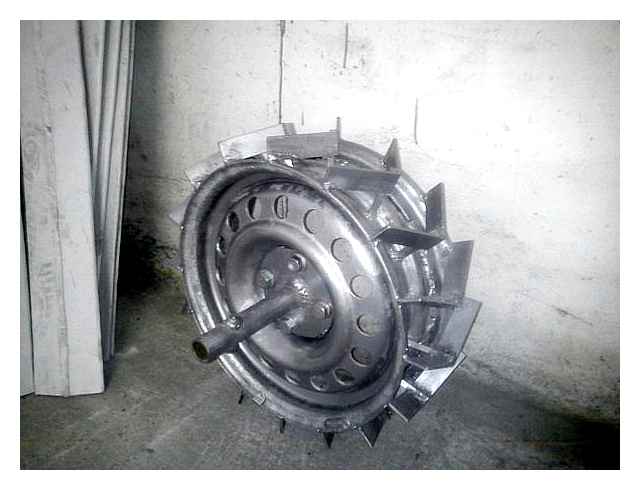
Homemade cutters for a power tiller
In order to create a tiller for a power tiller with your own hands, it is necessary to stock up on such tools and blanks:
- metal tube (with a diameter of no more than 42 mm);
- blanks for cutting elements of the mill (any unnecessary spare parts or pieces of metal will do. For example, you can use old car springs);
- welding;
- angle grinder.
The cutting elements are adjusted to the required dimensions and sharpened if necessary. Then they must be welded to the tube in the appropriate order.
Specialists recommend not making cutters with a diameter of more than 50 cm, as this will reduce the risk of its breakage during operation. Below is a detailed drawing for making a goose-foot type cutter:
When using the cutters, do not forget the safety precautions and rules of operation of the product. Before starting, the burrs must be above the ground and plunge slowly and smoothly into the soil.
Instructions on how to assemble the power tillers on a cultivator
Getting to work, it is more convenient to separate the left and right blades, prepare keys for tightening the threaded fasteners. A three-blade left-handed cutter bar will have two left-handed and one right-handed blades in each section, while the right-handed one will have two right-handed and one left-handed. Before attaching the cutting elements, make sure that the sharp edges face in the direction of the front of the power tiller.
Assembly of the first outer section
To assemble the left side cutter correctly, you should not deviate from the instructions:
- Position the shaft with the blade mounting plates vertically.
- Place the left blade against the flange parallel so that their edges and mounting holes overlap.
- Place the second left-hand blade at an angle on top.
- Screw in the bolt from the outer edge of both blades, but do not tighten.
- At an angle from above, place the right blade on the first two blades.
- Secure with bolts, tighten.
The illustration above shows the mounting of the cutting elements of one group. To correct the mistake, replace the upper blade with the left one.
Assembling the subsequent sections
The algorithm for assembling the components will be similar. The difference is the position of the first element on the next flange. The blade must not be mounted parallel to one of the blades of an already assembled group, but in such a way that it divides the angle (diagonal) between the already fixed blades.
Elements on the third flange must be installed with an offset relative to the group of blades of the second section, the fourth. with an offset relative to the third.
Nuances of assembling a 4-blade tiller
In order to correctly assemble the cutters on a cultivator with four cutting elements, the principle of diagonal displacement is also applied. Only the blades alternate sequentially, placing them perpendicular to each other on the flange. On one flange it is necessary to install one left blade, then one right blade, then the left blade again and finally the right blade. The video provides a detailed instruction on assembling and installing the attachment with 4 cutting blades.
Particular cases
Cutters on a power tiller with 2-3 sections usually have a solid shaft. But often there are models with collapsible or add-on sleeves mounted in sections. The diagonal principle of assembling the blades in all the above cases will be identical to the one described above. The process is complicated only by the need to perform additional actions. to assemble the whole cutter.
Assemble the structure by means of steel stoppers. They reliably secure all the elements of the attachment, preventing the loosening of connections under dynamic loads.
How to assemble a cutter on a single-axle Kentavr tractor?
Before starting the assembly, it is worth paying attention to the types of parts:
The first is considered standard, as it has an acceptable shape, and the blades are made of durable steel. The gooseneck cutter is a sturdy, unassembled and solid part.
In short, the instructions for assembling a tiller for the Kentavr motorblock is as follows:
- To begin with, you must take into account the important fact that the sharpened part of the tiller must cut into the ground during operation. It requires the right direction of rotation.
- At the very beginning of the assembly it is necessary to prepare a single-axle tractor.
- The machine itself should be leaned on a frame (the so-called coulter).
- Then tilt at an angle of forty-five degrees.
- Next, put wooden trestles under the handlebar of the power tiller.
- The final stage is the removal of the wheel.
For the assembled part to serve firmly and for a long time in the work, it is worth constructively calculating its functions. For the correct assembly of a tiller with their own hands for a power tiller, it is recommended to get acquainted with similar parts. Watching the introductory and informational videos on milling cutter assembly will also be effective.
After that, you can begin to create a drawing. Then, following it, assemble the necessary elements for the assembly. During assembly, it is important to proceed step by step. At the end, be sure to test the mechanism in action.
In general, everyone will be able to assemble their own tillers for a power tiller, which will further help in the productive cultivation of the land.
Which cutters are best
The sabre-type bits are suitable for any type of soil. For areas with stones and large roots, it is recommended to use attachments with high performance. In active tillers blades do not break because of high quality workmanship material. Cutting elements are characterized by maximum reliability, strength and durability. Cutters are installed on cultivators.
Goosefoot is characterized by high passability of the cutter on the virgin, untouched by agricultural machinery, as a result of which the soil is processed quickly and easily, the ground lump is thoroughly crushed, mixed at a depth of 30-40 cm. They are suitable for stony and hard-ground cultivation, for fighting weeds, and can be installed on both rotary tillers and power tillers.
The disadvantage of the tool is its lower durability. During operation the blades should be continuously inspected for damage and repaired. Goosefoot material does not have such high strength characteristics as alloyed or high-carbon steel, nevertheless lends itself well to welding processes. If the cutting elements break or crack, the product can be repaired at home with minimal expense. This quality is the main advantage when choosing a power tiller.
Such equipment as a tiller is essential for any power tiller, as it can be used to perform most of the work associated with tillage. A tiller generally comes with the machine, but if you need to change the width and depth of cultivation, you should buy the equipment separately.
Additional power tillers allow to increase a power tiller functionality and simplify its operation. Specialists recommend having several pairs of tillers in your arsenal.
Attachment overview
The popularity of power tillers in our country is due to the ability to connect a large number of attachments. Every owner should be familiar with the possibility of his machine, for this let’s look at the most common attachments.
Cutter
These attachments are factory-fitted and come loose with the power tiller. It can be used to mix the topsoil and increase fertility.
To assemble the cutters in the correct sequence, you need to use the diagram in the instruction manual, because incorrect assembly can immediately break off or fly off and cause health hazards.
When the tillers are installed, the single-axle tractor is actually turned into a cultivator.
This attachment is also used for mixing the topsoil before planting and after harvesting. There are two versions of ploughs: ordinary and rotary. They differ in the shape of the plowshares. The second variant is made in the form of a feather and breaks up large blocks of soil when plowing.
Mowers
For mowing grass and further preparation of hay for winter time mowers are used. Thanks to the PTO, Brait power tillers can work with rotary mowers. They work by using rotating blades that are spun around by centrifugal force and cut the vegetation.
Potato harvester and potato planter
Potatoes are considered to be a widespread crop, grown all over our country. But the work of planting, caring for and harvesting them is physically and time-consuming. This is made easier with the Brait tillers and potato planter.
For the care of potatoes, weed cutters are used, which are two metal discs that, when driving, throw soil from between the rows onto the bushes, thereby cutting the weeds.
Trailers and carts
Trailer equipment is used for transportation.
The trailers are equipped with an operator’s seat at the front, which allows you to control the tiller while sitting.
Trailing implements should be selected according to the object to be transported:
- The version with hinged sides is convenient when transporting loose goods;
- With high sides is used for voluminous objects;
- The extended version is used for transporting pipes or logs of trees.
Adapter
The main problem with working with a power tiller is that you have to move behind it while standing on your feet, which makes it impossible to operate for long periods of time. Therefore, the manufacturer offers special adapters with a seat. It is connected to the back of the Brait power harvester and makes it easy to control the machine.
Snow blower and spade
After the harvest work is over, many owners put the Brait single axle tractor into preservation until the next spring. However, they can also come in handy in the winter for snow removal.
Snow blowers are special attachments that pick up snow with the pulley and then throw it away at a distance of 5 meters with the help of the rotor.
The shovel blade looks like a curved sheet of metal set at an angle. While driving, it simply shovels a layer of snow to the side. The shovel blade is usually used by utility companies to clean roads.
Wheels and grousers
The manufacturer of Brait power tillers offers different width of tires that have high traction due to aggressive tread.
If a single-axle tractor still slips or skips over patches of ground, you can install traction shoes to improve stability. They dig into the ground while riding and give the tractor extra stability.
Weights and hitches
The official manufacturer offers a wide range of power tillers from light to heavy. If its weight is not sufficient, special weights can be added to increase it. They are made in the form of pancakes, which are hung on the wheel axle.
The Brait power tiller has a universal hitch that allows you to use attachments from other manufacturers: Kaskad and Neva.
Operating instructions
Every new Brait power tiller owner should begin by reading the owner’s manual. This shows how to start, operate and maintain the machine.
Instructions for the first start up
- Getting started correctly is the key to long term use. Assembly should be carried out strictly according to the recommendations in the owner’s manual.
- After this you need to fill up with oil and fuel as there are none in the factory.
- For the first eight hours the Brait single axle tractor should be used sparingly at one-third of its maximum power. This is to make sure that the oil goes all the way around the engine and lubricates it.
- Replace the engine oil when the running-in period is complete.
Service
In order to keep the Brait single axle tractor in working order, it is necessary to maintain it according to the recommendations in the instruction manual.
If the single axle tractor is petrol, then fuel of AI-92 or AI-95 grade should be filled. If the engine is a diesel engine, it needs to be changed. Always use clean, fresh fuel without sludge and foreign substances.
Engine oil change intervals depend on how often you use your Brait tractor.
If it was used with a minimum load, it is allowed to change it once per 50 hours of operation. If it was used for transporting heavy loads or plowing virgin land, it must be changed after 25 hours. It is recommended to use SAE 10W-40 as a new lubricant.
The transmission unit needs to be changed twice a year: in the spring and fall. Use Tap-15B or TAD-17 oil.
Correcting the main faults
Brait single axle tractors are quality equipment that can still malfunction over time: starting to leak little from the transmission unit, stalling during operation, or failing to develop maximum power. Therefore, every owner should know how to repair the most common malfunctions in the work of power tiller Brait:
If engine won’t start:
- Empty fuel tank (refill fuel);
- Old gasoline is being used (try draining the leftovers and refilling with fresh gasoline);
- Dirty or faulty spark plug (remove and visually inspect spark plug, check and adjust electrode gap if necessary);
- Low oil level in the crankcase (add engine oil).
If the engine jerks:
- Contact at the spark plugs is loose (secure the wire firmly);
- Water or dirt in the fuel tank (drain the fuel and clean the fuel system);
- Clogged fuel or air filter (remove and clean them);
- Dirt has entered the carburetor (disassemble it and clean all parts with gasoline).
If more serious damage occurs, it is better to contact the service center, the address of the nearest to you can be found on the forum or on the official website.
How to assemble properly the cutters on a single axle tractor?
The assembly of the cutter with their own hands should be carried out as correctly as possible. Here too, special care must be taken to keep the active part of the machine in contact with the ground during operation. For this purpose, it is initially recommended to study the drawings, and then already proceed to the manufacture of equipment. The following tools are required to create the cutters:
- The rotor shaft of the required length. It can be split in two if you want to assemble a milling machine of two units.
- Short axle.
- Gearbox with clamps.
- Left and right blades.
- Bolts, washers, nuts.
Assembling the construction does not take more than an hour, but here it is important to install the knives in such a way that they do not interfere with the rotation.
- Equip the long rotor axle with 30 degree blades.
- It is necessary to combine four knives on one block, fixing them to the gearboxes.
- Next, the correctness of the construction is checked and all fasteners are tightened.
The Brait single axle tractor is very robust and is designed to withstand considerable loads.
Installation of the cutters on the single axle tractor
To mount the tillers on a single-axle tractor, you should use special wooden trestles, which should be about 50 cm high. The machine should be supported on the coulter and tilted at a 45 degree angle. Then the wheels are removed and the burrs are put on. On the outer ends, special plates are installed on both sides, which make the machine run more smoothly and steadily.
All tillers are self-sharpening tools. There is no need to sharpen them, because it can only spoil the design. Only in some cases, if you have been using the tiller for a very long time and see that it has become bad at working the ground, you can sharpen the blades.
The tiller is an important element of every machine. Homemade properly assembled tillers can be used on any modern power tillers, in particular on Neva MB 1 and MB 2, MTZ and others. These designs will help with tillage and make farming tasks easier.