How to cut an angle evenly at 45 degrees
Trim on the door: The easiest way to cut it at a 45° angle even without experience
The architrave is an integral part of the door frame, which gives the aesthetics of the exterior. However, this element is very often scratched and wiped, and therefore requires replacement. And here the main task is to cut it at an angle of 45 °. Such work is quite simple if you have a plane at hand, but what to do if you do not have one, and you need to do it urgently? In today’s article we are going to talk about the easiest ways to make a 45° overcut, even without any experience, using improvised materials and tools. But to begin with. the simplest variant with a tool such as a plane.
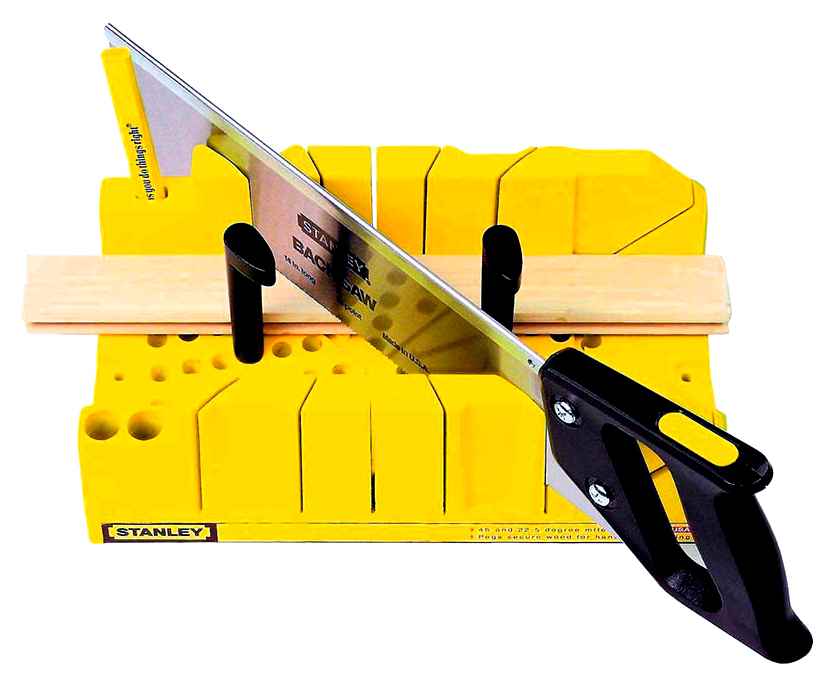
Such a device as a plier is very convenient to use, in addition, it is inexpensive. Therefore, if possible, it is better to buy it in advance, it will not take up much space in the pantry. Most often, the jig is sold together with a thin hacksaw, which is easier to cut the architraves. If it is absent, then you should not use an ordinary hacksaw for cutting. It is best suited for this purpose hacksaw for metal, a cut with its help will turn out more accurate.
What to do if no suitable tool is available
In this case you can use an ordinary protractor from school. Easily measure angles with it. However, you may not have a protractor handy either if there are no schoolchildren in the house. In this case, an ordinary tile will help, with the help of which a strip is drawn at right angles, and then it is divided in half. The cut is best made from the front side, working with a hacksaw across the entire plane.
You can also use an ordinary ruler for marking. the marks will be much more accurate than with tiles.
How to properly cut pipes of different metals at 45 degrees and 90 degrees
How to cut a pipe at a certain angle? About a straight cut has already been mentioned. Next, consider the methods of cutting tubular billets of various metals using a metalworker’s plane. In addition to the ease of cutting, the chisel minimizes the amount of sawdust, which is important if the work is done at home.
The Locksmith’s Jigsaw consists of two assemblies:
- Hand hacksaw, which has upper tubular guides that allow you to hold the tool strictly perpendicular to the direction of cutting;
- A channel-like body in which there are holes. slots on both sides to help the worker make precise angular cuts (usually 90° and 45°, but there are some jigsaws with an angle meter, which can make angular cuts in the range of angles from 100 to 1150).
A distinction is made between cast and stamped mash hacksaws. Although the former are cheaper, they do not work well under the conditions of periodic bending stresses.
It is important to choose the right hacksaw design. Only high-precision tools with upper guides that are additionally secured against bending by spring stops are suitable for making angular cuts.
Choice of size of a crosscutting jig is made according to the following parameters:
- Width of the jigsaw, which determines the maximum diameter of the workpiece.
- The length of the jigsaw, which increases the accuracy of the cut.
- availability of angle gauge.
- depth and width of through cuts in the side walls of the channel: the deeper they are, the less sensitive the tool is to cutting conditions. the state of lubrication, the increased temperature of the hacksaw blade and the workpiece. On the other hand, when sawing large diameter pipes the larger width of the kerf impairs the accuracy.
- Body material: steel (cast or stamped) jigsaws are clearly preferable to plastic ones, even though the latter are lighter.
How to cut a pipe at a 45 degree angle? When working with a locksmith’s plane, you must first file the material, and then, making sure the wall is perpendicular, gradually increase the pressure on the hacksaw blade.
How to cut a square profile pipe
You can saw a profile pipe in a similar way, but in this case it would be easier to use an angle grinder. The device is applied in turn to each side, for which the element to be cut will need to be rotated, and a marking is made. Then the pipe must be secured firmly and you can begin the work. Any appropriate tool can be used for sawing. If you have a lot of pipe to cut, it is advisable to make full templates from the scraps. In this case, measuring and marking work need only be done once.
When it is necessary to cut a pipe of large diameter, a number of special devices and tools can be used. This may be necessary if, for example, a pipeline needs to be repaired.
- angle grinder. The use of angle grinder is justified in terms of tool availability and comparative cheapness of the work. But do not count on high productivity in this case, in addition, to carry out such work is fraught with considerable risk.
- Roller machine. Such devices are also often called pipe cutters. In fact, such a device is the same angle grinder, but more adapted for this type of work. The machine includes a special base, where the element to be cut is mounted, and a cage with mounted cutting rollers, which perform the actual work. It is important to understand that each machine must be purchased for a specific purpose, that is, for the size of the pipe.
- Gas cutting. This option is most often used when working with large diameters. Cutting is done by the action of a high intensity flame and the scrap generated is blown away by the rush of the gas. The method can be considered the most practical and effective.
Cutting with gas is the fastest option here
SEE The gas cutter on AliExpress →
There are other options for carrying out the task, such as the use of plasma, waterjet or laser cutting, but they are practically not used in private use.
What kind of tool is needed
When installing a skirting board, it must be trimmed to size or in the corners.
To cut the corner of the ceiling plinth, as a rule, the following tools will help:
- Wood saw. Used for working with wood.
- Metal hacksaw. This tool is handy for cutting plastic, foam and plastic friezes. The result is a fairly clean, burr-free joint. It is convenient to use a compound saw when working with saws.
- A box cutter. It can be used to cut foam baguettes, without using special devices. The main thing is that the knife is well sharpened and has a thin and even blade. If you act carefully, the cut is smooth, without any dents.
When using the saw, it is important not to apply excessive force, otherwise the plinth will crumple. It is best to try it out on a scrap piece first. This will allow you to get beautiful pieces in the future.
Ways to get a nice corner
The most difficult area when decorating the ceiling surface frieze serve corners. If you simply cut the skirting at the right angle, you will be left with ugly gaps. To achieve a tight fit between two adjacent products, you must also trim their edges. There are several ways to do it.
In rooms with even corners and walls, it is usually not very difficult to cut a ceiling plinth with a wire cutter. The tool looks like a U-shaped trough with saw guides made at 90 and 45 degrees. By placing inside the device the element that requires cutting, inserting the saw into the guides. In the process of cutting the baguette must be held firmly in place, to avoid defects. It is quite difficult to cut a skirting board, because it is necessary to achieve simultaneous fit to two planes. If the width of the baguette is small, it is more convenient to press it to the near side. “How to cut ceiling baseboards. tools and cutting rules”.
How to cut the corner of the ceiling plinth, if the outer corner is designed:
- Before you cut the corners of the ceiling plinth with a wire cutter, a 45-degree angle sawing is made.
- The chair should be set in a comfortable position. This will make it possible to determine the exact location of the skirting board: in the first place this applies to the edge of the product, which will be adjacent to the ceiling. To avoid confusion, it is most convenient to place the right side of the bar on the right, and the left side. on the left.
- The surface is pressed to the bottom surface of the chair. In this case, the second part is lifted, being the closest. It should be so put on the wall of the chair, so as to avoid its wobbling during the work. In this positioning, the front side of the product is turned to the opposite side.
- Piercing must be done at an angle of 45 degrees from yourself. If you do it right, when you fold the two halves, you get a nice outside corner.
After the correct sawing of the ceiling plinth in the corners is completed, both pieces should first be attached to the ceiling “dry” to check the matching geometry of the corner. If necessary, corrections can be made by trimming with a knife. Small gaps are easier to cover with putty, which, after drying, should be treated with sandpaper. As for the inner corner, it is much easier to formalize it.
The procedure how to cut the ceiling plinth in the corners of the internal type is much like the above described. The first thing to do is to determine the side that will be adjacent to the ceiling. It is placed on the bottom of the chair. The back side is leaned against the near wall. After the sawing of the plinth on the ceiling is finished, the obtained fragments should be dryly attached to the corner, checking the quality of the junction. If necessary, adjustment is carried out. After that, the installation of one and the second skirting board on the mounting compound. Small gaps in the corner can be filled with a special putty.
Styrofoam
By and large, polystyrene foam is a type of plastic foam, which has an increased margin of safety. The cost of products from extruded polystyrene is slightly higher compared to the foam, but the reliability of such skirting boards is much higher. To break such a part is already problematic.
For the cutting of Styrofoam skirting boards any sharp tool, such as a construction knife or hacksaw is required. Due to the high strength, it is much easier to work with such products. they almost do not break or deform in the process of work. There will be less waste in the end.
Polyurethane
Polyurethane baseboards are the most expensive products. The high cost is due to a large number of advantages, including excellent resistance to moisture, high mechanical strength, reliability and elasticity. For most situations, this option will be optimal.
However, there are exceptions. polyurethane does not withstand temperature changes. If you place such skirting boards in the kitchen near the stove, over time, polyurethane will deform and crack. Cutting such trim is performed by a special knife, and there are no complications in the process.
How to cut a skirting board for an angle other than 90 degrees
Many rooms can “boast” corners that do not correspond to 90 degrees. Such situations occur as a result of shrinkage of the soil and the structure itself, as well as a violation of the technology of erecting walls.
In this case, the correct marking with a stool or drawing to do it will not work, all actions are performed directly on the spot:
- Before trimming the corner of the ceiling plinth, it is attached to one of the walls and make a stop end to the other wall.
- Along the skirting board, run a fishing line for a trimmer.
- Similar actions are performed on the other wall.
- At the intersection of the two lines make a mark on one of the skirting boards, which connect to the corner of the workpiece. On this line make an incision.
- Repeat on the other skirting board and try on both blanks. Make any necessary corrections.
- The baseboards are glued in place, the joint in this case should be quite tight.
Work with outer corners
As a rule, the rooms may be present and outside corners, which also need to be covered with skirting boards. The question of how to trim the baseboards on the corners of the ceiling in this case, you can solve the following ways:
- Using a power plier. Practically the same steps are performed as for internal angles. The only difference is that the glued side of the plinth is pressed to the surface of the device.
- On-site marking. Similarly, inside corners on the ceiling draw lines and use the same technique. At a rounded external corner joint, the place of the joint is finished with a knife.
How to make a 90-degree branch out of the pipe
The easiest option. find a guide to the manufacture and installation of piping. It has drawings for making with reference dimensions. To make it, you will need to make patterns from cardboard or a thick sheet of paper, outline them on the pipe, and then use an angle grinder or gas to cut out the parts and weld. Particular attention should be paid to the quality of welds, because it is much easier to underweld and check the product is not yet assembled, than later climb in the corners and look for leaks.
Pipes up to 100 mm in diameter bend on the pipe bender by heating, and do not usually need to make special fittings. Usually for manufacture of a corner of 90 degrees it is used 3-4 segments. If the diameter of the pipe will be 100-159 mm, 3 segments are enough. With a diameter of over 159 mm, 4 segments are used. Manufacture of 90 degree fittings on pipes with a diameter greater than 180 mm is possible with the use of 5 or more segments, so that the whirling flow was not as large.
How to Hold an Angle Grinder Properly
Many people have an angle grinder, but most people do not know. how to use it correctly and how to hold it. It leads not only to defects in work, but also to serious injuries. An angle grinder is a rather dangerous power tool. The wheel should be installed with the drawing upwards and clamped with a special nut.
A man with a right hand holding an angle grinder by the handle with his right hand. The circle must be on the left side of the machine and the guard must cover it from above. The rotation is such that sparks fly to the worker while cutting. If the angle grinder’s wheel jams and the angle grinder breaks free, it will not go toward the cutter, but in the opposite direction.
The left hand holds the machine by the handle, which is screwed into the threaded hole on the body. There are several of them for special use cases, but the correct position of the handle is only the top one.
This position of the machine requires the use of protective equipment. To protect your eyes and exposed face, it is necessary to wear safety glasses or, better yet, a face mask. To protect exposed body parts from sparks and small splinters while cutting, you must wear a suit of thick material.
5-degree pattern. 45 degree angle pattern
Often the home handyman needs to make an urgent measurement or marking at a certain angle, and there is no square or protractor at hand. In this case, a few simple rules will help him out.
If you urgently need to build a right angle, and you do not have a square, you can use any printout. The angle of a paper sheet is a very precise right angle ( 90 deg.). The cutting (punching) machines in printers are set up very precisely. Otherwise the initial roll of paper will begin to cut crookedly and tangentially. So you can be sure that this angle is exactly right.
And if there is not even a printed edition or it is necessary to build an angle on the ground, for example when marking a foundation or a sheet of plywood with uneven edges? In this case the rule of the golden (or Egyptian) triangle will help us.
A golden (or Egyptian, or Pythagorean) triangle is a triangle with sides that relate to each other as 5:4:3. According to Pythagoras’ theorem, in a right triangle, the square of the hypotenuse is equal to the sum of the squares of the cathetuses. Т.е. 5×5 = 4×4 3×3. 25=169 and it’s undeniable.
Therefore, to build a right angle, it is sufficient to draw a straight line for the trimmer on the workpiece with a length of 5 (10,15,20, etc.д. multiple of 5 cm). And then, from the edges of this line begin to measure off on one side 4 (8,12,16, etc.).e is a multiple of 4 cm), and on the other side 3 (6,9,12,15 etc.).д. multiple of 3 cm) distance. Should produce arcs with a radius of 4 and 3 cm. Where these arcs intersect each other is a right angle (90 degrees).
Such angles are usually used when making rectangular frames. A material from which the frame is made (baguette) is sawn at an angle of 45 degrees and joined. If you do not have a plane or protractor at hand, you can get a template angle of 45 degrees as follows. It is necessary to take a sheet of writing paper or any printed publication and bend it so that the line for the bending trimmer passed exactly through the corner, and the edges of the bent sheet coincide. The resulting angle and will be equal to 45 degrees.
House lamp made of wood with their own hands
An angle of 60 degrees is required to build equilateral triangles. For example, you need to saw these triangles for decorative work or accurately set a power swath. The 30-degree angle is rarely used in its pure form. However, from this angle (and from the 90 degree angle) construct an angle of 120 degrees. And this is the angle needed to construct equilateral hexagons, a figure very popular with carpenters.
To construct a very precise pattern of these angles at any time, memorize the constant (number) 173. They follow from the ratio of sines and cosines of these angles.
Take a sheet of paper from any printed publication. Its angle is exactly 90 degrees. From the angle on one side, measure 100 mm (10 cm).) and on the other, 173 mm (17.3 cm). Connect these points. So we have a pattern with one angle of 90 degrees, one angle of 30 degrees and one angle of 60 degrees. You can check on protractor. everything is exact!
Remember this number. 173, and you can always build angles of 30 and 60 degrees.
When marking up workpieces or drawings on parts, besides the corners themselves, their proportions are very important. This is especially important when making rectangular parts or for example when marking foundations, cutting large sheets of material. Incorrect construction or marking brings a lot of unnecessary work later or to the appearance of a large amount of waste.
Unfortunately, even very precise marking tools, even professional ones, always have a certain error.
There is, however, a very simple method for determining whether a pattern is rectangular or not. In a rectangle, the diagonals are exactly equal! So, after the construction it is necessary to measure the lengths of the diagonals of a rectangle. If they are equal, it’s okay, it’s really a rectangle. And if not, you have built a parallelogram or rhombus. In this case, it is necessary to “play” a little with the adjacent sides, which would achieve the exact (for this case) equality of the diagonals of the marked rectangle.
Forty-five degree beveling. How to saw at a 45-degree angle
During home repair work may need to saw materials at an angle of 45 degrees. Usually it is done to connect the two parts “in the whisker”, that is, the corner of 90 degrees (frames, baseboards, door trims, etc.). To make you happy with the result of the work, it is important to fit the adjacent parts of the workpieces absolutely precisely. To do it without a special device. a crosscutters. is extremely difficult, especially for the novice craftsman.
Prepare an angled jig to help you make an accurate 45-degree angle cut of the wood without any problems. This device is an inverted “U” shaped profile with slots on the sides for the hacksaw. These are usually at 45, 60, and 90 degree angles. The more complex saws are additionally equipped with arbitrary fixed slots, or have a swivel design. it allows you to set the saw to the optimum position.
Buy a ready-made carpentry tool from a hardware store with a wooden, metal, or plastic tray. For the beginner craftsman this is the best option. If you want, you can make a simple joiner with your own hands from three sawn boards or plywood strips (thickness. about 1,5-2 cm).
Drill a few holes in the walls of the future chair, apply joinery glue to the ends and assemble the box (tray) of the chair. Fasten the angle jig with screws. The walls of the tool should lie strictly parallel one to the other; the bottom and each sidewall make clear perpendiculars.
Mark an angle of 45 degrees with a pencil, add additional groove lines if necessary. Use a protractor to make sure you are not making a mistake in your calculations.
The most responsible thing is the slots. It is recommended to perform them with the same hacksaw that will later be used for sawing in the finished jigsaw. Start sawing without strong pressure on the working tool, hold the blade. Saw one side first, then the opposite side.
Proceed with the processing of the lumber. Fasten the jigsaw to the workbench or work table with a screw clamp (clamps for fixing parts) or screws. Then make a mark for the future sawing on the lath (plank, baseboard) and put the workpiece into the box. Press it firmly against one of the sides of the template, aligning the marks with the 45 degree corner cut.
Insert the hacksaw into the slots of the jigsaw and saw the workpiece. The work of the saw will be limited to fixed kerfs, and you will make an even and precise cut.
When sawing the baseboards, make sure that the corners of the room are really right. If the walls are very uneven, the angle of the kerf on the workpieces should be corrected. Measure the joints of the interior walls with an angle meter and divide the result in half (baseboard joint “in the whisker”). To make an accurate cut, it is recommended to make grooves with a given angle in a homemade jigsaw. Another variant is a store swivel tool, which allows you to change the angle from 0 to 180 degrees in steps of about 15 degrees.
Ways of fixing the trimmed trim to the door frame
Fastening of architraves to the door-frame can also be various. The simplest method is fixing of telescopic architraves. The main thing here is to correctly cut the elements to size, and then simply insert the tongue of the trim into the groove of the frame. Additional fixing is usually not necessary.
Other types of architraves can be fixed with finishing nails. They have practically no flat, and therefore they will not be visible at all. The next option. self-tapping screws. There is also a nuance here. you need to think about how to hide them. Otherwise the nails spoil the appearance.
The fixing with liquid nails is worth mentioning as a separate variant. But despite the simplicity of such fixation it has its disadvantage: if you need to replace the trims you may face a problem with disassembly, while the previous options allow you to easily remove the elements.
The final part
The installation of the platbands can not be called too easy, especially if the domestic master has no experience in this field. However, with the proper diligence and accuracy, anything is possible. If a master at home doubts his abilities, it is better to ask for help from the specialists. After all, by sawing off an extra half centimeter, you can completely spoil the leaf of the planking. That said, it’s not certain that the right color will be found in the store. If the master decided to do all the work himself, then the best option would be first to practice on unnecessary boards.
We hope that the information provided today will be useful for new masters at home. The editorial staff of our online magazine will be happy to answer your questions, if any arise in the process of reading. All you need to do is write them in the Комментарии и мнения владельцев below. There you can also share your method of sawing the platband at the right angle. If you liked the article, do not forget to rate it. your opinion is very important for us. And finally, as usual we offer you a short video, which will help you to better understand today’s topic. Take care of yourself and your loved ones and be healthy!