Bosch psb 500 re chuck change
Bosch PSB 450 RE instruction manual online. page 6
Bosch PSB 450 RE manual for the impact drill contains pages in Russian.
File size: 740.83 kB. This consists of 7 pages.
You can download a pdf file of this manual: Download PDF
With the on/off button. on / off
One of two speed stages can be selected. Pressing the on/off button after overcoming a noticeable resistance causes the device to change from the first to the second speed step.RPM step I:
On/Off Button. The switch-off button can be secured with a latching button
Infinitely variable speed control
Pressing the on/off button. Switching off
low force actuation produces low speed and enables smooth, controlled start-up.Turning speed increases with increasing pressure.
Preset RPM
set the desired speed (this is also possible when the tool is switched on).The number of revolutions required depends on the material and is selected on the basis of the results of the practical experiment.After a long run at a low RPM to cool down, let the appliance run at maximum idle speed for about three minutes.
(PSB 450 RE/500 RE/13 RE / 2000- Figure C/D)
The direction of rotation of the machine is reversed with the direction of rotation switch
(With the trigger depressed. switched off
Move the direction switch to the left as far as it will go (drilling, percussion drilling, screwdriving/screwdriving, etc.). д.).
Move the direction switch to the right as far as it will go (loosening or unscrewing screws/screws and nuts).
Switch the direction of rotation only when the tool is at a complete standstill.
be switched while the tool is running. Use carbide drills when drilling in concrete, stone and masonry. Optimum drilling conditions are achieved with carbide drills with hexagonal shank (accessories).
The first thing to do is to have the drill chuck replaced by a Bosch authorized service center for the repair of Bosch power tools.
Clamp the short shank of the Allen wrench in the drill chuck.
Loosen the drill chuck (Figure G)
Place the machine on a firm support (e.g. on a workbench). Lock the drill chuck with the locking button
the machine in this position, unscrew the drill chuck by turning it to the left as the screw is unscrewed (
Disengage the drill chuck by hitting the long shank of the internal hexagon key
Tightening the drill chuck (figure H)
Reassemble the drill chuck in reverse order (
Tighten the drill chuck with a torque of approx. 30. 35 Nm.
Only after the tile has been completely drilled, set the switch to the “hammer” symbol and continue with percussive drilling.
For metal drilling use only serviceable, sharpened HSS drill bits (HSS = high speed steel). Proper quality is guaranteed by Bosch accessories.
With the drill sharpening device (accessories) you can easily sharpen twist drill bits with diameters from 3.5 to 10 mm.
Did not find the spare part? Send us an inquiry and we will find it for you:
Could not find the spare part? Send us a request and we will find it for you:
Couldn’t find the spare? Send us an inquiry and we’ll find it for you:
Bosch PSB 500 RE instruction manual
The dust ring can wear out quickly
If damaged, replace this ring.
Installing the dust extraction device (see incremental screwdriver 11 anti-clockwise, see incremental screwdriver 11 anticlockwise). Figure. A) Bring the suction unit 12 from the front to the lower
side of the impact drill. Check for tight fit
suction device 12 to the body and securing it.Cleaning the dust extraction device
(refer to. Figure. (B-D) The dust container 13 has enough space for approx. for 10 holes with
10mm in diameter.If the suction efficiency drops or if the indicator
14 will show that it is completely full, you should
Распаковка Bosch PSB 500 RE
Empty the dust container 13. To do this, press the
knurled surface of release button 16 and
Remove the dust container 13.Empty and clean the dust container 13. Clean
check the dust filter 17 by tapping on it.Check the filter element 17 for damage and
Replace it if necessary.Press on filter fixture 17 and remove
filter element. Change the filter element 17 together with the
attachment. When installing the attachment, make sure that,
To remember to put the gasket 18.
Put dust container 13 back in place and press to
The button
release 16.Removing the dust extraction device (see “Removing the dust extraction device”). Figure. E)To remove the suction device 12, press the
release 20 and pull the suction unit 12
front.Storage of the suction unit (see “Storage of the suction unit” on page 54). fig. F) To hide the suction device in the case, remove it from the panel
Remove the suction device 12, fold it and put on the bracket 21.Fit the lock 22 or empty the dust container
13, before removing the suction unit.
Use the power tool only with
Before performing any work, be sure to,
that the thumbscrew 11 is tightened firmly. Outlet
tool out of control can have its
The auxiliary handle 10 can be rotated to any
position in order to be able to safely and safely sharpen the twist drill bits
no fatigue on the tool.Turn the thumbscrew to set
additional knob 11 counterclockwise and
Turn the knob 10 to the desired position. Then firmly
tighten the thumbscrew 11 in the clockwise direction
arrows.Setting the drilling depth (see “Adjusting the drilling depth”). Figure. G)With the depth limiter 1 can be set
the desired drilling depth X.Press the depth stop setting button 5 and
Insert the depth stop into the additional handle 10.The groove on the depth stop 1 must be
facing upwards.Pull out the depth stop so that the distance from
the tip of the drill bit up to the end of the depth stop
corresponds to the desired drilling depth X.
Change the working tool (cf. figure. Н)
Quick-action keyless chuckGrip the rear sleeve 3 of the quick-action keyless chuck firmly
4 of the chuck by hand and turn the front sleeve 2 to
direction n so that it is possible to insert
work tool. Insert the tool.Hold the rear sleeve 3 of the quick-change chuck firmly

of the chuck 4 and firmly rotate the front sleeve 2 by hand
in the direction of the o.Screwing toolsWhen using bit bits 24 always use
universal holder 23. Use bit only-
The nozzles that fit the screw head.Install the switch to screw it in
How to replace a drill chuck?
During the operation of the drill occasionally jams or fails the chuck. Because of this it has to be disassembled, repaired or replaced with a new one. In this article we will discuss how to change the chuck on the drill.
Types of chucks
All drill chucks are interchangeable, so you can always replace one type with another. (it is only important that the threads in the bushing match). First you need to decide on the type of chucks:
- wrench (universal). This type cartridge consists of cams (petals) with a thread in the base, which are seated in an adjusting sleeve. It has a toothed jaw (round slot) where the wrench is inserted and the cams are tightened/released. Accordingly, the tool is clamped or released, depending on the direction of rotation of the wrench.
- quick disconnect. The socket of the quick-action chuck has no keyhole, but is adjusted by running in the thread of the petals. Turning it counterclockwise moves the jaws apart and clockwise brings them together. Adjustment is done manually, without additional tools.
Tools needed to change the screwdriver cartridge
The following tools are used to replace the chuck on the drill:
- Slotted screwdriver and Phillips screwdriver;
- lithol;
- Anti-rust agent like WD-40;
- vice;
- Pliers or hexagon socket;
- wrench (for keyhole chuck).
Chuck replacement
The procedure for replacing a universal type chuck is as follows:
- First, use a wrench to open the cams to create a hole into which a Phillips head screwdriver can fit. Then use a screwdriver to unscrew the fixing bolt. Note that the bolt has a left-hand thread, so unscrew it in a clockwise direction. If the bolt is corroded and does not come off, you must add a little WD-40 inside and wait 2-3 minutes. After that, the bolt should be easy to unscrew.

- The next step is to remove the chuck. To do this, place the drill on the edge of the table so that the cartridge hangs all the way out. Then unscrew the body of the drill and remove the cover. With one hand we press the pinion and the cooling carriage, and with the other we put the wrench into the gear engagement, and with a sharp downward movement “tear off” the fastening of the element. Then it can be easily unscrewed by hand in a counterclockwise direction.
- Before installing a new part, it is necessary to lubricate the shaft with lithol. Notice the thread pitch on the new chuck must be the same as on the old one. Otherwise it will not tighten on the shaft. Screw the new part out so that the blades come apart completely. After that, hand-tighten the cartridge onto the shaft that has already been lubricated with lithol. Replace the plastic body of the drill and tighten all the screws with a screwdriver or an electric screwdriver.
- The final step is to install the fastening screw. It should be lubricated with lithol, so that the next time it unscrews more easily. Screw in the bolt counterclockwise, but do not tighten it as far as it will go. Then we check the performance of the device by installing the drill, and start the drill in operation.
Changing the quick-action chuck
By design, a quick-action chuck is almost identical to the key chuck, the only difference is the absence of a key hole. How to remove the chuck from the drill, if it has a rapid-clamping design? The following sequential steps will help in this:
Particulars of fastening the bits
There are two main options for fixing chucks for a drill, an electric screwdriver. This is the threaded connection and installation on the cone. In the first case, there are metric or inch threads inside the clamping mechanism and on the shaft. A special screw with a left-hand thread is mounted on the axle to hold it firmly and prevent it from spontaneous unscrewing.
The latter uses a tapered shaft, also known as Morse taper. It has a characteristic shape, the same as the inner channel of the nozzle. Locking is performed by tight fit of one part into another. This variant is more often found in the clamping mechanisms of screwdrivers.
For ease of use, many manufacturers resort to special designation of the tool’s characteristics. The chuck mounting scheme can be identified by the marking. When you start with the drill and study the manual, you should pay attention to the type of the chuck and how it is connected. The following designations are found on modern equipment:
- Metric external thread. M, internal. MJ. The number after the letter, for example M9, indicates the connection diameter. It also determines the maximum size of the drill chuck, the minimum value of the shank.
- The presence of a UNF marker indicates the use of the inch system, which is typical of many foreign manufacturers. Therefore, you should carefully check the fitment of the new part before starting repair work.
- The tapered connection is marked with KM (Morse taper). The digits 0 to 7 following the letters indicate the chuck size.

Usually during the operation the wear and tear of the clamping mechanism itself, the seating. Then the drill can not be fixed firmly. When the equipment is working, it starts to wobble, it starts to throb. Chuck has to be changed in order to fix the problem.
Maintenance of the Bosch PSB 650RE Impact Drill
I decided to write a few articles on the simple disassembly of power tools and basic maintenance. I should warn you right away, I disassemble the tool without warranty or with warranty already expired, though frankly speaking I haven’t been addressed to warranty service yet. Let’s start this series of openings with a simple “green” impact drill BOSCH PSB 650RE. The drill is old, bought in Germany in 2007. The drill is made in Hungary. At one time decided that this drill is a full-fledged peorator, so the impact function at this time is almost absent, in the dissection will see why. But the overall impression of the drill is very positive, chuck runout are present, but they are very minimal, the chuck ROHM is very decent, jaws clamp perfectly and hold well. There were some problems with the reverse switch, but were cured by simple lubrication of the rubbing parts, otherwise no claims to this model. Currently, this drill is used as a regular drill, there is a peorator at home, so I no longer use it as a peorator 😉
So, let’s start the dissection. First let’s disconnect the additional handle and unscrew 7 screws, we will need a screwdriver with a “star” (torx T20), it is also possible to unscrew slotted screwdriver (places of screws are marked with red).
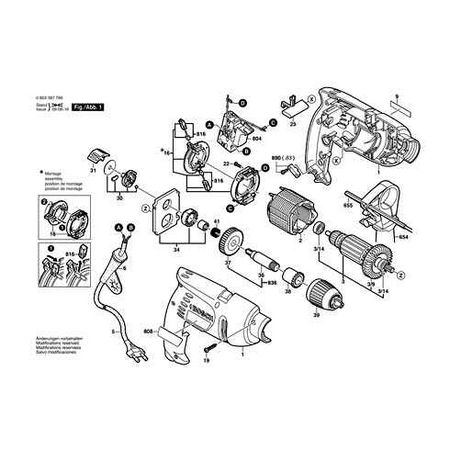
In order to undock a panel, it is necessary to pick up something thin and pass along the panel perimeter. After opening we discover the following picture. The electronic part (trigger) is connected to the motor with the quick-release terminals. Carefully disconnect them (you can not remember which wire is fastened to what, they have different length and connect the other way will not work). We pull out the motor and the mechanical part of the drill, having previously removed the reversing lever and the metal plate under the gearbox (marked green in the photo). Having examined the brushes, I decided not to take them out, they have a decent condition and they do not require replacement, so we carefully take out the stator unit and the switch of rotation (reverse) from the rotor axis. Brushes in this drill are changed by depressing the “tendrils” of the brush holder. ) Carefully unclamp the brush and spring and put the new ones in. The reversing unit from the stator as it is disconnected elementary, the unit turns clockwise by about 90 degrees and disconnects. After removing the reversing unit, let’s check the condition of the contact plates. In my case they are in good condition, no molten spots and development.
Let’s move on to the mechanics. Disconnect the rotor with the impeller from the gearbox by simply pulling it carefully out of the gearbox. Next we need to remove the plastic cover of the gearbox, by gently squeezing the two tabs and pulling the cover up. I must say the chuck was not taken off so I spent the further overhaul and cleaning in disassembled condition. The splines on the pinion which made the chuck were worn out, but since I was not going to recreate a good chuck, it was not recreated. If you want it can be replaced with a new one and the shock function will appear again. The grease was black or missing, but all bearings (needle) were in good condition and strangely enough German. Cleaned out all old grease and put new one in. Only found mineral-based, cast-based grease for friction units in gearboxes in my area. Ideally, it is better to lay the proprietary, which can be purchased at service centers BOSH, as an excuse I can say that I tried but decided to use what is available. The grease needs to be applied carefully, do not force it to the point where it comes out of all the cracks.
Carefully clean both panels from dust and other things, also carefully clean all other parts and then reassemble. Reassembly is done in the reverse order and won’t cause any difficulties. You might have some troubles with the locking system of the shaft and switching of the modes.
When closing the top panel, pay attention to the gaps and the absence of “bitten” wires. Fasten the screws, check everything rotates and there is no rattle. Switch it on and check it again. I think this scheme is suitable for most impact drills and with minor differences it can be used in other drills.
Thank you all! Let your tool serve you for a long time and bring only positive emotions! I would be glad if someone needed or found my review useful and will try to write a couple more in the near future.
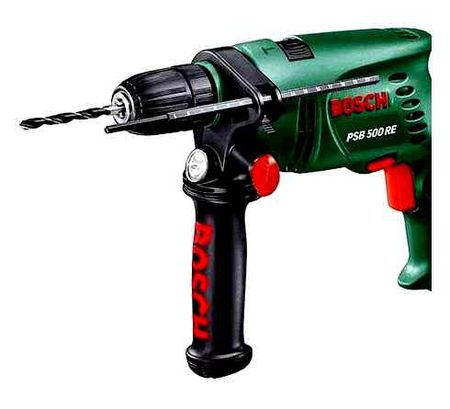
Bosch PSB 500 RE impact drill
Register online and get special from your first purchase!
This product is delivered prepaid.
| Gross weight | 2.64 kg |
| Net weight | 1.66 kg |
| Integrated dust extraction system | no |
| Two or more mechanical speeds | no |
| Max. drilling diameter (wood) | 20 mm |
| Max. drilling diameter (metal) | 10 mm |
| Max. torque | 7.5 Nm |
| Work area illumination | no |
| Speeds | 1 |
| Country of Origin | Hungary |
| Spindle with hexagonal bit recess | no |
| Electronic speed adjustment | yes |
| Chuck diameter | 13 mm |
| Maintaining constant RPM | no |
| Max. revolutions | 3000 rpm |
| Professional | no |
| Revolutions (rpm) | 0-3000 |
| Max. Drilling diameter (concrete/stone) | 13 mm |
| Number of Blows | 48,000 rpm |
| Type of chuck | BZP |
| Cable length | 2.5 м |
| STIHL reverser | yes |
| Packed in | case |
| Manufacturer’s product codes | 0603127020 |
| Power (W) | 500W |
| Instructions |