Drilling Large Holes in Thin Metal
The tricks of drilling with thin drills
Drills are special tools thanks to which one can quickly make holes in materials. They are held in place by the chuck on the drill or electric screwdriver. For the manufacture of such special tools, hard steel grades are used. Thanks to this they can be actively used during work with such materials as metal, stone, concrete, brick, wood.
Almost every person in the workshop has a set of drills (usually for working with metal). However, in some cases, the user can operate with exceptionally fine drills for a variety of jobs. For example, if you need to make a large hole in a sheet of metal, and there are no tools of large diameter available. There are a wide variety of tricks, the use of which will allow more effective use of thin drills during a variety of work.
How to drill in the right place?
If you think a little over the question, the answer should visit your head, even without prompting. At least it seems that way to me. But if you don’t want to think, read.
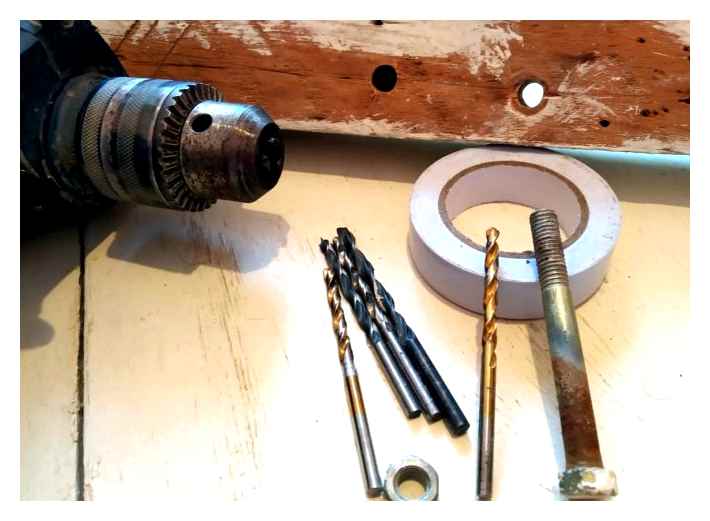
This case will require a core. This is a solid steel tool that has a cylindrical shape and a point on the end.
You put the tip to the desired spot for drilling, and hit the tipping point on the other side with a hammer a few times.
Now, when you are bored, you put a drill bit to the roughness on the surface and start drilling. the tip will not run anywhere.
Drilling springs
In order to drill a leaf spring it is necessary to use a variety of equipment and tools:
Electric drills are the special tools most often used for various repair jobs. Drills are powered by a 220 V mains supply or a battery pack. As a power element in drills are used electric motors with power of 500. 1200 watts, and to change the speed are used shaft speed switches and speed regulator.
When the need arises to drill a hole in the springs of the machine in the conditions of the workshop for operations, different types of machines can be used:
The most commonly used machines for drilling operations are vertical drills, which provide the necessary machining speed and accuracy.
The leaf springs are made from high-strength metal and require a special technique and the use of very strong drills.
The process of drilling a leaf spring at home is divided into several operations:
- Using a marker pen, you mark the spot on the sheet where you are going to drill, and using the core cutter you make a notch.
- To make a hole in the spring it is necessary to use 3 drills with different diameters, for example, for a hole of 10 mm you need to use drills with diameters. 3, 6, 10 mm, which greatly simplifies the labor intensity of the operation and reduces the possibility of overheating. During drilling, it is necessary to periodically lubricate the drill bit and the place on the metal where the treatment is made with machine oil, which reduces the load and simultaneously cools the contacting working surfaces.
When using an electric drill, it is necessary to choose a model with a power of 1-1.2 kW and equipped with a chuck rotation speed regulator. The recommended revolutions needed to drill the sheet are between 500 and 1000 rpm. In order to drill a sheet you can also use a screwdriver with a slow speed of the working shaft. It is also necessary to apply moderate pressure on the drill when drilling. During operation, blunt drill bits must be resharpened in good time to reduce heat and speed up drilling. To facilitate the sharpening of drills, it is better to use a special device with the obligatory observance of symmetry of the central part of the drill. Alignment faults cause the hole to be larger than necessary. The edges must always be of the same size. Sharpening angle of 120°, suitable for most materials.
- Before drilling into the plate it is absolutely necessary to clamp it firmly, depending on the equipment used, using a vice, clamps or special clamps.
To reduce the load on equipment and tools, the drilling method can also be used when the leaf spring is preheated. To do this, the exact marking with a marking pen on the leaf spring where the drilling will be done and a notch is made with a core, then the leaf spring is heated up to the red with a gas burner and the hole of the desired diameter is drilled. To restore the characteristics, the sheet is heated to red hot again on a torch and cooled in a bath of oil (hardened).
How to drill hardened steel at home. The Metal Worker’s Manual
The need for steel hardening can occur at any time. There are many different tools on the market that may not have been hardened during production or, on the contrary, overheated during heat treatment. You can think of drill bits that are well known, for example. If the steel is not hardened to normal, it will bend. If the steel is too hardened, the drill bit is likely to crumble.
How to drill with a step drill bit?
Step drills are versatile. just one can make holes of different diameters (from 2 to 40 mm). They are most effective when working with thin metal, when you want to get a neat edge. Better fixed in a chuck, they are easier to sharpen, and therefore, if used properly, serve longer, but also cost more than usual. In working with them, the principles are the same, but it is easier to drill large diameter holes than with conventional twist drills.
Metal drill bits work by cutting, but with a pobedite bit they crush materials. Bricks, concrete, stone are better suited for that. Therefore, as mentioned above, you can of course drill metal with a concrete drill bit, but it will quickly become unusable and the pobedite bit will collapse.
Revolutions
The larger the hole diameter? The lower the rpm should be. The deeper the drill is? the more you gradually reduce the pressure on the drill. With a drill diameter up to 5mm, the torque should not be higher than 1200-1500 rpm. Accordingly, 10 mm in diameter. no more than 700 rpm, 15 mm. 400 rpm.
As a rule, most household drills have power from 500 to 800W, which allows drilling holes up to 10-12 mm in diameter. It is possible to make holes up to 40 mm in metal of thickness up to 2 mm with step drill bits. For a thickness of 3 mm, it is better to use bimetallic drill bits.
Bimetal bits are proven for stainless and carbon steel, non-ferrous metals. They also work well with laminated materials such as wood, particle board, plywood, plastic, plexiglass, slate.
When drilling deep holes with any tool, sometimes a magnet may be needed to remove chips.
Particular attention should be paid to safety, be sure to protect your eyes from chips, and if it goes warping and jamming. immediately turn off the drill and set the torque to reverse.
In the absence of electricity or when the noise of the working tool can disturb others (read: when you can do repairs not to quarrel with the neighbors?)-the ideal solution for drilling metal will be a manual mechanical drill, the so-called hammer drill. Low RPM and pressure, no overheating, just what you need. Of course, there are also disadvantages. time-consuming and fatigue-prone. With such unpretentious “ancient” method you can drill holes up to 10 mm in diameter.
The peculiarity of deep holes
To drill deep holes in the metal, it is best to use a lathe. It is essential to perform cooling during this process. In doing so, the chips must be forcibly removed. The tool is periodically withdrawn from the workpiece to remove swarf.
When working without specialized devices it is not necessary to push in the nozzle more than 2/3 of its length. Water should be used for cooling in the process of work. If the work is done in several passes, it is not allowed to change the angle.
Special feature of large-diameter holes
This procedure is more complex than deep hole drilling. Cutting work is carried out using either a drill bit or a tapered drill bit. Metal crowns are similar to concrete and drywall products. The only difference is in the material used to create the cutting edge.
Drilling can also be carried out with standard products in several stages. A small-diameter bit is used first. A larger tool is then selected.
The most convenient way is to use cone drills. These tools allow you to drill a large hole in one sitting. To do this, the tool is simply pressed into the material.
An easy way to drill a square hole in metal
Any hole if made with a drill, is round and to make it square it is necessary to work well with a filing tool. Consider how you can drill a square hole in the metal with minimal use file on the example of the manufacture of a convenient and reliable little bit for a tap.
To make a screw driver with a square tap hole that has a 10 mm side, you need: 1. Metal rectangular bar blanks 13mm thick. 2. Electric drill. 3. Puncher. 4. Center drill. 5. Metal drill bits 4mm and 9mm in diameter. 6. Any coolant. 7. A small triangular file.
Fabrication of a drill bit is as follows: 1. Make a square with a side of 6 mm from paper, mark the center of it and glue it to the workpiece where the hole is drilled.
Put the workpiece on a suitable anvil and mark the tops and center of the glued square on it with a core.
When the paper is removed from the surface of the workpiece, it leaves five punched marks.
Clamps are used to fix the workpiece on the workbench surface, with a wooden plank put under it.
Using the center drill all five holes marked on the workpiece are drilled.
Finally drill four holes in the tops of the square with a drill bit having a diameter of 4 mm,
Remembering to cool them with a small amount of coolant from time to time.
Having reduced the frequency of rotation of the drill, with a drill 9mm diameter drill finally drill the last, fifth hole, located in the center of the square, again remembering to cool it from time to time.
Disassemble the construction of the clamps. The result is a billet screwdriver with a drilled square hole.
However, the edges of the hole are uneven and the tail part of the tap in it does not “sit”.
To make the tap’s shank fit into the hole completely, its edges are additionally machined with a file. It is more convenient to do it, of course, having clamped the workpiece in a vice, and the whole work takes no more than 15-20 minutes.
After treatment with the file the square hole in the workpiece becomes even, accurate, and the tail part of the tap goes into it completely.
This method of drilling a square hole in a metal workpiece reduces the labor required to process its edges to a minimum. And the resulting screwdriver will hold the tap’s shank securely and tightly when used. If stored carefully, it can be used by generations of craftsmen. Explanatory video on drilling a square hole in a metal workpiece. Source
How to drill with a drill bit?
Drilling metal with a drill involves following some recommendations:
- You will need an electric drill, core, hammer, machine oil and safety glasses to make the hole.
- Initially make a marking.
- Wear safety glasses.
- If there is little pressure on the drill, select the low rpm position and start working.
- Don’t forget to water the machining area with the tool with coolant.
If you follow the technology and use quality tools, you can make holes of different diameters and depths. To drill even holes or choose the exact depth, you can use a device called a “depth stop”. It is attached to the electric drill and adjusted to the desired depth.
Drilling metal with a drill
How to drill with an electric screwdriver?
Metal workpieces can be drilled not only with industrial equipment or an electric drill, but also using a cordless electric screwdriver. This power tool has a low power requirement. This makes it ideal for drilling holes of small diameters and depths.
Drilling is performed with industrial equipment and power tools. It is important to choose the right tool and consider the depth, diameter of the hole. Use coolant to keep the power tool in good working condition. Drill perpendicularly to avoid damage to the workpiece, tools.
Making a hole in metal without a drill
We apply a nail polish remover to the absorbent cotton and degrease the surface of our workpiece.
Apply varnish to the desired area. The lacquer must be applied thickly on both sides. Do not forget to thoroughly blot the ends. Let the workpiece for 10-15 minutes to dry the lacquer.
On the dried surface with a marker on both sides of the workpiece mark a place for the hole. The place I choose arbitrarily, now we need to show how to make a hole with this method. For example, you want to put a normal factory rivet. The diameter of the hole should be slightly smaller than the rivet’s size.
Then remove the varnish inside the contour of the hole with a knife. Make it on both sides.
I pour water into a bowl and add 3 tablespoons of salt. The height of the water in the container should be 10 mm less than the height of the section of the workpiece covered with varnish.
I take a device made from a hair clipper charger and two nails. The nails will act as electrodes. I connected them to a single contact. The other is just a stripped bare wire. I use a 12 volt charger, but a regular cell phone charger will do the job.
Stripped wire should be a plus, and electrodes. a minus. The plus wire with the clothespin attached to our workpiece. Then dipping the nails in the water.
It is possible to make slots in the vessel to fix the position of the nails. Plugging the charger into the socket. After turning on, the water around the nail electrodes begins to bubble, and the cleaned mark under the hole becomes black.
Note: To check the polarity of the wires, you must connect the charger. If the water starts bubbling around the nails, then it is minus and you have connected correctly. If there are bubbles in the water around the workpiece, it means that the minus is connected to it, and we need to switch the wire. The minus should always be connected to the electrodes, and the plus. to the workpiece to be pickled! Let the vessel for an hour, after 30 minutes after the start of the process it is necessary to change the water. Disconnecting the charger and pulling out the workpiece.
In the marked place there is a through hole. To make the diameter of the hole larger, the process can be continued. Or file away any rough edges with an emery board. This is how you can make the desired hole in a workpiece by etching high-speed steel with the most common tools.
Metal core drills (core bits). Is it worth it to buy them at Ali?
There are three ways to drill (drill, not make) a big hole in sheet metal. I don’t know any more, anyway. With a large-diameter drill bit, stepped or tapered drill bit, and a core drill bit. This is the drill bit we will talk about in this little review. Let’s look at the crown bit I bought about 12 years ago, and almost the same one I ordered on Ali about a year ago. And drill, of course. Anything written below may contain inaccuracies. The author is a “crooked handyman” and an amateur. I may be mistaken about something. Thank you for understanding.
Crown. aka core drill bit, and if to be absolutely correct and to GOST, then the ring drill bit, there are several types. Without going too deep, and without trying to sound too smart, there are bimetallic, high-speed steel, and carbide teeth. Then, in turn, they also differ in the shape of the “bowl” and the presence of spiral grooves to divert chips. But never mind, let’s skip that. I’m talking about bits for hand tools now. Not for magnetic drills and machines.
I have bimetal bits at home, I can show them to you
They are usually sold without a shank with a center drill bit. And these things are sold separately. Which is why their total cost can be pretty decent. They are bimetallic because the material they are made of is a compound of high speed steel and cobalt.
I don’t have a carbide drill bit, but I could order one, just for fun. They look like this
Well, I have bits made of high-speed steel with thick teeth. That’s what we’re going to talk about in this review. When I bought one, I had some experience with only bimetal drill bits. Why did you buy one of these?? And because there were no others. It was, as I said 12 years ago. I needed a couple of bits of a certain diameter, and without a backward glance I went to the nearest building hypermarket. And I saw a big dullard there, not metal bits. I didn’t have any. Actually. I initially thought I might have been blinded, or they were sold in some other department. With these naive questions, I went to the nearest employee of the store. But no, it didn’t. They just weren’t on sale. And not just at this store. Thinking that the country was struck by a “crown crisis”, I went to a state department store, and saw there crowns I had never seen before. No packages or blisters, probably a local “spill. I don’t remember the price, I was too excited to buy it and forgot, because I was about to get desperate. I only have one crown from that time. Here it is
Central drill bit of course has been changed many times (there should be a short one). And instead of the stock hexagonal clamping screw was screwed into the usual PH screwdriver. The core is full metal, and only the pilot drill is removable. Life has not spared the teeth of this crown and in some places they are chipped
But I have to tell you, they’re not critical. The crown is still cutting fine to this day. Although it’s made a lot of holes. This bit has a diameter of 30 mm and a tooth thickness of 2.4 mm. As I read somewhere, this type of crown is positioned for drilling thick sheet metal. I really don’t know what the problem is with bimetal crowns drilling into that kind of metal. I tried it and had no problems. All the more the height of the cup with teeth of the reviewed crowns is usually 6-8 mm. And therefore, this size is limited to the thickness of the “thick metal”. But from experience I can say that bits with thick teeth of this type cut into the metal more aggressively and cut through it faster. The wall of the appliance or metal box (and this is usually 1.5 mm) such a crown goes through in a few seconds. And I have drilled a million of these holes, and now in the review I will drill a million of the first one. Here are pictures from work, when this drill bit was used
Of course you can drill similar holes with a stepped drill bit (herringbone) or a tapered drill bit. But believe me, the difference in time will not be in favor of the step drill. The time it takes to go through one step of such a drill, will already exceed the time of drilling with a drill bit. The only and undoubted advantage of the step drill is its versatility in diameter. As many millimeters as you need, that’s how much you can drill with it. The same need to have a set of bits for such purposes. But, more often than not, one or two will suffice on an installation. The holes are made usually for the passage of cables, and high accuracy is not needed there. In fact, a crown of 25-30 mm most often closes this issue without any problems.
Having thus got quite positive experience of using such a drill bit and having seen a similar one in Ali’s offer, I ordered it to try it, of course. Diameter decided to take 25 mm (to replace the once lost). And now I have it
Came in a tube. Comes with a hexagon for the set screw. The bit is more collapsible than my old one. Plus it has a spring for easy removal of the cut “washer”
Drills for minor work 0,5 0,8 1,5 2,0 mm. A small repair of the R/C machine
I ordered these bits with no particular purpose. in case I need to drill something small someday. I was so undemanding and inattentive to the purchase that I did not even pay attention to the fact that the set includes not one drill of each diameter, but 10. Well, and the expectations of the drills divided by 10. They were lying around until I got to the point of fixing the radio-controlled car, which I had once reviewed, and during the review and drove it into the wall so that the pin connecting the wheel and the steering rack broke off. At the same time I decided to take pictures of the drills and make some primitive tests.
First, let’s run through the drill bits. As already said, the set contains four drill diameters: 0,5 mm 0,8 mm 1,5 mm 2,0 mm, each 10 pieces. The seller says they are good for drilling wood, plastic, aluminum. Each diameter is in a different bag.
My compasses are very rudimentary, not suitable for precise measurement. But taking into account its error, the stated diameters can be considered correct.
Close-up of the drills. I am not an expert, so if you are, write in the Комментарии и мнения владельцев what’s the sharpening, etc.д. by the look of it.
Now let’s see how they drill. I also used a spare set of collets for 0.5 mm, 1.0 mm, 1.5 mm, 2.5 mm, 3.0 mm drill bits.
Or rather, three of them. The collet for 1.5mm was actually 2mm, and I tested the 1.5mm drill bit by inserting it into an electric screwdriver. The two smallest drills tested on a board from a dead flying balloon with blades.
Recorded the drilling process slightly accelerated, the actual time is displayed on the timer.
Looking through the video, I noticed that I drilled at an angle of. I read that such thin drills usually break from that, but this one held up.
The 0.8mm was ok in the collet at 1mm.
1,5 mm, as already said, had to put in an electric screwdriver. Started with textolite, write speed 1:1
Next I thought we were promised aluminum drilling. Couldn’t find anything aluminum that wasn’t a shame, so I used a bottle cap.
After getting excited, I decided to give it a harder task and tried to drill a 1mm thick steel ruler. Not too fast, but the drill did the job. I think the result is pretty good.
2mm. I have not even tried it on textolite. Of course, it drills through hard covers.
And here with a ruler turned out to be a puncture. Tried two drills, with an ether and an electric screwdriver, the result is the same, within 30 seconds they are slightly deepened in the metal and went no further.
Now for the practical application. For quite a long time I have a 1/14 scale RU-car with broken steering. In a collision with a wall, it broke off a pin that connects the steering rack and the wheel itself. Fortunately, after the accident I managed to find the pin itself.
Just gluing it on is not the answer. So I decided to put it on a metal pin to reinforce. The pin was an ordinary paper clip. The diameter is 0.7 mm.
I straightened the paper clip and bent one end with thin pliers.
Next, using a drill 0.8 mm need to make holes in the pin and the attachment of the car wheel. I did a little bit of a barbaric way. Since it was a little late, my wife was tucking my daughter in, I did not want to buzz on the balcony engraver. So I attached a collet holder to the 2.5 mm drill bit and installed it in the screwdriver. It didn’t even look like it was hitting.
Drilled a hole in the wheel bracket, put a paper clip, heated it with a lighter and melted it into the plastic.